Table of Contents
Quick Links
Table of Contents

Related Manuals for ABB ArcSwitch

Summary of Contents for ABB ArcSwitch
- Page 1 — E L EC T R I FI C AT I O N S E R V I C E S O LU T I O N S ArcSwitch® manual...
-
Page 3: Table Of Contents
— Table of contents Introduction Declaration of conformity Warnings 07– 08 International symbols ArcSwitch panel unit Meter layout Testing Using ArcSwitch meter Electrical specification 14– 15 Maintenance 16– 18 Quick start guide (installation notes) Warranty Repair and calibration Troubleshooting Drawings... -
Page 4: Introduction
A R C S W I T C H ® M A N U A L — Introduction ArcSwitch® enables to operate from a safe Easily integrated on new switchgear or installed distance between personnel and equipment base, it is used to switch medium and low voltage during switching operations and provides the circuit breakers remotely. -
Page 5: Declaration Of Conformity
V94 EEX6. Safety Requirements IEC 61010 – 031: 2015 Product model ArcSwitch® Meter Electromagnetic Product model ArcSwitch® Panel Unit Conformance IEC 61326 – 01: 2012 RoHS IEC 50581 : 2012 (the above-mentioned products conform to the following product specifications) (the products herewith comply with the requirements of the following eu provisions of directives) L.V.D. -
Page 6: Warnings
• DO NOT WORK ALONE. Electrician or Electrical Engineer. • The operator should beware when switching • The intended use of the ArcSwitch® meter is to racking or withdrawing a circuit breaker; they switch a contact in parallel to the Open and... -
Page 7: International Symbols
— International symbols the arcswitch® meter and the arcswitch® Panel unit will have the following symbols on the overlay and on the rear product labels. you should make yourself familiar with these symbols and this manual before using the arcswitch® meter, arcswitch®... - Page 8 ARCSWITCH PANEL CAUTION: REMOVE LEADS BEFORE CAUTION: THE CIRCUIT SHOULD BE OPENING DE-ENERGISED AND INSTALLATION SHOULD BE CARRIED OUT BY A MODEL: ArcSwitch® Meter QUALIFIED ELECTRICIAN SERIAL NO: MODEL: ArcSwitch® panel SERIAL NO: FUSE 5 A HRC Size 10 X 38 WIRE SPEC: MINIMUM (1.0 mm²...
-
Page 9: Arcswitch Panel Unit
Pa n e l U n i t — ArcSwitch panel unit the arcswitch® panel unit, can be retrofitted to medium or low voltage switchgear very easily. it can be commissioned very quickly during a maintenance schedule without adding extra time to the outage period. -
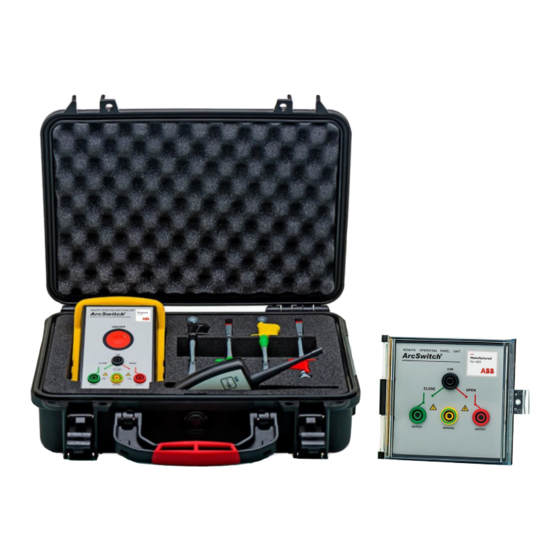
Page 10: Meter Layout
A R C S W I T C H ® M A N U A L — Meter layout — The ArcSwitch® meter kit, will come with the Carry case following items listed in (fig 2.) On receipt of your ArcSwitch® meter kit ArcSwitch®... -
Page 11: Testing
Contact continuity test ArcSwitch® meter welded closed. In such instances you should not • To test the contact of an ArcSwitch® meter. use the ArcSwitch® meter and the ArcSwitch® • First turn on and set the Multimeter to the meter you should be replaced. -
Page 12: Using Arcswitch Meter
• Take the red lead and connect from the the green LED goes off. ArcSwitch® meter red output jack and connect it to the red jack of the ArcSwitch® panel unit. Before connecting up the ArcSwitch meter® do • Take the black lead and connect from the not connect the ArcSwitch®... -
Page 13: Electrical Specification
Momentary contact / 03 Sec ON normal Max. contact on time 1 Minute on Max / 5 Minute off rest Contact load type Resistive Loads / Inductive Loads* ArcSwitch® panel unit Working voltage 230 V AC & 220 V DC Current 5 Amperes... -
Page 14: Maintenance
Replacing the 9V battery in the ArcSwitch® Meter • DO NOT REPLACE WITH A HIGHER RATED, The ArcSwitch® meter is to be used indoors! if it UNAPPROVED OR MAKESHIFT FUSE. gets wet, dry it off immediately. DO NOT USE IT •... - Page 15 • Turn the ArcSwitch® meter on and test the contacts are opening and closing when commanded by the ArcSwitch® Transmitter. • If you are storing the ArcSwitch® meter for an extended period, you should remove the batteries to prevent damage due to possible leaking of the electrolyte on to the electronic components inside.
-
Page 16: Quick Start Guide (Installation Notes)
Power supply: Safety requirements The ArcSwitch Panel Unit™. Can be supplied by 0 up to 230 V AC / 220 V DC, before using it, make ATTENTION: sure the power cable is not damaged, knotted, or Read the manual carefully before starting to use. - Page 17 Q U i c k s ta r t g U i D e ( i n s ta l l at i o n n ot e s ) — Location Rear electrical connections Install of The ArcSwitch Panel Unit ™ indoors, in a The Connections on the rear of the ArcSwitch Panel mounting ArcSwitch Panel Unit place protected from water splashes and sun Panel Unit™...
- Page 18 1.00mm² and a maximum cross- sectional area of Com socket and Positive Polarity is correct. 2.5 mm². • You can now connect the ArcSwitch Meter™ to the front input jacks and test open close Installation operations of the main circuit breaker.
-
Page 19: Warranty
— Warranty limited warranty and limitiation of liability The ArcSwitch® Meter is warranted to the original The manufacturer shall not be liable for loss of purchaser against defects in material and use of the instrument or other incidental or... -
Page 20: Repair And Calibration
Transmitter, also with the meter. Non-warranty repair or replacement charges will apply. Before sending for repair please check your batteries. The ArcSwitch® meter should not be opened or repaired as there is no internal serviceable parts (EXCEPT FOR REPLACING THE FUSE AND BATTERY) see maintenance section above on how to replace the fuse and the battery. -
Page 21: Troubleshooting
• Bell test across the com input jack to the ground The ArcSwitch® meter power contact is closing jack on ArcSwitch® meter and if it is very low when the ArcSwitch® Transmitter button is resistance or bells, then the overvoltage... -
Page 22: Drawings
Also, this prevents from having an open lv door on the switchgear when switching. note: installation of the arcswitch® panel unit should only be installed by a competent electrical engineer. note: the arcswitch® panel Unit connections are paralleled across the open and close buttons. -
Page 23: Demo Setup
D e m o s e t U P — Demo setup — You can see how the ArcSwitch® meter and ArcSwitch® panel unit integrates easily into the ArcSwitch® panel unit and ArcSwitch® low voltage control panel of medium voltage meter demo panel switchgear or low voltage switchgear in (fig 11.) -
Page 24: General Specification
A R C S W I T C H ® M A N U A L — General specification ArcSwitch® meter Power supply 9 vdc snap Battery type Neda 1604A, IEC 6LR61, PP3 Mass Approx. 900 grams Dimensions Approx. (W) 90mm (D) 60mm (H) 180mm... - Page 26 document.
- Page 28 — ABB Limited Service Department Belgard Road, Tallaght, Dublin 24, IRELAND More product information: abb.com/mediumvoltage Your contact center: abb.com/contactcenters More service information: abb.com/service © Copyright 2021 ABB. All rights reserved. Specifications subject to change without notice.