Canon imagePROGRAF SD-21 Setup Manual
Hide thumbs
Also See for imagePROGRAF SD-21:
- Setup manual (12 pages) ,
- Setup manual (12 pages) ,
- Setup manual (18 pages)
Table of Contents
Quick Links
SD-21
プリンタースタンド セットアップガイド
Printer Stand Setup Guide
Guide d'installation du socle de l'imprimante
Guía de configuración del Soporte de la impresora
Guia de configuração de suporte da impressora
Setup-Handbuch für das Druckergestell
Guida all'installazione del supporto della stampante
Installatiehandleiding printerstandaard
Przewodnik konfiguracji podstawki drukarki
目次
同梱品一覧
.....................................................................................2
スタンドを組み立てる
............................................................4
ロールユニットを取り付ける
.......................................... 10
スタッカーを組み立てる
.................................................... 10
バスケットを取り付ける
.................................................... 11
バスケットのポジション例
............................................... 17
Contents
Package Contents .......................................................................2
Assembling The Stand ..............................................................4
Attaching The Roll Unit ......................................................... 10
Assembling The Stacker ........................................................ 10
Attaching The Basket .............................................................. 11
Example Basket Positions .................................................... 17
Sommaire
Contenu du colis .........................................................................2
Assemblage du socle ................................................................4
Montage de l'unité de rouleau ........................................ 10
Assemblage de l'empileur .................................................. 10
Montage du panier ................................................................. 11
Exemple de positions du panier ..................................... 17
Índice
Contenido de la caja .................................................................2
Montaje del soporte ..................................................................4
Conexión de la unidad de rollo ....................................... 10
Montaje del apilador .............................................................. 10
Conexión de la cesta .............................................................. 11
Ejemplo de posiciones de la cesta ................................ 17
Conteúdo
Conteúdos da embalagem ...................................................2
Montagem do suporte ............................................................4
Fixação da unidade em rolo .............................................. 10
Montagem do empilhador ................................................ 10
Fixação da cesta ........................................................................ 11
Exemplos de posições da cesta ...................................... 17
Inhalt
Paketinhalt .......................................................................................2
Aufbau des Gestells ...................................................................4
Befestigung der Rolleneinheit .......................................... 10
Aufbauen des Staplers .......................................................... 10
Befestigung des Korbs .......................................................... 11
Beispielkorbkonfigurationen ............................................. 17
Sommario
Contenuto della confezione .................................................2
Assemblaggio del supporto .................................................4
Montaggio dell'unità rotolo .............................................. 10
Assemblaggio dell'impilatrice .......................................... 10
Fissaggio del raccoglitore ................................................... 11
Esempi di configurazioni del raccoglitore ................ 17
Inhoud
Inhoud van de verpakking ....................................................2
De standaard in elkaar zetten ..............................................4
De roleenheid bevestigen .................................................. 10
De stapelaar in elkaar zetten ............................................. 10
De opvangmand bevestigen ............................................ 11
Voorbeeld van opvangmandposities .......................... 17
Spis treści
Zawartość zestawu .....................................................................2
Montaż podstawki ......................................................................4
Dołączanie modułu rolki ...................................................... 10
Montaż układarki ...................................................................... 10
Dołączanie kosza ...................................................................... 11
Przykładowe konfiguracje kosza ..................................... 17
Table of Contents

Related Manuals for Canon imagePROGRAF SD-21


Summary of Contents for Canon imagePROGRAF SD-21
- Page 1 SD-21 プリンタースタンド セットアップガイド Printer Stand Setup Guide Guide d’installation du socle de l’imprimante Guía de configuración del Soporte de la impresora Guia de configuração de suporte da impressora Setup-Handbuch für das Druckergestell Guida all’installazione del supporto della stampante Installatiehandleiding printerstandaard Przewodnik konfiguracji podstawki drukarki 目次...
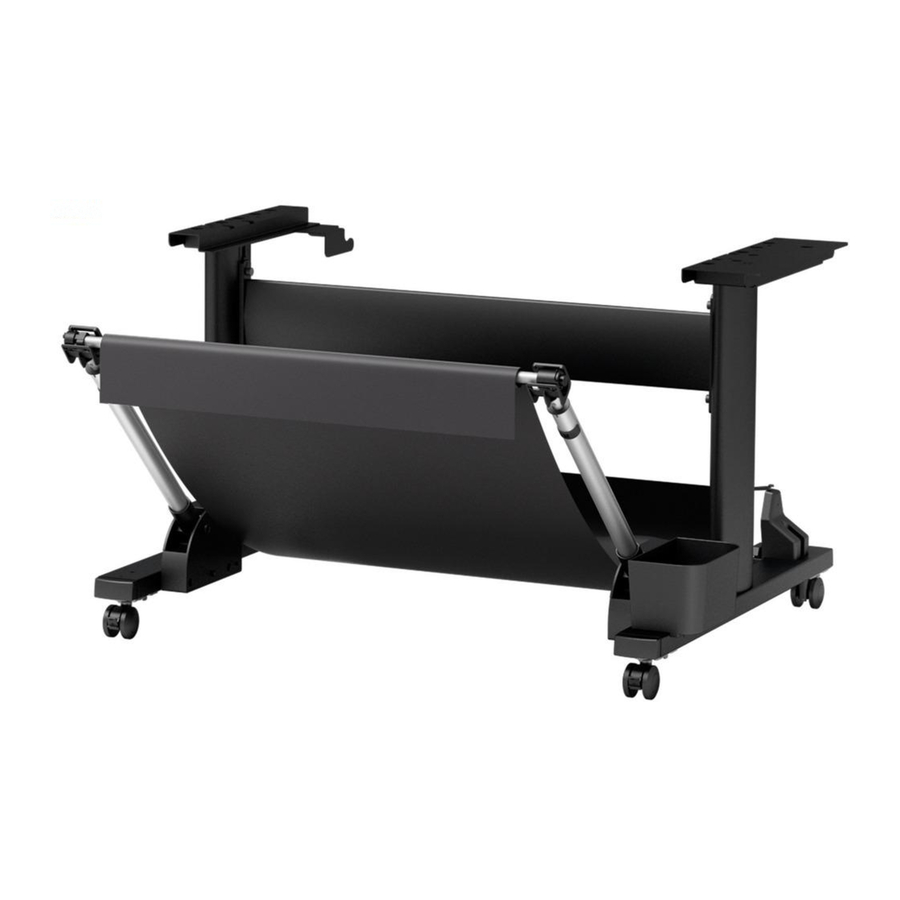
- Page 2 Caution Avvertenza The Canon SD-21 printer stand is a printer stand exclusively for the Canon TX-2000, TX-2100, PRO- 2000, and PRO-2100 printer. Follow the instructions in the manual to securely attach the printer to Il supporto della stampante Canon SD-21 è progettato esclusivamente per le stampanti Canon the stand.
- Page 3 同梱品一覧 Contenido de la caja Contenuto della confezione Package Contents Conteúdos da embalagem Inhoud van de verpakking Contenu du colis Paketinhalt Zawartość zestawu スタンドレッグ スタンドレッグ スタンドステー アクセサリポケット Stand leg L Stand leg R Stand stay Accessory pocket Jambe L du socle Jambe R du socle Soutien du socle Compartiment accessoires...
- Page 4 バスケット布/バスケットロッド(タグ側) バスケットロッド(ひも側) バスケットアーム(× ) Basket cloth / Basket rod (tag side) *2 Basket rod (cord side) *1 Basket arm (x 2) Tissu du panier / Tige de panier (côté étiquette) *2 Tige de panier (côté cordon) *1 Bras de panier (x 2) Tela de la cesta / Varilla de la cesta (lado de la etiqueta) *2 Varilla de la cesta (lado del cable) *1 Brazo de la cesta (x 2)
- Page 5 スタンドを組み立てる Montaje del soporte Assemblaggio del supporto Assembling the Stand Montagem do suporte De standaard in elkaar zetten Assemblage du socle Aufbau des Gestells Montaż podstawki 注意 Vorsicht スタンドは、 必ず 人以上で組み立ててください。 人で作業すると、 けがの原因になった ● ● Der Aufbau des Gestells erfordert 2 oder mehr Personen. Wenn das Gestell von einer Person allein aufgebaut wird, besteht Verletzungsgefahr oder führt dies zu り、...
- Page 6 スタンドステーの左右に刻印された▲ ( ) とスタンドレッグの内側に刻印された▲ ( ) が重なるように位置を合わせ、 スタンドステーのフック状の部分( )をスタンドレッグに引っかけます。 Align the positions of the ▲ (A) stamped on the left and right of the stand stay to overlap with the ▲ (B) stamped on the inner sides of the stand legs, and hook the hook-shaped parts of the stand stay (C) onto the stand legs. Alignez les positions du ▲...
- Page 7 スタンドにプリンター設置時の位置合わせ用のロッドを取り付けます。位置合わせ用ロッドは、 バスケットを使用する場合 ( ) と シリーズでスタッカーを使用する場合 ( ) で異なります。 それぞれの手順へ進んでください。 The rod for aligning the position when installing the printer is attached to the stand. The rod for aligning the position differs between the case of using the basket (6-a) and the case of using the stacker in the TX series (6-b).
- Page 8 プリンター本体をスタンドに置くときの位置合わせ用の目印を確認します。目印は、バスケットを使用する場合( )と シリーズでスタッカーを使用する場合( )で異なります。 それぞれの手順へ進んでください。 Check the position alignment marking when placing the printer on the stand. The marking differs between the case of using the basket (7-a) and the case of using the stacker in the TX series (7-b). Proceed to the appropriate procedure. Vérifiez le marquage d'alignement de la position lorsque vous placez l'imprimante sur le socle.
- Page 9 プリンターを 人で持ち上げ、スタンドまで移動します。 Have 6 people lift the printer and move it to the stand. Ayez recours à 6 personnes pour soulever l’imprimante et le mettre sur le socle. Levante la impresora entre 6 personas y muévala hasta el soporte. São necessárias 6 pessoas para levantar a impressora e movê-la ao suporte. Heben Sie den Drucker mit 6 Personen an, und transportieren Sie ihn zum Gestell.
- Page 10 スタッカーを使用する場合( シリーズのみ) When using the stacker (TX series only) Lors de l'utilisation de l'empileur (série TX uniquement) Cuando se utilice el apilador (serie TX únicamente) Usando o empilhador (apenas série TX) Bei Verwendung des Staplers (nur TX-Serie) Quando si usa l'impilatrice (solo serie TX) Bij gebruik van de stapelaar (alleen TX-serie) W przypadku używania układarki (tylko seria TX) 位置合わせに使用したロッドを取り外し(①)...
- Page 11 ロールユニットを取り付ける Conexión de la unidad de rollo Montaggio dell'unità rotolo Attaching the Roll Unit Fixação da unidade em rolo De roleenheid bevestigen Montage de l’unité de rouleau Befestigung der Rolleneinheit Dołączanie modułu rolki ロールユニットを使用する場合は、ここでスタンドにロールユニットを取り付けます。詳細はロールユニットに同梱の「ロールユニットセットアップガイド」を参照してください。 If you are using a roll unit, attach the roll unit to the stand at this point. Refer to the "Roll Unit Setup Guide" included with the roll unit for details. Si vous utilisez une unité...
- Page 12 バスケットを取り付ける Conexión de la cesta Fissaggio del raccoglitore Attaching the Basket Fixação da cesta De opvangmand bevestigen Montage du panier Befestigung des Korbs Dołączanie kosza バスケットアーム側面の突起( )とスタンドレッグの内側に開いた穴( )を合わせて、バスケットアームをスタ ンドに取り付けます。 Align the protrusions (A) on the side of the basket arm with the holes (B) on the inner side of the stand leg, and attach the basket arm to the stand.
- Page 13 ロッドホルダー底部の突起( )を、 スタンドレッグの後ろ側に つ並んだ穴のうち、 一番内側( )に差し込み、 ロッ ドホルダーを取り付けます。 Insert the protrusion (A) on the base of the rod holder into the hole that is innermost (B) from among the 4 holes on the rear side of the stand leg, and attach the rod holder. Insérez la partie saillante (A) de la base du support de tige dans le trou le plus à...
- Page 14 バスケット布を、白いタグ( )が付いていない面を上にして広げ、バスケットロッド(ひも側)をバスケット布の 筒状の部分に通します。 Spread out the basket cloth with the surface that does not have the white tag (A) facing up, and feed the basket rod (cord side) through the cylindrical part of the basket cloth. Etalez le tissu du panier avec la surface sur laquelle ne figure pas l’étiquette blanche (A) orientée vers le haut, et introduisez la tige du panier (côté...
- Page 15 バスケットロッド(ひも側)の両端を、ロッドホルダーの内側に図のように取り付けます。 Attach both ends of the basket rod (cord side) to the inner sides of the rod holders as shown in the diagram. Attachez les deux extrémités de la tige du panier (côté cordon) aux côtés intérieurs des supports de tige, comme indiqué...
- Page 16 バスケットを持ち上げます。 ① バスケットアームの太い部分を持って、止まるまで引き出してください。 ② バスケットロッド(タグ側)を持ち上げてください。 Lift up the basket. ① Grasp the thick parts of the basket arms and pull out until they stop. ② Lift up the basket rod (tag side). Soulevez le panier. ① Saisissez les parties épaisses des bras du panier et tirez jusqu’à ce qu’elles s’arrêtent. ②...
- Page 17 バスケット布の先端がバスケットの内側に入っていないか確認します。 内側に入っていた場合は、外側に出してください。 Check that the edge of the basket cloth is not inside the basket. If it is inside, remove it to the outside. Vérifiez que le bord du tissu du panier ne se trouve pas à l’intérieur du panier. S’il est à...
- Page 18 U moet de positie van de opvangmand wijzigen afhankelijk van hoe de roleenheid wordt gebruikt. Uwaga Położenie kosza należy zmienić w zależności od sposobu korzystania z modułu rolki. QT6-3979-V01 XXXXXXXX © CANON INC. 2020 PRINTED IN XXXXXXXX IMPRIMÉ XX XXXXXXXX...