
Summary of Contents for Dell ESA 5000
- Page 1 Dell™ ESA 5000/7000 Getting Started Guide ESA 5000 Regulatory Model Number: 1RK34-0BE ESA 7000 Regulatory Model Number: 1RK34-0BF...
- Page 2 Trademarks Dell, the Dell logo, SonicWALL, and all other SonicWALL product and service names and slogans are trademarks of Dell Inc. Other trademarks and trade names may be used in this document to refer to either the entities claiming the marks and names or their products.
- Page 3 Figure 1. Package contents If any items are missing from your package, contact Support at https://support.s oftware.dell.com...
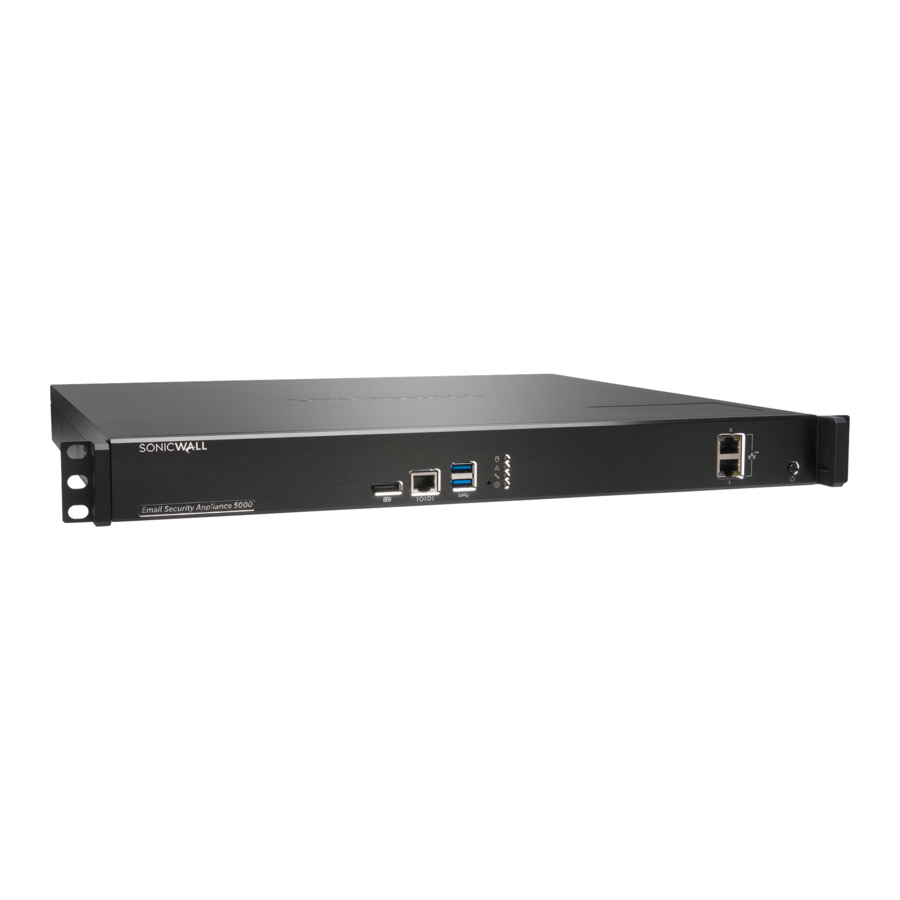
- Page 4 5000/ESA 7000 front panels...
- Page 5 Dell ESA 5000/7000 Getting Started Guide...
- Page 6 This section provides instructions and illustrations for rack mounting the Dell ESA 5000/7000. The ESA 5000/ESA 7000 appliance is designed to be mounted in a standard 19-inch rack. The product packaging contains a slide rail kit for mounting the appliance in a four-post cabinet. Before installing the appliance in an equipment rack, the rails must be attached to the appliance and to the rack posts.
- Page 7 Assemble the Slide Rail Fasten 4 screws to the rail. WASHERS*8 M4 SCREW*8 Dell ESA 5000/7000 Getting Started Guide...
- Page 8 Assemble the Slide Rail Fasten two-sided screws to the rail. M5 SCREW*8 M5 Nut*8...
-
Page 9: Installing The Outer Rails
1 Attach the rail to the posts of the rack by using three rack screws. 2 Extend the outer back rail to the back of the rack and firmly attach it with two rack screws. 3 Repeat step 1 and 2 to install the other rail. Dell ESA 5000/7000 Getting Started Guide... - Page 10 Assemble Inner Rail to Chassis Fasten 6 screws to attach the inner channel onto the chassis.
-
Page 11: Installing The Appliance In The Rack
2 Push the appliance all the way in until the front Continue to pull the appliance until it is fully removed brackets contact the rack. from the outer rails. 3 Optionally attach the front brackets to the rack. Removing the appliance Dell ESA 5000/7000 Getting Started Guide... - Page 12 Insert Chassis to Frame Slide inner channel into rails. Push hook down to separate.
- Page 13 Dell ESA 5000/7000 Getting Started Guide...
-
Page 14: Safety And Regulatory
Safety and regulatory... -
Page 15: Safety Instructions
Therefore, consideration should be given to installing the equipment • The Dell ESA appliance is designed to be mounted in in an environment compatible with the maximum a standard 19-inch rack mount cabinet. -
Page 16: Lithium Battery Warning
IEC 60227, designation, or connect these ports directly to communication wiring or H05 VV-F or H05 VVH2-F2, and rated for at least 3G 0.75 other wiring that exits the building where the Dell ESA is mm². located. - Page 17 Hinweise beachtet werden: Anzeigegeräten gemäß § 2 der deutschen Verordnung für Arbeitsplätze mit visuellen Anzeigegeräten vorgesehen. • Das Dell ESA Modell ist für eine Montage in einem standardmäßigen 19-Zoll-Rack konzipiert. • Wählen Sie für die Montage einen Ort, der keinem direkten Sonnenlicht ausgesetzt ist und sich nicht in der •...
- Page 18 Verwendung in bestimmten Ländern und Regionen Bitte folgen die den lokalen Richtlinien beim Einkauf zugelassen. Überprüfen Sie bitte vor der Verwendung von Material oder Komponenten. eines Netzkabels, ob es für die Verwendung in Ihrem • Prüfen Sie den Anschluss des Geräts an die Land oder Ihrer Region zugelassen ist und den Stromversorgung, damit der Überstromschutz sowie die geforderten Normen entspricht.
-
Page 19: Hinweis Zur Lithiumbatterie
Alle Ethernet- und RS232-C-Kabel eignen sich für die Verbindung von Geräten in Innenräumen. Schließen Sie an die 確定安裝牢固。選擇一個安裝位置,將四個裝載洞孔對齊 19 吋 Anschlüsse der Dell keine Kabel an, die aus dem Gebäude in 架設機櫃的安裝桿。 dem sich das Gerät befindet herausgeführt werden. Dell ESA 5000/7000 Getting Started Guide 安全說明... - Page 20 • •應當提供一個合適額定值並且已被認可的分支電路斷路器作為 •當使用光纖小型可插拔(SFP)模塊,確保它是 IEC60825認證。 安裝該裝置的一部分。在購買材料或部件時,應遵循當地安全代 碼。 鋰電池警告 •必須留心裝置與電源電路的連接問題,電路過載對過電流保護 與電路電線的影響需降至最低。解決這個問題時,需正確考慮裝 使用者不得自行更換 戴爾ESA 網際網路安全性裝置中使用的鋰 置銘牌額定值。不要過載電路。 電池。必須將 戴爾ESA 送回 ESA授權的服務中心,以更換 戴爾 •必須維護可靠的機架裝載設備接地。必須特別留意電源供應器 相同的鋰電池或製造商推薦的同類型鋰電池。若因任何原因必須 連線,而不是直接連接到電源板之類的分支電路。 丟棄電池或 ESA 網際網路安全性裝置,請嚴格遵守電池製造 戴爾 商的指示。 •從工廠運出時,這個戴爾 SonicWALL產品包括為後備交流電源 和增加可靠性而附帶的兩個電源。 纜線連結 •要斷開交流電源,兩條電源線都必須被拔除。 •隨附的電源線僅限於特定的國家或地區使用。使用前,請確認 所有乙太網路與 RS232 (主控台) 線路都是為與其他裝置進行內建 電源線的額定值且已被認可在你的地區上使用。 連接所設計的。請不要將這些連接埠直接連接至通訊線路,或其 他連出 戴爾ESA 所在建築的線路。• •切勿在交流電源線還連接著電源時移除或安裝電源。...
- Page 21 EU and EFTA Declaration of conformity A “Declaration of Conformity” in accordance with the directives and standards has been made and is on file at Dell Inc. Products Europe BV, Limerick, Ireland. CE declarations can be found online at www.dell.com.
-
Page 22: Contacting Dell
Dell listens to customers and delivers worldwide innovative technology, business solutions and services they trust and value. For more information, visit www.software.dell.com. • Contacting Dell on page • Technical support resources on page Contacting Dell Technical support: Online support Product questions and sales:...