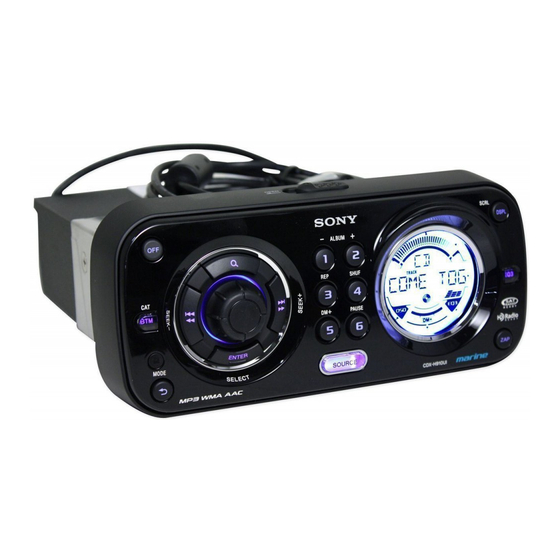
Sony CDX-H910UI Operating Instructions Manual
Fm/am compact disc player
Hide thumbs
Also See for CDX-H910UI:
- Operating instructions manual (47 pages) ,
- Service manual (42 pages) ,
- Specifications (2 pages)
Table of Contents
Available languages
Available languages
Quick Links
FM/AM
Compact Disc Player
To cancel the demonstration (DEMO) display, see page 6.
Pour annuler la demonstration (DEMO), reportez-vous a la page 6.
Para cancelar la pantalla de demostración (DEMO), consulte la página 6.
Zum Deaktivieren der Demo-Anzeige (DEMO) schlagen Sie bitte auf Seite 6 nach.
Om de demonstratie (DEMO) te annuleren, zie pagina 6.
CDX-H910UI
©2008 Sony Corporation
4-127-574-12 (1)
Operating Instructions
Mode d'emploi
Manual de instrucciones
Bedienungsanleitung
Gebruiksaanwijzing
US
FR
ES
DE
NL
NL
Chapters
Table of Contents

Related Manuals for Sony CDX-H910UI


Summary of Contents for Sony CDX-H910UI
- Page 1 Para cancelar la pantalla de demostración (DEMO), consulte la página 6. Zum Deaktivieren der Demo-Anzeige (DEMO) schlagen Sie bitte auf Seite 6 nach. Om de demonstratie (DEMO) te annuleren, zie pagina 6. CDX-H910UI ©2008 Sony Corporation 4-127-574-12 (1) Operating Instructions Mode d’emploi...
- Page 2 Notice for customers: the following information is only applicable to equipment sold in countries applying EU Directives The manufacturer of this product is Sony Corporation, 1-7-1 Konan, Minato-ku, Tokyo, Japan. The Authorized Representative for EMC and product safety is Sony Deutschland GmbH, Hedelfinger Strasse 61, 70327 Stuttgart, Germany.
- Page 3 Civic Office, your household waste disposal service or the shop where you purchased the product. The “HD Radio Ready” logo indicates that this product will control a Sony HD Radio (sold separately). For HD Radio tuner operation, please refer to the HD Radio tuner Operating Instructions.
-
Page 4: Table Of Contents
Table of Contents Getting Started Playable discs on this unit ....6 Resetting the unit ......6 Canceling the DEMO mode . - Page 5 Support site If you have any questions or for the latest support information on this product, please visit the web site below: For customers in the U.S.A. and Canada: http://esupport.sony.com http://www.xplodsony.com/ For customers in Europe: http://support.sony-europe.com For customers in Latin America: http://esupport.sony.com/ES/LA/...
-
Page 6: Getting Started
About water resistancy This unit is designed for use in a marine environment. To protect the unit from water spray, waves, rain, moisture, ultraviolet rays, etc., the unit has undergone the following tests to ensure reliability and functionality (Front panel only): •... -
Page 7: Preparing The Card Remote Commander
Preparing the card remote commander Remove the insulation film. For how to replace the battery, see page 22. Setting the clock The clock uses a 12-hour digital indication. Press and hold (SELECT/ENTER). The setup display appears. Press (SELECT/ENTER) repeatedly until “CLOCK-ADJ”... -
Page 8: Location Of Controls And Basic Operations
Location of controls and basic operations Main unit SCRL DSPL ALBUM SHUF PAUSE MODE SOURCE Front panel opened RESET... -
Page 9: Number Buttons
This section contains instructions on the location of controls and basic operations. For details, see the respective pages. The corresponding buttons on the card remote commander control the same functions as those on the unit. A BTM/CAT* button page 12 To start the BTM function (press and hold). -
Page 10: Card Remote Commander Rm-X151
Card remote commander RM-X151 The following buttons on the card remote commander have also different buttons/functions from the unit. Remove the insulation film before use (page 7). w; < (.)/, (>) buttons To control radio/CD/USB, the same as (SEEK) –/+ on the unit. Setup, sound setting, etc., can be operated by <... -
Page 11: Searching For A Track
Searching for a track Searching a track by name — Quick-BrowZer You can search for a track in a CD or USB device easily by category. (BROWSE) Control dial ALBUM SHUF PAUSE MODE SOURCE (BACK) SELECT/ENTER Press (BROWSE). The unit enters the Quick-BrowZer mode, and the list of search categories appears. -
Page 12: Radio
Radio Storing and receiving stations Caution When tuning in stations while boating, use Best Tuning Memory (BTM) to prevent an accident. Storing automatically — BTM Press (SOURCE) repeatedly until “TUNER” appears. To change the band, press (MODE) repeatedly. You can select from FM1, FM2, FM3, AM1 or AM2. -
Page 13: Display Items
“SHUF OFF.” USB devices For details on the compatibility of your USB device, visit the support site. Support site For customers in the U.S.A. and Canada: http://esupport.sony.com http://www.xplodsony.com/ For customers in Europe: , Artist http://support.sony-europe.com For customers in Latin America: http://esupport.sony.com/ES/LA/... -
Page 14: Display Items
Removing the USB device 1 Stop the USB device playback. 2 Remove the USB device. If you remove your USB device during playback, data in the USB device may be damaged. Notes • Do not use USB devices so large or heavy that they may fall down due to vibration, or cause a loose connection. -
Page 15: Playing Back Ipod
Support site For customers in the U.S.A. and Canada: http://esupport.sony.com http://www.xplodsony.com/ For customers in Europe: http://support.sony-europe.com For customers in Latin America: http://esupport.sony.com/ES/LA/... -
Page 16: Display Items
Display items A Source B Track name, Artist name, Album name, Track number/Elapsed playing time, Clock To change display items B, press (DSPL). When album/podcast/genre/artist/playlist is changed, its item number appears momentarily. Note Some letters stored in iPod may not be displayed correctly. -
Page 17: Other Functions
Other functions Changing the sound settings Adjusting the sound characteristics Press (SELECT/ENTER) repeatedly until the desired item appears. Rotate the control dial to adjust the selected item. Press (BACK). The setting is complete and the display returns to normal play/reception mode. The following items can be set (follow the page reference for details): DSO (Dynamic Soundstage Organizer) -
Page 18: Adjusting Setup Items - Set
Adjusting setup items — SET Press and hold (SELECT/ENTER). The setup display appears. Press (SELECT/ENTER) repeatedly until the desired item appears. Rotate the control dial to select the setting (example “ON” or “OFF”). Press and hold (SELECT/ENTER). The setup is complete and the display returns to normal play/reception mode. -
Page 19: Using Optional Equipment
Using optional equipment CD changer Selecting the changer 1 Press (SOURCE) repeatedly until “CD” appears. 2 Press (MODE) repeatedly until the desired changer appears. Unit number Disc number Playback starts. Skipping albums and discs 1 During playback, press (1)/(2) (ALBUM –/ Press (1)/(2) (ALBUM –/+) To skip album... -
Page 20: Rotary Commander Rm-X4S
Rotary commander RM-X4S Attaching the label Attach the indication label depending on how you mount the rotary commander. SE L M O D E D SP L Location of controls The corresponding buttons on the rotary commander control the same functions as those on this unit. -
Page 21: Additional Information
• Apple is not responsible for the operation of this device or its compliance with safety and regulatory standards. If you have any questions or problems concerning your unit that are not covered in this manual, consult your nearest Sony dealer. Folder (album) MP3/WMA/ AAC file... -
Page 22: Maintenance
If the fuse blows again after replacement, there may be an internal malfunction. In such a case, consult your nearest Sony dealer. Specifications AUDIO POWER SPECIFICATIONS CEA2006 Standard Power Output: 17 Watts RMS × 4 at 4 Ohms <... -
Page 23: Troubleshooting
Before going through the checklist below, check the connection and operating procedures. If the problem is not solved, visit the following support site. Support site For customers in the U.S.A. and Canada: http://esupport.sony.com http://www.xplodsony.com/ For customers in Europe: http://support.sony-europe.com For customers in Latin America: http://esupport.sony.com/ES/LA/ For customers in Pan Asia: http://www.sony-asia.com/section/support... - Page 24 During playback or reception, demonstration mode starts. If no operation is performed for 5 minutes with “DEMO-ON” set, demonstration mode starts. t Set “DEMO-OFF” (page 18). The display disappears from/does not appear in the display window. • The dimmer is set “DIM-ON” (page 18). •...
-
Page 25: Error Displays/Messages
*2 The disc number of the disc causing the error appears in the display. If these solutions do not help improve the situation, consult your nearest Sony dealer. If you take the unit to be repaired because of CD playback trouble, bring the disc that was used at the time the problem began. - Page 26 (vendu séparément). Consultez votre détaillant agréé Sony le plus proche pour en savoir plus sur le fonctionnement du module tuner radio satellite. « SAT Radio », « SAT Radio Ready », les logos SAT Radio et SAT Radio Ready, ainsi que toutes les marques associées sont des marques de...
- Page 27 ZAPPIN est une marque commerciale de Sony Corporation. Windows Media et le logo Windows sont des marques de commerce ou des marques déposées de Microsoft Corporation aux Etats-Unis et/ou dans d’autres pays. iPhone, iPod, iPod classic, iPod nano, et iPod touch sont des marques d'Apple Inc., déposées...
- Page 28 Table des matières Préparation Disques pouvant être lus ....6 Réinitialisation de l’appareil ....6 Désactivation du mode DEMO .
- Page 29 Si vous avez des questions ou si vous souhaitez consulter les toutes dernières informations techniques sur ce produit, rendez-vous sur le site Web suivant : Pour les utilisateurs résidant aux Etats-Unis et au Canada : http://esupport.sony.com http://www.xplodsony.com/ Pour les utilisateurs résidant en Europe : http://support.sony-europe.com...
-
Page 30: Préparation
A propos de l’étanchéité Cet appareil est conçu pour être utilisé dans un environnement marin. Pour le protéger des projections d’eau, des vagues, de la pluie, de l’humidité, des rayons ultraviolets, etc., il a été soumis aux tests suivants afin de s’assurer de sa fiabilité... -
Page 31: Préparation De La Mini-Télécommande
Préparation de la mini- télécommande Retirez la feuille isolante. Conseil Pour obtenir des informations sur la façon de remplacer la pile, reportez-vous à la page 22. Réglage de l’horloge L’horloge fonctionne suivant un cycle de 12 heures. Appuyez sur la touche (SELECT/ENTER) et maintenez-la enfoncée. -
Page 32: Emplacement Des Commandes Et Opérations De Base
Emplacement des commandes et opérations de base Appareil principal MODE Façade ouverte RESET Cette section contient les instructions relatives à l’emplacement des commandes et aux opérations de base. Pour plus de détails, reportez-vous aux numéros de pages correspondants. Les touches correspondantes de la mini- télécommande commandent les mêmes fonctions que celles de l’appareil. - Page 33 E Touches numériques CD/USB : (1)/(2) : ALBUM –/+ (en cours de lecture MP3/WMA/AAC) Permettent de sauter des albums (appuyez) ; de sauter des albums en continu (appuyez sur la touche et maintenez-la enfoncée). (3) : REP page 13, 15, 16 (4) : SHUF page 13, 15, 16 (5) : DM+ Améliore les sons compressés...
-
Page 34: Mini-Télécommande Rm-X151
Mini-télécommande RM-X151 Les touches suivantes de la mini-télécommande ont également des touches ou des fonctions différentes de celles de l’appareil. Retirez la feuille isolante avant l’utilisation (page 7). w; Touches < (.)/, (>) Permettent de commander la radio, le lecteur CD, le périphérique USB, identiques aux touches (SEEK) –/+ de l’appareil. -
Page 35: Recherche D'une Plage
Recherche d’une plage Recherche d’une plage par nom — Quick-BrowZer Vous pouvez facilement rechercher une plage sur un CD ou un périphérique USB par catégorie. (BROWSE) Molette de réglage ALBUM SHUF PAUSE MODE SOURCE (BACK) SELECT/ENTER Appuyez sur (BROWSE). L’appareil passe en mode Quick-BrowZer et la liste des catégories de recherche apparaît. -
Page 36: Radio
Radio Mémorisation et réception des stations Attention Pour syntoniser des stations pendant que vous naviguez, utilisez la fonction de mémorisation des meilleurs accords (BTM) afin d’éviter les accidents. Mémorisation automatique — BTM Appuyez plusieurs fois sur (SOURCE) jusqu’à ce que l’indication « TUNER » apparaisse. -
Page 37: Lecture D'un Disque
Pour obtenir des informations détaillées sur le raccordement à un changeur CD, reportez-vous à la page 19. Lecture d’un disque Faites glisser le commutateur OPEN dans le sens de la flèche. Ouvrez la façade. Insérez le disque (côté imprimé vers le haut). -
Page 38: Périphériques Usb
Périphériques USB Pour plus de détails sur la compatibilité de votre périphérique USB, visitez le site Web d’assistance de Sony. Site d’assistance Pour les utilisateurs résidant aux Etats-Unis et au Canada : http://esupport.sony.com http://www.xplodsony.com/ Pour les utilisateurs résidant en Europe : http://support.sony-europe.com... -
Page 39: Lecture Répétée Et Aléatoire
• Les paramètres affichés diffèrent selon le périphérique USB, le format d’enregistrement et les réglages. Pour obtenir davantage d’informations, visitez le site Web d’assistance de Sony. • Le nombre maximal de données pouvant être affichées est le suivant. – dossiers (albums) : 128 –... -
Page 40: Rubriques D'affichage
La lecture des plages de l’iPod commence automatiquement à l’endroit où vous aviez arrêté la lecture. Si un iPod est déjà raccordé, appuyez plusieurs fois sur (SOURCE) jusqu’à ce que l’indication « USB » s’affiche pour lancer la lecture. (« IPD » s’affiche sur l’écran lorsque l’iPod est reconnu.) * Si la dernière lecture sur l’iPod a été... -
Page 41: Contrôle Direct D'un Ipod - Commande Passager
Sélectionnez Pour lire TRACK une plage en boucle. ALBUM un album en boucle. PODCAST un podcast en boucle. ARTIST un artiste en boucle. PLAYLIST une liste de lecture en boucle. GENRE un genre en boucle. SHUF ALBUM un album dans un ordre aléatoire. -
Page 42: Personnalisation De La Courbe De L'égaliseur - Eq3
Personnalisation de la courbe de l’égaliseur — EQ3 Le paramètre « CUSTOM » de EQ3 vous permet d’effectuer vos propres réglages de l’égaliseur. Sélectionnez une source, puis appuyez plusieurs fois sur (EQ3) pour sélectionner « CUSTOM ». Appuyez plusieurs fois sur (SELECT/ENTER) jusqu’à... -
Page 43: Sauvegarde De La Mémoire
ILM (Eclairage) Permet de modifier la couleur de l’éclairage : « ILM-1 », « ILM-2 ». M.DSPL (Affichage animé) Permet de sélectionner le mode affichage animé. – « LM » : pour afficher les motifs animés et le limnimètre. – « ON » : pour afficher les motifs animés. –... -
Page 44: Télécommande Marine Rm-X60M/X11M
Télécommande marine RM-X60M/ X11M Emplacement des commandes Les touches correspondantes de la télécommande marine commandent les mêmes fonctions que celles de cet appareil. RM-X60M VOLUME +/– SOURCE MUTING (ATT) RM-X11M VOL +/– GP/ALBM –/+ Les commandes suivantes de la télécommande marine requièrent un fonctionnement différent de l’appareil. -
Page 45: Appareil Audio Auxiliaire
Modification du sens de fonctionnement Le sens de fonctionnement des commandes est réglé par défaut comme indiqué sur l’illustration ci-dessous. Pour augmenter Pour diminuer Si vous devez monter le satellite de commande du côté droit de la colonne de direction, vous pouvez inverser le sens de fonctionnement. -
Page 46: Ordre De Lecture Des Fichiers Mp3/Wma/Aac
Si vous avez des questions ou des problèmes concernant cet appareil qui ne sont pas abordés dans ce mode d’emploi, contactez votre revendeur Sony. Entretien Remplacement de la pile au lithium de la mini-télécommande Dans des conditions d’utilisation normales, la pile... -
Page 47: Spécifications
Si le nouveau fusible saute également, il est possible que l’appareil soit défectueux. Dans ce cas, consultez votre revendeur Sony le plus proche. Spécifications Lecteur CD Rapport signal/bruit : 120 dB Réponse en fréquence : 10 à 20 000 Hz... -
Page 48: Dépannage
Si le problème persiste, visitez le site Web d’assistance suivant. Site d’assistance Pour les utilisateurs résidant aux Etats-Unis et au Canada : http://esupport.sony.com http://www.xplodsony.com/ Pour les utilisateurs résidant en Europe : http://support.sony-europe.com Pour les utilisateurs résidant en Amérique latine : http://esupport.sony.com/ES/LA/... -
Page 49: Affichage Des Erreurs Et Messages
Réception radio Impossible de capter des stations. Le son comporte des parasites. Le raccordement est incorrect. t Raccordez un câble de commande d’antenne électrique (bleu) ou un câble d’alimentation d’accessoires (rouge) au câble d’alimentation de l’amplificateur d’antenne du bateau (uniquement si votre bateau est équipé... - Page 50 OFFSET Il est possible qu’il y ait un problème de fonctionnement. t Vérifiez le raccordement. Si le message d’erreur reste affiché, contactez votre revendeur Sony le plus proche. OVERLOAD Le périphérique USB est surchargé. t Déconnectez le périphérique USB, puis changez la source en appuyant sur (SOURCE).
- Page 52 UE El fabricante de este producto es Sony Corporation, 1-7-1 Konan, Minato-ku, Tokio, Japón. El representante autorizado para EMC y la seguridad de productos es Sony Deutschland GmbH, Hedelfinger Strasse 61, 70327 Stuttgart, Alemania.
- Page 53 ZAPPIN es una marca comercial de Sony Corporation. Windows Media y el logotipo de Windows son marcas comerciales o marcas comerciales registradas de Microsoft Corporation en Estados Unidos o en otros países. iPhone, iPod, iPod classic, iPod nano, y iPod touch son marcas comerciales de Apple Inc.,...
- Page 54 Tabla de contenido Procedimientos iniciales Discos que se pueden reproducir en esta unidad ....... . 6 Restauración de la unidad .
- Page 55 Sitio Web de soporte técnico en línea Para resolver cualquier duda u obtener la información más reciente sobre el soporte técnico de este producto, visite el siguiente sitio Web: Para los clientes de EE.UU. y Canadá: http://esupport.sony.com http://www.xplodsony.com/ Para los clientes de Europa: http://support.sony-europe.com Para los clientes de Latinoamérica:...
-
Page 56: Procedimientos Iniciales
Resistencia al agua Esta unidad se ha diseñado para utilizarse en un entorno marino. Para proteger la unidad de la espuma del mar, las olas, la lluvia, la humedad, los rayos ultravioleta, etc., la unidad se ha sometido a las siguientes pruebas con el fin de garantizar su fiabilidad y funcionalidad (solamente el panel frontal): •... -
Page 57: Preparación Del Mando A Distancia De
Preparación del mando a distancia de tarjeta Retire la lámina de aislamiento. Sugerencia Para obtener información acerca de la sustitución de la pila, consulte la página 23. Ajuste del reloj El reloj emplea una indicación digital de 12 horas. Mantenga pulsado (SELECT/ENTER). Aparece la pantalla de ajustes. -
Page 58: Ubicación De Los Controles Y Operaciones Básicas
Ubicación de los controles y operaciones básicas Unidad principal SCRL DSPL ALBUM SHUF PAUSE MODE SOURCE Panel frontal abierto RESET... - Page 59 Esta sección contiene instrucciones sobre la ubicación de los controles y las operaciones básicas. Para obtener información detallada, consulte las páginas correspondientes. Los botones correspondientes del mando a distancia de tarjeta controlan las mismas funciones que los de la unidad. A Botón BTM/CAT* página 12 Para iniciar la función BTM (mantener...
-
Page 60: Mando A Distancia De Tarjeta Rm-X151
Mando a distancia de tarjeta RM-X151 Los botones siguientes del mando a distancia de tarjeta también presentan botones y funciones distintos de los de la unidad. Extraiga la película de aislamiento antes de utilizar el mando a distancia de tarjeta (página 7). w;... -
Page 61: Búsqueda De Una Pista
Búsqueda de una pista Búsqueda de una pista por nombre — Quick-BrowZer Es posible buscar una pista de un CD o dispositivo USB fácilmente por categoría. (BROWSE) Selector de control ALBUM SHUF PAUSE MODE SOURCE (BACK) SELECT/ENTER Pulse (BROWSE). La unidad entra en el modo Quick-BrowZer y aparece la lista de categorías de búsqueda. -
Page 62: Radio
Radio Almacenamiento y recepción de emisoras Atención Para sintonizar emisoras mientras navega, utilice la función Memoria de la mejor sintonía (BTM) para evitar accidentes. Almacenamiento automático — BTM Pulse (SOURCE) varias veces hasta que aparezca “TUNER”. Para cambiar de banda, pulse (MODE) varias veces. -
Page 63: Reproducción De Un Disco
Para obtener más información sobre cómo seleccionar un cambiador de CD, consulte la página 20. Reproducción de un disco Deslice el interruptor OPEN en la dirección de la flecha. Abra el panel frontal. Introduzca el disco (con la etiqueta hacia arriba). Cierre el panel frontal. -
Page 64: Dispositivos Usb
Para obtener más información acerca de la compatibilidad del dispositivo USB, visite el sitio web de soporte técnico. Sitio Web de soporte técnico en línea Para los clientes de EE.UU. y Canadá: http://esupport.sony.com http://www.xplodsony.com/ Para los clientes de Europa: http://support.sony-europe.com Para los clientes de Latinoamérica: http://esupport.sony.com/ES/LA/... -
Page 65: Reproducción Repetida Y Aleatoria
Sitio Web de soporte técnico en línea Para los clientes de EE.UU. y Canadá: http://esupport.sony.com http://www.xplodsony.com/ Para los clientes de Europa: http://support.sony-europe.com Para los clientes de Latinoamérica: http://esupport.sony.com/ES/LA/... -
Page 66: Elementos De La Pantalla
El iPod se encenderá automáticamente y aparecerá la siguiente pantalla en el iPod.* Las pistas del iPod comienzan a reproducirse automáticamente desde el último punto reproducido. Si ya existe un iPod conectado, pulse (SOURCE) varias veces hasta que aparezca “USB” para iniciar la reproducción. (“IPD” aparece en la pantalla cuando se reconoce el iPod.) * Si el iPod se reprodujo en el modo de control del... -
Page 67: Reproducción Repetida Y Aleatoria
Omisión de álbumes, podcasts, géneros, listas de reproducción y artistas Para Pulse (1)/(2) (ALBUM –/+) Omitir [pulsar una vez para cada elemento] (1)/(2) (ALBUM –/+) Omitir continuamente [mantener pulsado hasta el punto deseado] Reproducción repetida y aleatoria Durante la reproducción, pulse (3) (REP) o (4) (SHUF) varias veces hasta que aparezca el ajuste deseado. -
Page 68: Otras Funciones
Otras funciones Cambio de los ajustes de sonido Ajuste de las características del sonido Pulse (SELECT/ENTER) varias veces hasta que aparezca el elemento deseado. Gire el selector de control para ajustar el elemento seleccionado. Pulse (BACK). El ajuste finaliza y la pantalla regresa al modo de reproducción/recepción normal. -
Page 69: Definición De Los Elementos De Configuración
Definición de los elementos de configuración — SET Mantenga pulsado (SELECT/ENTER). Aparece la pantalla de ajustes. Pulse (SELECT/ENTER) varias veces hasta que aparezca el elemento deseado. Gire el selector de control para seleccionar el ajuste (por ejemplo, “ON” u “OFF”). Mantenga pulsado (SELECT/ENTER). -
Page 70: Copia De Seguridad De La Memoria
Copia de seguridad de la memoria Los últimos ajustes se almacenan automáticamente. Los ajustes de sonido (excepto el volumen), elementos de configuración (excepto el reloj) y preajustes del sintonizador se almacenan en la memoria interna de la unidad. Uso de un equipo opcional Cambiador de CD Selección del cambiador 1 Pulse (SOURCE) varias veces hasta que... -
Page 71: Mando Rotatorio Rm-X4S
Los siguientes controles del mando a distancia subacuático requieren una operación diferente a los de la unidad. • Botones VOLUME (VOL) +/– Coinciden con los del selector de control de la unidad. • Botones GP/ALBM –/+ Corresponden al botón (1)/(2) (ALBUM –/+) de la unidad. -
Page 72: Equipo De Audio Auxiliar
Equipo de audio auxiliar Si conecta un dispositivo de audio portátil opcional a la toma AUX IN de la unidad y simplemente selecciona la fuente, podrá escuchar el sonido a través de los altavoces del barco. Puede ajustar cualquier diferencia en el nivel de volumen entre la unidad y el dispositivo de audio portátil. -
Page 73: Orden De Reproducción De Los Archivos Mp3/Wma/Aac
Si desea realizar alguna consulta o solucionar algún problema relativo a la unidad que no se trate en este manual, póngase en contacto con el distribuidor Sony más cercano. Mantenimiento Carpeta (álbum) Archivo MP3/ Sustitución de la pila de litio del... -
Page 74: Especificaciones
En este caso, póngase en contacto con su distribuidor de Sony. Especificaciones Sección del reproductor de CD Relación señal-ruido: 120 dB Respuesta de frecuencia: de 10 a 20.000 Hz Fluctuación y trémolo: inferior al límite medible... -
Page 75: Solución De Problemas
Si el problema persiste, visite el siguiente sitio web de soporte técnico. Sitio Web de soporte técnico en línea Para los clientes de EE.UU. y Canadá: http://esupport.sony.com http://www.xplodsony.com/ Para los clientes de Europa: http://support.sony-europe.com Para los clientes de Latinoamérica: http://esupport.sony.com/ES/LA/... -
Page 76: Mensajes/Indicaciones De Error
Recepción de radio No es posible recibir la emisoras. Hay ruidos que obstaculizan el sonido. La conexión es incorrecta. t Conecte un cable de control de antena motorizada (azul) o un cable de fuente de alimentación auxiliar (rojo) al cable de fuente de alimentación del amplificador de antena del barco (solamente si el barco dispone de una antena de FM/AM incorporada en el cristal trasero o lateral). - Page 77 *2 La pantalla muestra el número del disco que causa el error. Si estas soluciones no ayudan a mejorar la situación, póngase en contacto con el distribuidor Sony más cercano. Si entrega la unidad para su reparación a causa de problemas en la reproducción de CD, lleve el disco...
- Page 78 Hinweis für Kunden: Die folgenden Informationen gelten nur für Geräte, die in Ländern verkauft werden, in denen EU-Richtlinien gelten Der Hersteller dieses Produkts ist Sony Corporation, 1-7-1 Konan, Minato-ku, Tokio, Japan. Autorisierter Vertreter für EMV und Produktsicherheit ist Sony Deutschland GmbH, Hedelfinger Straße 61, 70327 Stuttgart,...
- Page 79 Inhaltsanbieter verwenden die in diesem Gerät enthaltene Technologie zur Verwaltung digitaler Rechte für Windows Media („WM-DRM“, Windows Media Digital Rights Management), um die Integrität des Inhalts („Sicherer Inhalt“) zu gewährleisten, sodass sich keine Person das geistige Eigentum, einschließlich Urheberrecht, an diesen Inhalten widerrechtlich aneignen kann.
- Page 80 Inhalt Vorbereitungen Mit diesem Gerät abspielbare CDs ..6 Zurücksetzen des Geräts ....6 Abbrechen des DEMO-Modus .
- Page 81 Support-Website Wenn Sie Fragen haben oder die neuesten Support-Informationen zu diesem Produkt abrufen möchten, rufen Sie bitte folgende Website auf: Für Kunden in den USA und Kanada: http://esupport.sony.com http://www.xplodsony.com/ Für Kunden in Europa: http://support.sony-europe.com Für Kunden in Lateinamerika: http://esupport.sony.com/ES/LA/ Für Kunden in Asien: http://www.sony-asia.com/section/support...
-
Page 82: Vorbereitungen
Hinweis zur Wasserfestigkeit Dieses Gerät ist für den Betrieb auf See geeignet. Um den Schutz vor Gischt, Wellen, Regen, Feuchtigkeit, ultravioletten Strahlen usw. zu prüfen und die Zuverlässigkeit und Funktionsfähigkeit des Geräts gewährleisten zu können, wurde es folgenden Tests unterzogen (nur Frontplatte): •... -
Page 83: Vorbereiten Der Kartenfernbedienung
Vorbereiten der Kartenfernbedienung Entfernen Sie die Isolierfolie. Tipp Informationen zum Austauschen der Batterie finden Sie auf Seite 23. Einstellen der Uhr Die Uhr zeigt die Uhrzeit im 12-Stunden-Format digital an. Halten Sie (SELECT/ENTER) gedrückt. Die Einstellanzeige erscheint. Drücken Sie (SELECT/ENTER) so oft, bis „CLOCK-ADJ“... -
Page 84: Lage Und Grundfunktionen Der Teile Und Bedienelemente
Lage und Grundfunktionen der Teile und Bedienelemente Hauptgerät SCRL DSPL ALBUM SHUF PAUSE MODE SOURCE Geöffnete Frontplatte RESET... - Page 85 In diesem Abschnitt werden Lage und Grundfunktionen der Teile und Bedienelemente beschrieben. Nähere Erläuterungen finden Sie auf den jeweiligen Seiten. Die entsprechenden Tasten auf der Kartenfernbedienung haben dieselbe Funktion wie die Tasten am Gerät. A Taste BTM/CAT* Seite 12 Starten der BTM-Funktion (gedrückt halten). B Taste OFF Ausschalten bzw.
-
Page 86: Kartenfernbedienung Rm-X151
Kartenfernbedienung RM-X151 Die folgenden Tasten auf der Kartenfernbedienung unterscheiden sich außerdem hinsichtlich ihres Namens bzw. ihrer Funktion von denen am Gerät. Ziehen Sie vor dem Gebrauch die Isolierfolie heraus (Seite 7). w; Tasten < (.)/, (>) Beim Steuern von Radio-, CD- und USB- Funktionen entsprechen diese Tasten den Tasten (SEEK) –/+ am Gerät. -
Page 87: Suchen Nach Einem Titel
Suchen nach einem Titel Suchen nach einem Titel anhand seines Namens — Quick-BrowZer Sie können anhand der Kategorie mühelos nach einem Titel auf einer CD oder einem USB-Gerät suchen. (BROWSE) Steuerregler ALBUM SHUF PAUSE MODE SOURCE SELECT/ENTER (BACK) Drücken Sie (BROWSE). -
Page 88: Radio
Radio Speichern und Empfangen von Sendern Achtung Wenn Sie während der Bootsfahrt Sender einstellen, sollten Sie die BTM-Funktion (Speicherbelegungsautomatik) verwenden. Andernfalls besteht Unfallgefahr. Automatisches Speichern von Sendern — BTM Drücken Sie (SOURCE) so oft, bis „TUNER“ erscheint. Zum Wechseln des Frequenzbereichs drücken Sie mehrmals (MODE). -
Page 89: Wiedergeben Einer Cd
Einzelheiten zum Auswählen eines CD- Wechslers finden Sie auf Seite 20. Wiedergeben einer CD Schieben Sie den Schalter OPEN in Pfeilrichtung. Öffnen Sie die Frontplatte. Legen Sie eine CD ein (mit der beschrifteten Seite nach oben). Schließen Sie die Frontplatte. Die Wiedergabe beginnt automatisch. -
Page 90: Usb-Geräte
USB-Geräte Einzelheiten zur Kompatibilität Ihres USB- Geräts finden Sie auf der Support-Website. Support-Website Für Kunden in den USA und Kanada: http://esupport.sony.com http://www.xplodsony.com/ Für Kunden in Europa: http://support.sony-europe.com Für Kunden in Lateinamerika: http://esupport.sony.com/ES/LA/ Für Kunden in Asien: http://www.sony-asia.com/section/support http://www.sony-asia.com/caraudio/ • Sie können USB-Geräte des Typs MSC... -
Page 91: Repeat Und Shuffle Play
Begriff für die iPod-Funktionen bei einem iPod und iPhone verwendet, sofern nicht im Text oder in Abbildungen anders angegeben. Support-Website Für Kunden in den USA und Kanada: http://esupport.sony.com http://www.xplodsony.com/ Für Kunden in Europa: http://support.sony-europe.com Für Kunden in Lateinamerika: http://esupport.sony.com/ES/LA/ Für Kunden in Asien:... -
Page 92: Informationen Im Display
Die Titel auf dem iPod werden automatisch ab der zuletzt wiedergegebenen Stelle abgespielt. Wenn bereits ein iPod angeschlossen ist, drücken Sie zum Starten der Wiedergabe (SOURCE) so oft, bis „USB“ erscheint. („IPD“ erscheint im Display, wenn der iPod erkannt wird.) * Wenn die Wiedergabe am iPod beim letzten Mal mit direkter Steuerung erfolgte, erscheint diese Anzeige nicht. -
Page 93: Repeat Und Shuffle Play
Repeat und Shuffle Play Drücken Sie während der Wiedergabe (3) (REP) oder (4) (SHUF) so oft, bis die gewünschte Einstellung im Display erscheint. Einstellung Funktion TRACK Wiederholtes Wiedergeben eines Titels. ALBUM Wiederholtes Wiedergeben eines Albums. PODCAST Wiederholtes Wiedergeben eines Podcasts. ARTIST Wiederholtes Wiedergeben der Titel... -
Page 94: Weitere Funktionen
Weitere Funktionen Ändern der Klangeinstellungen Einstellen der Klangeigenschaften Drücken Sie (SELECT/ENTER) so oft, bis die gewünschte Option angezeigt wird. Stellen Sie durch Drehen des Steuerreglers die ausgewählte Option ein. Drücken Sie (BACK). Die Einstellung ist damit abgeschlossen und im Display erscheint wieder die Anzeige für den normalen Wiedergabemodus bzw. -
Page 95: Einstellen Von Konfigurationsoptionen
Einstellen von Konfigurationsoptionen — SET Halten Sie (SELECT/ENTER) gedrückt. Die Einstellanzeige erscheint. Drücken Sie (SELECT/ENTER) so oft, bis die gewünschte Option angezeigt wird. Wählen Sie durch Drehen des Steuerreglers die Einstellung aus (beispielsweise „ON“ oder „OFF“). Halten Sie (SELECT/ENTER) gedrückt. Die Einstellung ist damit abgeschlossen und im Display erscheint wieder die Anzeige für den normalen Wiedergabemodus bzw. -
Page 96: Sicherungsfunktion Für Speicherdaten
Sicherungsfunktion für Speicherdaten Die zuletzt ausgewählten Einstellungen werden automatisch gespeichert. Klangeinstellungen (mit Ausnahme der Lautstärke), Konfigurationsoptionen (mit Ausnahme der Uhrzeit) und gespeicherte Sender werden im internen Speicher des Geräts abgelegt. Verwenden gesondert erhältlicher Geräte CD-Wechsler Auswählen des Wechslers 1 Drücken Sie (SOURCE) so oft, bis „CD“ erscheint. -
Page 97: Joystick Rm-X4S
Bei folgenden Reglern auf der bootstauglichen Fernbedienung müssen Sie anders als mit dem Gerät vorgehen. • Lautstärketaste(n) VOLUME (VOL) +/– Entspricht dem Steuerregler am Gerät. • Taste(n) GP/ALBM –/+ Entsprechen den Tasten (1)/(2) (ALBUM –/+) am Gerät. • Taste MUTING Dämpfen des Tons. -
Page 98: Zusätzliche Audiogeräte
Zusätzliche Audiogeräte Wenn Sie ein gesondert erhältliches tragbares Audiogerät an die Buchse AUX IN am Gerät anschließen und dann einfach die Tonquelle auswählen, können Sie den Ton über die Lautsprecher des Boots wiedergeben lassen. Unterschiede im Lautstärkepegel zwischen diesem Gerät und dem tragbaren Audiogerät können korrigiert werden. -
Page 99: Wiedergabereihenfolge Von Mp3-/Wma-/Aac-Dateien
Einhaltung von Sicherheitsstandards. Sollten an Ihrem Gerät Probleme auftreten oder sollten Sie Fragen haben, auf die in dieser Anleitung nicht eingegangen wird, wenden Sie sich bitte an Ihren Sony-Händler. Wartung Austauschen der Lithiumbatterie der Kartenfernbedienung Unter normalen Bedingungen hält die Batterie etwa 1 Jahr. -
Page 100: Technische Daten
überprüfen Sie den Stromanschluss und tauschen die Sicherung aus. Brennt die neue Sicherung ebenfalls durch, kann eine interne Fehlfunktion vorliegen. Wenden Sie sich in einem solchen Fall an Ihren Sony-Händler. Technische Daten CD-Player Signal-Rauschabstand: 120 dB Frequenzgang: 10 – 20.000 Hz... -
Page 101: Störungsbehebung
überprüfen Sie bitte zunächst, ob Sie das Gerät richtig angeschlossen und bedient haben. Wenn das Problem sich nicht beheben lässt, besuchen Sie folgende Support-Website. Support-Website Für Kunden in den USA und Kanada: http://esupport.sony.com http://www.xplodsony.com/ Für Kunden in Europa: http://support.sony-europe.com Für Kunden in Lateinamerika: http://esupport.sony.com/ES/LA/ Für Kunden in Asien:... - Page 102 Gespeicherte Sender und die korrekte Uhrzeit werden gelöscht. Die Sicherung ist durchgebrannt. Störgeräusche sind zu hören, wenn der Zündschlüssel gedreht wird. Die Leitungen sind nicht korrekt an den Stromanschluss für Zubehörgeräte angeschlossen. Das Gerät wechselt während der Wiedergabe bzw. des Radioempfangs in den Demo-Modus. Wenn „DEMO-ON“...
-
Page 103: Fehleranzeigen/Meldungen
USB-Wiedergabe Sie können über einen USB-Hub nichts wiedergeben lassen. Dieses Gerät kann keine USB-Geräte erkennen, die über einen USB-Hub angeschlossen sind. Die Wiedergabe ist nicht möglich. Das USB-Gerät funktioniert nicht. t Schließen Sie es nochmals an. Es dauert länger, bis am USB-Gerät die Wiedergabe beginnt. - Page 104 Es liegt möglicherweise eine interne Fehlfunktion vor. t Überprüfen Sie die Verbindungen. Wenn die Fehleranzeige weiterhin im Display angezeigt wird, wenden Sie sich an einen Sony-Händler. OVERLOAD Das USB-Gerät ist überlastet. t Trennen Sie das USB-Gerät von diesem Gerät und wechseln Sie mit (SOURCE) die Tonquelle.
- Page 106 EU-richtlijnen in acht nemen De fabrikant van dit apparaat is Sony Corporation, 1-7-1 Konan, Minato-ku, Tokio, Japan. De geautoriseerde vertegenwoordiger voor EMC en productveiligheid is Sony Deutschland GmbH, Hedelfinger Strasse 61, 70327 Stuttgart, Duitsland.
- Page 107 Inhoudsleveranciers gebruiken de technologie voor beheer van digitale rechten voor Windows Media die in dit apparaat is opgenomen ("WM-DRM"), om de integriteit van hun inhoud te beschermen ("Beschermde inhoud"), zodat hun intellectuele eigendomsrechten, waaronder copyright, op dergelijke inhoud niet ten onrechte worden gebruikt. Dit apparaat gebruikt WM-DRM-software om Beschermde inhoud ("WM-DRM-software") te kunnen afspelen.
- Page 108 Inhoudsopgave Aan de slag Discs die kunnen worden afgespeeld op dit apparaat ....... 6 Het apparaat opnieuw instellen .
- Page 109 Ondersteuningssite Als u vragen hebt of de recentste ondersteuningsinformatie over dit product wilt hebben, gaat u naar de onderstaande website: Voor klanten in de Verenigde Staten en Canada: http://esupport.sony.com http://www.xplodsony.com/ Voor klanten in Europa: http://support.sony-europe.com Voor klanten in Latijns-Amerika: http://esupport.sony.com/ES/LA/ Voor klanten in Pan-Azië:...
-
Page 110: Aan De Slag
Waterbestendigheid Dit apparaat is ontworpen voor gebruik in een waterrijke omgeving. Om het apparaat te beschermen tegen waterdruppels, golven, regen, vocht, ultraviolette straling, enzovoort, zijn de volgende tests uitgevoerd op het apparaat om verzekerd te zijn van betrouwbaarheid en functionaliteit (alleen het voorpaneel): •... -
Page 111: De Kaartafstandsbediening Voorbereiden
De kaartafstandsbediening voorbereiden Verwijder het beschermende laagje. Zie pagina 22 voor meer informatie over het vervangen van de batterij. De klok instellen De digitale klok werkt met het 12-uurs systeem. Houd (SELECT/ENTER) ingedrukt. Het installatievenster wordt weergegeven. Druk herhaaldelijk op (SELECT/ENTER) tot "CLOCK-ADJ"... -
Page 112: Bedieningselementen En Algemene Handelingen
Bedieningselementen en algemene handelingen Hoofdeenheid SCRL DSPL ALBUM SHUF PAUSE MODE SOURCE Voorpaneel geopend RESET... - Page 113 In dit gedeelte vindt u informatie over de locatie van bedieningselementen en instructies voor algemene handelingen. Bekijk de betreffende pagina's voor meer informatie. De overeenkomstige toetsen op de kaartafstandsbediening bedienen dezelfde functies als die op het apparaat. A BTM/CAT* toets pagina 12 De BTM-functie inschakelen (ingedrukt houden).
-
Page 114: Kaartafstandsbediening Rm-X151
Kaartafstandsbediening RM-X151 De volgende toetsen op de kaartafstandsbediening verschillen van de toetsen op het apparaat of hebben andere functies dan de toetsen op het apparaat. Verwijder het beschermende laagje vóór gebruik (pagina 7). w; < (.)/, (>) toetsen Radio/CD/USB bedienen, dezelfde functie als (SEEK) –/+ op het apparaat. -
Page 115: Zoeken Naar Een Track
Zoeken naar een track Zoeken naar een track op naam — Quick-BrowZer U kunt gemakkelijk op categorie zoeken naar een track op een CD of USB-apparaat. (BROWSE) Regelknop ALBUM SHUF PAUSE MODE SOURCE (BACK) SELECT/ENTER Druk op (BROWSE). De Quick-BrowZer-stand op het apparaat wordt geactiveerd en er wordt een lijst met zoekcategorieën weergegeven. -
Page 116: Radio
Radio Zenders opslaan en ontvangen Let op Als u afstemt op zenders tijdens het varen, moet u de BTM-functie (geheugen voor beste afstemming) gebruiken om ongelukken te vermijden. Automatisch opslaan — BTM Druk herhaaldelijk op (SOURCE) tot "TUNER" wordt weergegeven. Druk herhaaldelijk op (MODE) om de band te wijzigen. -
Page 117: Schermitems
USB-apparaten Ga naar de ondersteuningssite voor meer informatie over de compatibiliteit van het USB- apparaat. Ondersteuningssite Voor klanten in de Verenigde Staten en Canada: http://esupport.sony.com http://www.xplodsony.com/ Voor klanten in Europa: http://support.sony-europe.com Voor klanten in Latijns-Amerika: http://esupport.sony.com/ES/LA/ Voor klanten in Pan-Azië: http://www.sony-asia.com/section/support... -
Page 118: Schermitems
Als er al een USB-apparaat is aangesloten, kunt u het afspelen starten door herhaaldelijk op (SOURCE) te drukken tot "USB" wordt weergegeven. Druk op (OFF) om het afspelen te stoppen. Het USB-apparaat verwijderen 1 Stop het afspelen van het USB-apparaat. 2 Verwijder het USB-apparaat. -
Page 119: Een Ipod Afspelen
Ondersteuningssite Voor klanten in de Verenigde Staten en Canada: http://esupport.sony.com http://www.xplodsony.com/ Voor klanten in Europa: http://support.sony-europe.com Voor klanten in Latijns-Amerika: http://esupport.sony.com/ES/LA/... -
Page 120: Schermitems
Schermitems A Bron B Tracknaam, artiestennaam, albumnaam, tracknummer/verstreken speelduur, klok Als u schermitems B wilt wijzigen, drukt u op (DSPL). Als album/podcast/genre/artiest/afspeellijst wordt gewijzigd, wordt het itemnummer tijdelijk weergegeven. Opmerking Het is mogelijk dat sommige letters die zijn opgeslagen in de iPod niet juist worden weergegeven. De weergavestand instellen Druk tijdens het afspelen op (MODE). -
Page 121: Een Ipod Rechtstreeks Bedienen - Passagiersbediening
Een iPod rechtstreeks bedienen — Passagiersbediening U kunt een iPod die is aangesloten op de dockconnector rechtstreeks bedienen. Houd tijdens het afspelen (MODE) ingedrukt. "MODE IPD" wordt weergegeven en u kunt de iPod rechtstreeks bedienen. De schermitems wijzigen Druk op (DSPL). De schermitems worden als volgt gewijzigd: Tracknaam t Artiestennaam t Albumnaam t MODE IPD t Klok... -
Page 122: De Equalizercurve Aanpassen - Eq3
De equalizercurve aanpassen — EQ3 Met "CUSTOM" bij EQ3 kunt u zelf equalizerinstellingen opgeven. Selecteer een bron en druk herhaaldelijk op (EQ3) om "CUSTOM" te selecteren. Druk herhaaldelijk op (SELECT/ENTER) tot "LOW", "MID" of "HI" wordt weergegeven. Draai de regelknop om het geselecteerde item aan te passen. -
Page 123: Geheugenback-Up
M.DSPL (bewegingsdisplay) De stand voor het bewegingsdisplay selecteren. – "LM": bewegende patronen en niveaumeter weergeven. – "ON": bewegende patronen weergeven. – "OFF": het bewegingsdisplay uitschakelen. A.SCRL (automatisch rollen) Lange items automatisch laten rollen: "ON", "OFF". LOCAL (lokale zoekfunctie) – "ON": alleen afstemmen op zenders met sterke signalen. -
Page 124: Maritieme Kaartafstandsbediening Rm-X60M/X11M
Maritieme kaartafstandsbediening RM-X60M/X11M Bedieningselementen De overeenkomstige toetsen op de maritieme kaartafstandsbediening bedienen dezelfde functies als die op het apparaat. RM-X60M VOLUME +/– SOURCE MUTING (ATT) RM-X11M VOL +/– GP/ALBM –/+ De volgende bedieningselementen op de maritieme kaartafstandsbediening moeten op een andere manier worden bediend dan op het apparaat. -
Page 125: Randapparatuur Voor Audio
De werkingsrichting wijzigen De werkingsrichting van de bedieningselementen is in de fabriek ingesteld, zoals hieronder wordt aangegeven. Verhogen Verlagen Als u de bedieningssatelliet rechts op de stuurkolom moet monteren, kan de werkingsrichting worden omgekeerd. 1 Terwijl u de VOL regelaar indrukt, houdt u (SEL) ingedrukt. -
Page 126: Afspeelvolgorde Van Mp3-/Wma
Met alle vragen of problemen met betrekking tot dit apparaat die niet aan bod komen in deze gebruiksaanwijzing, kunt u terecht bij uw Sony- handelaar. Onderhoud De lithiumbatterij van de... -
Page 127: Technische Gegevens
RM-X60M/X11M zijn niet waterdicht. Stel ze niet bloot aan water. Het is mogelijk dat niet alle vermelde accessoires verkrijgbaar zijn bij uw Sony-handelaar. Neem contact op met uw Sony-handelaar voor meer informatie. Wijzigingen in ontwerp en technische gegevens voorbehouden zonder voorafgaande kennisgeving. -
Page 128: Problemen Oplossen
Als het probleem niet is opgelost, gaat u naar de volgende ondersteuningssite. Ondersteuningssite Voor klanten in de Verenigde Staten en Canada: http://esupport.sony.com http://www.xplodsony.com/ Voor klanten in Europa: http://support.sony-europe.com Voor klanten in Latijns-Amerika: http://esupport.sony.com/ES/LA/ Voor klanten in Pan-Azië:... -
Page 129: Foutmeldingen/Berichten
Radio-ontvangst De zenders kunnen niet worden ontvangen. Het geluid is gestoord. De aansluiting is niet juist. t Sluit de bedieningskabel van de elektrische antenne (blauw) of voedingskabel voor accessoires (rood) aan op de voedingskabel van de antenneversterker van de boot (alleen als uw boot is uitgerust met een FM/AM-antenne in de achter- of zijruit). - Page 130 *2 Het discnummer van de disc met de fout wordt weergegeven in het scherm. Als deze oplossingen niet helpen, moet u de dichtstbijzijnde Sony-handelaar raadplegen. Als u het apparaat ter reparatie wegbrengt omdat CD's niet goed worden afgespeeld, kunt u beste de disc meenemen waarmee het probleem is begonnen.
-
Page 132: Operating Instructions
Diebstahls zur ldentifikation lhres Eigentums dienen. Marineaudio Geräte-Pass Dieser Geräte-Pass dient als Eigentumsnachweis für Ihr Marineaudio-Gerät im Falle eines Diebstahls. Wir empfehlen, den Geräte-Pass nicht im Fahrzeug aufzubewahren, um Missbrauch zu verhindern. Modellbezeichnung CDX-H910UI Seriennummer (SERIAL NO.) http://www.sony.net/ Sony Corporation Printed in Thailand 1-800-222-7669 http://www.SONY.com...