Table of Contents
Quick Links
Table of Contents

Related Manuals for Asus VivoWatch BP


Summary of Contents for Asus VivoWatch BP
- Page 1 A15521 June 2019 First Edition HC-A04 / HC-A04A User Manual Android App iOS App...
- Page 2 Table of Contents English ..........................1 日本語 ..........................35 ..........................69 Appendix ........................103...
- Page 3 Introduction Thank you for purchasing the ASUS VivoWatch BP! ASUS VivoWatch BP is the world’s first wearable device that packs ASUS HealthAI technology and some fitness functions with all the benefits of being accurate, smart, and compact. Please fill in the following information for future reference:...
-
Page 4: About This Manual
Chapter 1: Getting started This chapter details the hardware components of your ASUS VivoWatch BP and shows you how to use the different parts of your ASUS VivoWatch BP. Chapter 2: Using your ASUS VivoWatch BP This chapter provides an overview of using your ASUS VivoWatch BP. -
Page 5: Conventions Used In This Manual
This message contains important information that must be followed to keep you safe while performing tasks and prevent damage to your ASUS VivoWatch BP’s data and components. Typography Bold = This indicates a menu or an item that must be selected. -
Page 6: Safety Precautions
5°C and 40°C, and stored in environments with ambient temperatures between -20°C and 45°C. • DO NOT leave your ASUS VivoWatch BP in a hot car. Temperatures in a parked car on sunny days can exceed the recommended ambient temperatures. - Page 7 • Keeping your ASUS VivoWatch BP and the strap clean and dry will reduce the possibility of skin irritation. • If you experience redness, swelling, itchiness, or any other irritation or discomfort on your skin around, or beneath, your ASUS VivoWatch BP, please remove your ASUS VivoWatch BP and consult your physician before resuming wear.
-
Page 8: Battery Precautions
Battery precautions • Do not dispose of in fire. • Never attempt to short-circuit the battery. • Never attempt to disassemble and reassemble the battery. • Discontinue usage if leakage is found. - Page 9 Getting started...
- Page 10 Getting to know your ASUS VivoWatch BP • Your ASUS VivoWatch BP can be used as a standalone device for measurements and time adjustments. • Download and install the companion app for a complete overview of your health data. For more details, refer to the...
- Page 11 • ASUS VivoWatch BP complies with IP67 for dust and water- resistant. Suitable for splashes, rain, snow, or showering. Not suitable for swimming, diving, snorkeling, scuba diving, or high speed watersports. • DO NOT use your ASUS VivoWatch BP in liquids with chemicals or salt water (such as sea water, swimming pools, or hot springs) as it may damage the charging connectors.
- Page 12 For more details, refer to the Using your ASUS VivoWatch BP section in this manual. Touch screen display panel Use the touch screen display panel to operate your ASUS VivoWatch BP using gestures. For more details, refer to the Using your ASUS...
-
Page 13: Home Button
Home button Press this button on your ASUS VivoWatch BP to return to the home screen. You can also press this button to unlock your ASUS VivoWatch BP or enable other functions. Press and hold this button for two (2) seconds to power on your ASUS VivoWatch BP, or press and hold this button for fifteen (15) seconds to power off your ASUS VivoWatch BP. - Page 14 Charging your ASUS VivoWatch BP 1. Align and place the charging connectors on your ASUS VivoWatch BP onto the charging connectors in the charging dock. Stand Portable charging dock charging dock The stand charging dock comes bundled with the HC-A04 and HC-A04A models, and the portable charging dock comes bundled with the HC-A04A model only.
- Page 15 2. Gently push your ASUS VivoWatch BP so that it is firmly seated inside the charging dock. Stand charging dock Portable charging dock...
- Page 16 • Do not short circuit the charging connectors on the dock. • Some power banks can not detect low current devices, and will therefore not be able to charge the ASUS VivoWatch BP.
- Page 17 Using your ASUS VivoWatch BP...
-
Page 18: Installing The Companion App
Installing the companion app Pair your ASUS VivoWatch BP with the companion app to take advantage of all its features, such as activity data, pill reminders, path tracking, message and call notifications, and sleep and health recommendations. 1. On your phone, log in or sign up for a Google account or Apple ID. -
Page 19: Pairing For The First Time
Pairing for the first time • Turn on the Bluetooth of your phone before pairing. • Ensure that the ASUS VivoWatch BP is within three meters from your phone. 1. Press and hold the home button for two (2) seconds to power on your ASUS VivoWatch BP. - Page 20 Pairing with another device or pairing again • Turn on the Bluetooth of your phone before pairing. • Ensure that the ASUS VivoWatch BP is within three meters from your phone. 1. From the Today screen, tap Device on the bottom of the screen.
- Page 21 2. From the Device screen, tap Pairing. 3. Select your ASUS VivoWatch BP from the available list, then tap OK to start the pairing.
- Page 22 Navigating your ASUS VivoWatch BP Unlocking your ASUS VivoWatch BP Press the Home button to unlock your ASUS VivoWatch BP. You can scroll through the ASUS VivoWatch BP features after it is unlocked. After a period of inactivity, the ASUS VivoWatch BP...
- Page 23 Scrolling through ASUS VivoWatch BP features Swipe left or right to scroll through the ASUS VivoWatch BP features. You can press the Home button to return to the HOME screen.
- Page 24 Viewing more information for the selected feature Swipe up or down to view more information for the selected ASUS VivoWatch BP feature or change the watch face. Not all features contain additional information.
-
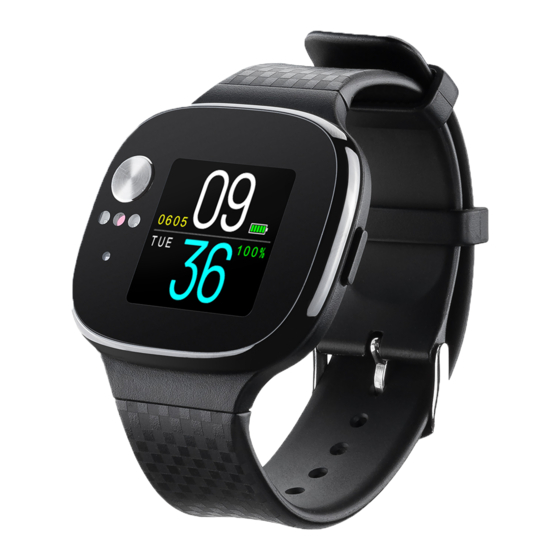
Page 25: Home Screen
The screens shown in this manual are for reference only. Home screen The ASUS VivoWatch BP home screen displays the time, date, and status of your ASUS VivoWatch BP. Icon... -
Page 26: Measuring Screen
Measuring screen This screen allows you to measure your heart rate and health data. Your ASUS VivoWatch BP can also estimate your emotional stress by using the PTT (Pulse Transit Time) Index and the estimated the blood flow rate. Swipe right from the Home screen to enter the Measuring screen. - Page 27 To get more accurate results: • Wear the ASUS VivoWatch BP in a normal way with the watch face facing up, the bottom of the ASUS VivoWatch BP touching your skin, and the ASUS VivoWatch BP away from your wrist bone.
- Page 28 VivoWatch BP automatically determines your current heart rate. To get more accurate results: 1. Wear the ASUS VivoWatch BP in a normal way with the watch face facing up, the bottom of the ASUS VivoWatch BP touching your skin, and the ASUS VivoWatch BP away from your wrist bone.
- Page 29 Enter your personal information correctly for more accurate health data. Language Change device language. Brightness Adjust the brightness of your ASUS VivoWatch BP. This effect is more noticeable in darker environments. About View more information about your device, such as firmware...
-
Page 30: Activities Screen
Activities screen Your ASUS VivoWatch BP will automatically record your daily activities and display them on this screen. Swipe left from the Home screen to enter the Activities screen. You can view your daily activities such as steps you have taken, calories you have burned, your sleep time, and your comfort sleep time as they are recorded. -
Page 31: Exercise Screen
Exercise screen This screen allows you to keep track of your exercise sessions. When you start exercise mode, your ASUS VivoWatch BP will record information about the current exercise session and show the information as they are recorded. Entering exercise mode To enter exercise mode, swipe left or right to the EXERCISE screen, then tap START to enter exercise mode. - Page 32 From the exercise screen, swipe left or right to view information such as the real time heart rate, exercise time, calories, steps, and distance for the current exercise session. Exiting exercise mode Press the home button and tap END to exit exercise mode.
- Page 33 Notifications When you receive a call or message on your paired phone, your ASUS VivoWatch BP will vibrate and show you the phone number of the caller or a preview of the message. Reminders Your ASUS VivoWatch BP will also show you walk and pill reminders to aid...
- Page 34 Updating your ASUS VivoWatch BP Updating through the ASUS HealthConnect App 1. Launch the ASUS HealthConnect App. 2. From the Today screen, tap Device on the bottom of the screen. Device icon...
- Page 35 3. From the Device screen, tap on the device you would like to update. 4. Tap Update. A pop-up message will appear when the firmware update is completed.
- Page 37 はじめに この度はASUS製品をお買い上げいただき、 誠にありがとうございます。 本製品 は、 コンパクトな設計で健康的な生活をサポートする、 ASUS HealthAI テク ノロ ジーを搭載したウェアラブルデバイスです。 日 本 語 お買い上げ日: ________________________________ 製造番号: ___________________________________ お客様により良いサポート、 サービスをご提供するために、 ユーザー登録をお願いいたします。 ご登録は無料です。 https://account.asus.com/product_reg.aspx...
- Page 38 本マニュアルについて 本マニュアルでは、 製品の使用方法、 接続方法、 各種機能の設定方法について 説明をしています。 お客様に本製品を末永くご愛用いただくためにも、 ご使用 前にこのユーザーマニュアルを必ずお読みください。 Chapter 1: 製品概要 日 本 本製品の各部位および付属品について 語 Chapter 2: セッ トアップ 本製品の使用方法および機能について Appendices (付録) 本製品の規格や海外の法令の適合について ご使用前にこのユーザーマニュアルを必ずお読みください。 各 言語のマニュアルは、 サポートサイトよりダウンロードいただけ ます。 https://www.asus.com/VivoWatch/ASUS-VivoWatch-BP- HC-A04/HelpDesk_Manual/ または https://www.asus.com/VivoWatch/ASUS-VivoWatch-BP-HC- A04A/HelpDesk_Manual/...
- Page 39 マニュアルの表記 本書には、 製品を安全にお使いいただき、 お客様や他の人々への危害や財産 への損害を未然に防止していただくために、 守っていただきたい事項が記載さ れています。 内容をよくご理解いただいた上で本文をお読みください。 日 作業人が死亡する、 または重傷を負う可能性が想定される内 本 容を示しています。 語 製品を使いやすくするための情報や補足の説明を記載してい ます。 ハードウェアの損傷やデータの損失の可能性があることを示 し、 その危険を回避するための方法を説明しています。 表記 太字 = 選択するメニューや項目を表示します。 ・ 本書に記載している画面は一例です。 画面の背景、 画面デザイン、 表示さ れる項目名、 アイコンなどの種類や位置などが実際の画面と異なる場合 があります。 ・ 本書は、 本書作成時のソフトウェアおよびハードウェアの情報に基づき作 成されています。 ソフトウェアのバージョンアップなどにより、 記載内容と ソフトウェアに搭載されている機能および名称が異なる場合があります。 また、 本書の内容は、 将来予告なく変更することがあります。...
- Page 40 安全上のご注意 • 本製品は防水設計です。 屋外で悪天候下 (大雨、 台風など) 、 極端に湿 度の高い場所でのご使用はお避けください。 万が一水に濡れた場合 は、 すみやかに乾いた柔らかい布で水分を拭き取ってください。 • 濡れた手で本製品を操作したり、 接続したりしないでください。 感電の原 日 因となります。 本 • ご自身で修理、 分解、 改造をしないでください。 故障の原因になる上に、 感 語 電、 火災の危険があります。 また、 分解した部品による特に小さなお子様の 誤飲の危険があります。 絶対にしないでください。 • 湿度変化の激しい場所 (クーラーや暖房機のそばなど) に置かないでくだ さい。 本製品の内部に結露が発生し、 火災、 感電、 故障の原因となります。 •...
- Page 41 • 本製品の本体とバンドは常に清潔さに保つようご留意ください。 • 本製品の使用において、 密着した部位や周囲の皮膚に赤みや腫れ、 痒み 等の炎症が生じた場合は、 直ちに本製品の使用を停止し、 医師にご相談 ください。 • 症状が軽減した後でも、 使用を再開した場合、 炎症が再発する場合もあ ります。 日 本 • 運動は体調に合せて実施してください。 気分が悪くなるなど体調変化を感 語 じたときは、 すみやかに医師にご相談ください。 • 破損したクレードルを使用しないでください。 故障、 火災の原因となります 。 • クレードルに埃などの異物が付着した状態で使用しないでください。 火 災の原因となります。 • クレードル内部に異物や水などの液体が入ったときは、 そのまま使用しな いでください。 感電、 火災の原因となります。 • 本製品は、 お客様の責任でご使用ください。 お客様本人および第三者の いかなる損害に対しても、...
- Page 42 バッテリーに関する注意事項 • 本製品に内蔵の充電式電池は、 リチウム電池です。 不要になったリチウム電 池は、 お住まいの地域の各自治体の指示に従い適切に処分して ください。 • 充電式電池を使用する前に、 本書をお読みください。 また、 お読みいただ いた後は大切に保管し、 必要なときにお読みください。 日 • 製品に内蔵されている充電池は、 お客様ご自身で交換や取り外しをしな 本 語 いでください。 (製品廃棄時を除く) • 本製品は、 乳幼児の手の届かないところに置いてください。 不用意な取り 扱いは危険をともないます。 • 電子レンジや高圧容器に入れないでください。 急に加熱されたり、 密閉状 態が壊れたりして、 発熱、 破裂、 発火の原因となります。 • 充電式電池を水に投じたり、 湿らせないでください。 • 充電時、...
- Page 43 日 本 語 製品概要...
- Page 44 本体各部の名称 日 本 語...
- Page 45 日 本 語 • 本製品は、 測定機やデジタル時計としてスタンドアロンでも ご利用いただけます。 • 測定したデータの集計データや各機能の設定を行うには、 専 用アプリが必要です。 アプリスト アからダウンロードしてご利 用ください。 • 本製品はIP67に準拠した防塵・防水タイプです。 • 化学物質を含む液体、 海水、 プール、 温泉の中に浸けないでくだ さい。 充電端子が腐食したり、 機器の故障の原因になります 。 • 本製品が濡れてしまった場合は、 錆や腐食を防止するため必 ず本体を真水で丁寧に洗浄し、 乾いた布で水分や汚れを綺麗 に拭き取ってください。...
- Page 46 電極 PPGセンサーと連携して心拍数と健康データを測定することができ ます。 PPG (Photoplethysmogram) センサー 日 電極と連携して、 健康データを測定することができます。 このセン 本 サーを使用して心拍数を測定することもできます。 語 タッチディスプレイ 指で画面に直接触れて操作します。 ホームボタン 画面ロックを解除する、 ホーム画面に戻る、 エクササイズモードを終 了することができます。 電源オフ状態でこのボタンを2秒間押し続けると電源がオンになり、 電源オン状態でこのボタンを15秒間押し続けると電源がオフになり ます。 データの消失を防ぐため、 本体の電源を切る前に必 ず専用アプリでデータを同期してください。 バンド (医療グレードシリコーン使用) 腕の太さ (装着部周囲の長さ) にあわせて、 バンドの穴位置を調節し ます。 充電端子 (入力定格: 5Vdc、 0.5A) 本体と付属の充電用クレードルを接続するための端子です。...
- Page 47 充電する 本体をクレードルにセットします。 クレードルと本体端子の位置が合って いることを確認します。 日 本 語 スタンド充電クレードル ポータブル充電クレードル スタンド充電クレードルはHC-A04 / HC-A04A モデルのみ、 ポータブル充電クレードルはHC-A04A モデルのみに付属し ます。...
- Page 48 • 充電をする前に、 本体やクレードルが濡れていないことを確 認してください。 水滴が付着している場合には水滴を拭き取 り、 水分が完全になくなるまで常温で放置して乾燥させたの ち、 充電を開始してください。 濡れた状態で充電すると、 感 日 電、 発火、 発煙等の恐れがあり、 大変危険ですので、 絶対にし 本 ないでください。 語 • 充電用クレードルなどの付属品は防塵・防水ではありません。...
- Page 49 2. 本体をゆっく りと押し込み、 クレードル内にしっかりと収まるようセットし ます。 日 本 語 スタンド充電クレードル ポータブル充電クレードル...
- Page 50 3. クレードルのUSBポートにUSBケーブルを接続し、 もう一端をPCや電源ア ダプターへ接続し充電を開始します。 日 本 語 スタンド充電クレードル ポータブル充電クレードル • 充電するときは、 必ず付属のクレードルとUSBケーブルを使 用してください。 破裂や電池の液漏れ、 加熱などにより、 火 災やけが、 周囲の汚損の原因となります。 • 本体を逆向きにセットしないでください。 本体および充電ク レードルが破損する恐れがあります。 • 低電流デバイスを検出することができないモバイルバッテ リーなどでは本製品を充電することはできません。...
- Page 51 日 本 語 セットアップ...
- Page 52 アプリをインストールする 測定データ、 アクティビティや運動の集計データ、 通知機能、 リマインダー機能 など、 各種設定やデータの同期を行うために専用アプリをインストールします 。 1. インターネットに接続されたスマートフォンまたはタブレットを用意し ます。 日 2. Google Play™ または App Store を開きます。 本 語 3. 「ASUS Health Connect」 を検索します。 • アプリの利用料は無料ですが、 ダウンロードやご利用時にかかるパケット 通信料はお客さまのご負担となります。 • ご利用方法によっ ては通信料が高額になることがありますので、 ご利用の際 はパケッ ト通信定額サービスをお申込みされていることを強く推奨します 。...
- Page 53 ペアリングする • お使いになる機器のBluetooth機能をオンにしてください。 • ペアリングを行う際は、 本機とお使いの機器を3メートル以 内に近づけてください。 日 本 本機の電源がオンになっていることを確認します。 語 2. 「ASUS Health Connect」 を起動します。 3. 画面に表示される指示に従いペアリングを行いプロフィールを設定し ます。...
- Page 54 他のデバイスとペアリングする • お使いになる機器のBluetooth機能をオンにしてください。 • ペアリングを行う際は、 本機とお使いの機器を3メートル以 内に近づけてください。 日 本 語 ホーム画面下の デバイス アイコンをタップします。 デバイス アイコン...
- Page 55 2. デバイス画面の ペアリング ボタンをタップします。 3. 利用可能なリストから接続したいASUS Vivoデバイスを選択し、 ペアリン グを開始します。 日 本 語...
- Page 56 ASUS VivoWatch BPの操作 画面ロックの解除 一定時間何も操作をしないと自動的にホーム画面に切り替わり画面が ロックされます。 画面ロック状態では操作を行うことができません。 画面ロッ クは本体の ホームボタン を押すことで解除することができます。 日 本 語...
- Page 57 機能を切り替える タッチディスプレイに触れたまま、 左右に指をスライドして機能を切り替えるこ とができます。 日 本 語 ホーム画面に戻す場合は、 本機のホームボタンを押してくだ さい。...
- Page 58 表示する記録や項目を切り替える タッチディスプレイに触れたまま、 上下に指をスライドして表示する記録や項 目を切り替えることができます。 日 本 語...
- Page 59 搭載機能 本製品は、 歩数、 運動時間、 睡眠などの様々な活動量の計測・記録することが でき、 あなたの健康的な生活をサポートします。 ホーム画面 日 本 本体のホーム画面には、 時間、 日付、 電池残量などの情報が表示されます。 語 ホーム画面に表示される内容は選択する盤面によって異なります。 アイコン 説明 画面ロック中 バッテリーレベル 接続中 アラームオン ホーム画面の盤面を変更するには、 タッチディスプレイに触れ たまま、 上下に指をスライドします。...
- Page 60 測定 本製品に搭載されている電極とPPGセンサーを使用し、 心拍数と健康データ を測定することができます。 また、 PTT (Pulse Transit Time:脈波伝播時間) 指 数と血流量の推定値を使用し、 精神的ストレス状態をチェックすることができ ます。 ホーム画面で指を右方向にスライドすることで、 測定画面に移動するこ 日 とができます。 本 心拍数と健康データを測定するには、 画面の指示に従い電極とPPGセンサー 語 の上に指を置きます。...
- Page 61 測定を開始する前に、 本製品を正しく装着していることをご確認ください。 正し く取り付けられていない場合、 測定精度に影響する場合があります。 正確に測定するために • 手首の骨茎状突起に掛らない位置で、 腕の甲側に装着します。 • 腕に密着するように装着してください。 測定などのデータが取得し 日 にくい場合は、 バンドを1段階小さいサイズに調整して、 再度お試しくだ 本 語 さい。 • バンドはきつく締めすぎないでください。 きつく締めすぎると血流が悪く なり脈拍の傾向が計測できない場合があります。 • 測定する環境条件、 方法などにより測定値は変動すること があります。 PPGセンサー部に汚れなどがある場合は、 事前 にセンサーの汚れをきれいに拭き取ってください。 • PPGセンサーの点灯中の光を直視しないでください。 視力低 下や失明の恐れがあります。 • 小さなお子様が使用する場合は、 必ず保護者の指導監督の もとでご使用してください。 • 本製品は医療機器ではありません。 医療行為、 研究、 実験、 ま た精度を要する業務・...
- Page 62 心拍数 PPGセンサーで測定された現在の心拍数が表示されます。 日 本 語 正確に測定するために ・ 手首の骨茎状突起に掛らない位置で、 腕の甲側に装着します。 ・ 腕に密着するように装着してください。 測定などのデータが取得しにくい 場合は、 バンドを1段階小さいサイズに調整して、 再度お試しください。 ・ バンドはきつく締めすぎないでください。 きつく締めすぎると血流が悪く なり脈拍が計測できない場合があります。 ・ 外気温や身体の表面温度が低い場合は、 温めてから計測を行なってくだ さい。...
- Page 63 設定 本製品の設定を変更することができます。 日 本 語 設定 説明 目覚まし時計 アラームのオン/オフ、時間を設定します。 時間 時計機能の日時を設定します。 プロフィール 測定データの基準範囲を策定するために、性別、身長、 誕生年月の使用者の情報を設定します。 言語 画面の表示言語を変更します。 明るさ 画面の明るさを調節します。 暗所で画面が見にくい場合に お試しください。 ABOUT ファームウェアバージョン、シリアルナンバー(製造番 号)など、お使いの製品の情報を表示します。...
- Page 64 アクティビティ 歩数、 燃焼カロリー、 睡眠時間、 などの1日のアクティビティ (活動量) 情報が 表示されます。 アクティビティ画面には、 ホーム画面で指を左方向にスライドすることで移動 することができます。 日 本 語 アクティビティ画面で指を上下にスライドして表示内容を切り 替えることができます。...
- Page 65 運動 エクササイズモードを使用して運動を簡単に記録し、 リアルタイムデータを表 示したりすることができます。 エクササイズモードを実行する エクササイズモードを実行するには、 ホーム画面で指を左方向に3回スライドし 日 てエクササイズ画面へ移動し、 START をタップします。 本 語 • エクササイズモードのGPS機能をONで使用する場合は Outdoor をタップし、 屋外の空の開けた場所に移動して本 機がGPS信号を受信したことを確認してください。 • GPS信号が正しく受信されると、 アイコンが表示され ます。 エクササイズモード実行中は、 画面で指を左右にスライドして表示内容を切り 替えることができます。...
- Page 66 エクササイズモードを終了する ホームボタンを押して終了画面へ移動 し、 END をタップします。 日 本 語...
- Page 67 通知機能 ペアリングしているスマート フォ ンに電話着信や通知 (プッシュ通知) がある と、 画面に発信者情報やメッセージのプレビューを表示し、 本体が振動して着 信を通知します。 日 本 語 リマインダー 本製品には、 定期投薬を知らせたり、 一定時間運動や移動が行なわれなかった 場合などに画面表示と振動で通知するリマインダー機能が搭載されています。...
- Page 68 ASUS VivoWatch BPの更新 アプリで更新する 「ASUS HealthConnect」 を起動します。 2. ホーム画面下の デバイス アイコンをタップします。 日 本 語 デバイス アイコン...
- Page 69 3. デバイス画面から、 更新を実行したいデバイスをタップします。 4. 更新 ボタンをタップします。 ファームウェア更新が完了すると、 ポップアッ プが表示されます。 日 本 語...
- Page 70 日 本 語...
- Page 71 הקדמה הואASUS VivoWatch BP !ASUS VivoWatch BP תודה על קניית השעון , ופונקציות כושרASUS HealthAI השעון הראשון בעולם שכולל את טכנולוגיית עם כל מה שצריך כדי להיות מדויק, חכם וקומפקטי. מומלץ למלא את הפרטים :הבאים עכשיו, למקרה שיהיה בהם צורך בעתיד...
- Page 72 מדריך זה כולל מידע לגבי תכונות החומרה והתוכנה של השעון : ומסודר לפי הפרקים הבאיםASUS VivoWatch BP פרק 1: צעדים ראשונים ואיךASUS VivoWatch BP בפרק הזה מוסבר על חלקי החומרה של .ASUS VivoWatch BP להשתמש בחלקים השונים של ASUS VivoWatch BP-פרק 2: שימוש ב...
- Page 73 .הודעה זו מכילה מידע נוסף וטיפים שיעזרו לביצוע משימות הודעה זו מכילה מידע חיוני שחשוב להביא בחשבון כדי לשמור על הבטיחות בזמן ביצוע משימות, וכדי למנוע נזק לרכיבים ולנתונים .ASUS VivoWatch BP של טיפוגרפיה .= סימון זה מציין תפריט או פריט שצריך לבחור...
- Page 74 .ASUS VivoWatch BP -כשעונדים את השעון הדוק מדי יש יותר סיכוי לחוות גירוי מ • .ASUS VivoWatch BP . מדי פעם כדי לאפשר לעור לנשוםASUS VivoWatch BP מומלץ להסיר את • והרצועה ולשמור עליהם יבשיםASUS VivoWatch BP מומלץ לנקות את •...
- Page 75 במקרים של אדמומיות, נפיחות, גירוד או כל גירוי או חוסר נוחות אחרים בעור • , יש להסיר אתASUS VivoWatch BP-וסביב או מתחת ל . ולהתייעץ עם רופא לפני המשך ענידת השעוןASUS VivoWatch BP ענידת השעון, גם אחרי שהתסמינים נעלמים, עלולה לגרום לגירוי לחזור או •...
- Page 76 אמצעי זהירות לסוללה .אין להשליך אותה לאש • .אין לבצע פעולות שעלולות לגרום לקצר בסוללה • .לעולם אין לנסות לפרק ולהרכיב מחדש את הסוללה • .הפסק להשתמש בה אם מצאת דליפה • 74 74...
- Page 77 צעדים ראשונים 75 75...
- Page 78 ASUS VivoWatch BP הכרת כמוצר בפני עצמוASUS VivoWatch BP-• אפשר להשתמש ב .למדידת זמן ומדדים שונים • אפשר להוריד ולהתקין את האפליקציה הנלווית כדי ליהנות מנתוני בריאות נוספים. הסבר נוסף בנושא מפורט בחלק .התקנת האפליקציה הנלווית שבמדריך 76 76...
- Page 79 יש נוזלים עם כימיקלים או מלח (כגון מי ים, בריכות שחייה או מרחצאות חמים) מחשש לנזק למחברי הטעינה. אם נוזלים יש לשטוף היטבASUS VivoWatch BP כאלה באו במגע עם את המחברים במים נקיים ולייבש אותם באמצעות מטלית .נקייה כדי למנוע קורוזיה...
- Page 80 .בריאות. החיישן זה גם מאפשר למדוד את הדופק -הסבר נוסף בנושא מפורט בחלק שימוש ב . שבמדריךASUS VivoWatch BP לוח מסך מגע . באמצעות תנועותASUS VivoWatch BP מסך המגע משמש להפעלת -הסבר נוסף בנושא מפורט בחלק שימוש ב . שבמדריךASUS VivoWatch BP 78 78...
- Page 81 'לחצן 'בית למסךASUS VivoWatch BP לחיצה על הלחצן הזה מחזירה את אוASUS VivoWatch BP הבית. אפשר גם ללחוץ עליו כדי לפתוח את .להפעיל פונקציות אחרות לחיצה קצרה על הלחצן הזה במשך שתי (2) שניות מפעילה את . לחיצה ארוכה עליו במשך כ-51 שניות מכבהASUS VivoWatch BP .ASUS VivoWatch BP את...
- Page 82 ASUS VivoWatch BP טעינת מול מחברי הטעינהASUS VivoWatch BP 1. מיישרים את מחברי הטעינה של .במטען ומחברים אותם תחנת עגינה נייחת תחנת עגינה ניידת ,HC-A04A- וHC-A04 תחנת העגינה הנייחת מצורפת לדגמי . בלבדHC-A04A ותחנת העגינה הניידת מצורפת לדגם .• חשוב לוודא שמחברי הטעינה נקיים ויבשים לפני הטעינה...
- Page 83 . כדי שיתחבר היטב למטעןASUS VivoWatch BP 2. לוחצים בעדינות על תחנת עגינה נייחת תחנת עגינה ניידת 81 81...
- Page 84 נדלק אוטומטית כשהסוללה טעונהASUS VivoWatch BP .במלואה - עלול לגרום נזק חמור לUSB-• חיבור לא נכון של כבל ה . נזק שנגרם כתוצאה משימוש לא נכוןASUS VivoWatch BP .אינו מכוסה באחריות .• אין לחבר את מחברי הטעינה למטען באופן שיגרום קצר...
- Page 85 ASUS VivoWatch BP-שימוש ב 83 83...
- Page 86 התקנת האפליקציה הנלווית לאפליקציה הנלווית כדי ליהנות מכלASUS VivoWatch BP מומלץ לחבר בין התכונות של השעון, כמו נתוני פעילות, תזכורות לנטילת תרופות, מעקב אחרי .מסלולים, התראות על הודעות ושיחות והמלצות לשיפור השינה והבריאות . בטלפון או יוצרים חשבון חדשApple ID אוGoogle 1. נכנסים לחשבון...
- Page 87 נמצא קרוב לטלפוןASUS VivoWatch BP-• חשוב לוודא ש .)(עד 3 מטר 1. לוחצים על לחצן הבית במשך שתי (2) שניות כדי להדליק את .ASUS VivoWatch BP .ASUS HealthConnect 2. פותחים את אפליקציית כדי לסיים אתASUS VivoWatch BP-3. פועלים לפי ההוראות בטלפון וב .ההתאמה 85 85...
- Page 88 התאמה מחדש או עם מכשיר אחר . בטלפון לפני ההתאמהBluetooth-• צריך להפעיל את ה נמצא קרוב לטלפוןASUS VivoWatch BP-• חשוב לוודא ש .)(עד 3 מטר . (מכשיר) בחלק התחתון של המסךDevice (היום), הקש עלToday 1. במסך ) (מכשירDevice סמל...
- Page 89 .) (התאמהPairing (מכשיר), הקש עלDevice 2. במסך שלך מהרשימה הזמינה, ולאחר מכן הקש עלASUS VivoWatch BP-3. בחר ב . (אישור) כדי להתחיל את תהליך הצימודOK 87 87...
- Page 90 ASUS VivoWatch BP-ניווט ב ASUS VivoWatch BP פתיחת (לחצןHome button , לוחצים עלASUS VivoWatch BP כדי לפתוח את ASUS הבית). אחרי שפותחים אותו אפשר לדפדף בין כל התכונות של .VivoWatch BP ASUS VivoWatch ,אחרי פרק זמן מסוים של חוסר פעילות...
- Page 91 ASUS VivoWatch BP דפדוף בתכונות של אפשר להחליק שמאלה או ימינה כדי לדפדף בין התכונות של .ASUS VivoWatch BP (לחצןHome button כדי לחזור למסך הבית, אפשר ללחוץ על .)הבית 89 89...
- Page 92 הצעת פרטים נוספים על התכונה שנבחרה אפשר להחליק למעלה או למטה כדי להציג פרטים נוספים על התכונה שנבחרה . או לשנות את העיצוב של תצוגת השעוןASUS VivoWatch BP-ב .לא כל התכונות כוללות פרטים נוספים 90 90...
- Page 93 ASUS VivoWatch BP התכונות של מציג מידע על סטטוס הפעילות היומית שלך, זמניASUS VivoWatch BP .פעילות גופנית ואיכות השינה כדי לעזור לך לנהל אורח חיים בריא יותר .התמונות שבמדריך הזה הן להמחשה בלבד מסך הבית מוצגים השעה, התאריך והסטטוס שלASUS VivoWatch BP במסך הבית של...
- Page 94 מסך המדידה ASUS VivoWatch BP .במסך הזה מוצגות המדידות של הדופק ונתוני הבריאות (המודד את מעבר הדם ביןPTT גם יכול להעריך את הלחץ הרגשי באמצעות מדד שני כלי דם) ואת קצב זרימת הדם. כדי להיכנס למסך המדידה, מחליקים ימינה...
- Page 95 יכול להשפיע על רמתASUS VivoWatch BP בריאות. האופן שבו עונדים את .הדיוק במדידות :טיפים לקבלת מדידות מדויקות יותר , כמו כל שעון רגיל, מעבר לפרק כף הידASUS VivoWatch BP לענוד את • כשהצד שמראה את השעה פונה כלפי מעלה והחלק התחתון של...
- Page 96 מודדASUS VivoWatch BP שלPPG-במסך הזה מוצג הדופק שלך. חיישן ה .אוטומטית את הדופק :טיפים לקבלת מדידות מדויקות יותר , כמו כל שעון רגיל, מעבר לפרק כף הידASUS VivoWatch BP 1. לענוד את כשהצד שמראה את השעה פונה כלפי מטה והחלק התחתון של . נוגע בעורASUS VivoWatch BP ...
- Page 97 מומלץ להזין פרטים אישיים מדויקים כדי לקבל נתוני בריאות .נכונים .שינוי שפת המכשיר שפה . בדרך כלל צריךASUS VivoWatch BP כיוון רמת הבהירות של בהירות .לכוון את הבהירות בסביבות חשוכות יותר ,הצגת פרטים על המכשיר, כמו גרסת הקושחה, מספר סידורי...
- Page 98 מסך הפעילויות מתעד אוטומטית את הפעילויות היומיות ומציג אותןASUS VivoWatch BP .במסך הזה. כדי להיכנס למסך הפעילויות, מחליקים שמאלה במסך הבית כאן אפשר לבדוק את הפעילויות היומיות שתועדו, כמו מספר הצעדים, מספר .קלוריות שנשרפו, שעות השינה ונוחות השינה .כדי להציג פעילויות אחרות מחליקים למעלה ולמטה...
- Page 99 מסך פעילות גופנית במסך הזה אפשר לעקוב אחרי אימוני כושר ופעילות גופנית. כשעוברים למצב מתעד ומציג פרטים על האימון אוASUS VivoWatch BP ,פעילות גופנית .הפעילות מעבר למצב פעילות גופנית כדי לעבור למצב פעילות גופנית, מחליקים שמאלה או ימינה במסך הפעילות...
- Page 100 אפשר להחליק ימינה או שמאלה במסך הפעילות הגופנית כדי להציג פרטים על .הפעילות הנוכחית כמו דופק בזמן אמת, זמן הפעילות, קלוריות, צעדים ומרחק יציאה ממצב פעילות גופנית ליציאה ממצב אימונים, לחץ על לחצן .) (סיוםEND הבית והקש על 98 98...
- Page 101 התראות ,כשיש שיחה נכנסת או כשמקבלים הודעה בטלפון שחובר לשעון ירטוט ויציג את מספר הטלפון של המתקשר או תצוגהASUS VivoWatch BP .מקדימה של ההודעה תזכורות גם מציג תזכורות ללכת וליטול תרופות כדי לעזור לךASUS VivoWatch BP .לנהל אורח חיים בריא יותר...
- Page 102 ASUS VivoWatch BP עדכון הקושחה של ASUS HealthConnect עדכון דרך אפליקציית .ASUS HealthConnect 1. פותחים את אפליקציית . (מכשיר) בחלק התחתון של המסךDevice (היום), הקש עלToday 2. במסך ) (מכשירDevice סמל...
- Page 103 . (מכשיר), הקש על המכשיר שאותו ברצונך לעדכןDevice 3. במסך . (עדכן). בסיום תהליך העדכון של הקושחה תוצג הודעהUpdate 4. הקש על...
- Page 105 Appendix...
- Page 106 Federal Communications Commission Interference Statement This equipment has been tested and found to comply with the limits for a Class B digital device, pursuant to part 15 of the FCC Rules. These limits are designed to provide reasonable protection against harmful interference in a residential installation.
- Page 107 RF exposure warning The equipment complies with FCC RF exposure limits set forth for an uncontrolled environment. The equipment must not be co-located or operating in conjunction with any other antenna or transmitter. Compliance Statement of Innovation, Science and Economic Development Canada (ISED) This device complies with Innovation, Science and Economic Development Canada licence exempt RSS standard(s).
- Page 108 Radio Frequency (RF) Exposure Information The radiated output power of the Wireless Device is below the Industry Canada (IC) radio frequency exposure limits. The Wireless Device should be used in such a manner such that the potential for human contact during normal operation is minimized.
- Page 109 Directive 2014/53/EU. Full text of EU declaration of conformity is available at https://www.asus.com/support/. The Simplified EU Declaration of Conformity of this device has been updated. This device now complies with Radio Equipment Directive 2014/53/EU, and no longer complies with R&TTE...
- Page 110 NCC警語: 經型式認證合格之低功率射頻電機,非經許可,公司、商號或使用者均 不得擅自變更頻率、加大功率或變更原設計之特性及功能。 低功率射頻電機之使用不得影響飛航安全及干擾合法通信;經發現有干 擾現象時,應立即停用,並改善至無干擾時方得繼續使用。 前項合法通信,指依電信法規定作業之無線電通信。低功率射頻電機須 忍受合法通信或工業、科學及醫療用電波輻射性電機設備之干擾。 注意!使用過度恐傷害視力: 1. 使用 30 分鐘請休息 10分鐘。 2. 未滿 2 歲幼兒不看螢幕,2 歲以上每天看螢幕不要超過 1 小時。 「產品之限用物質含有情況」之相關資訊,請參考下表。 限用物質及其化學符號 單元 鉛 汞 鎘 六價鉻 多溴聯苯 多溴二苯醚 (Pb) (Hg) (Cd) (PBB) (PBDE) 印刷電路板及 - ○ ○ ○ ○ ○...
- Page 111 Global Environmental Regulation Compliance and Declaration ASUS follows the green design concept to design and manufacture our products, and makes sure that each stage of the product life cycle of ASUS product is in line with global environmental regulations. In addition, ASUS disclose the relevant information based on regulation requirements.
-
Page 112: Proper Disposal
Proper disposal Do not throw your ASUS VivoWatch BP in municipal waste. This product has been designed to enable proper reuse of parts and recycling. The symbol of the crossed out wheeled bin indicates that the product (electrical, electronic equipment and mercury-containing button cell battery) should not be placed in municipal waste. -
Page 113: Notices For Removable Batteries
Notices for removable batteries • Risk of explosion if battery is replaced by an incorrect type. • The battery and its component must be recycled or disposed of properly. Avis concernant les batteries remplaçables • La batterie de l’ordinateur portable peut présenter un risque d’incendie ou de brûlure si celle-ci est retirée ou désassemblée. -
Page 114: Nordic Lithium Cautions (For Lithium-Ion Batteries)
Nordic Lithium Cautions (for lithium-ion batteries) CAUTION! Danger of explosion if battery is incorrectly replaced. Replace only with the same or equivalent type recommended by the manufacturer. Dispose of used batteries according to the manufacturer’s instructions. (English) ATTENZIONE! Rischio di esplosione della batteria se sostituita in modo errato. - Page 115 ВНИМАНИЕ! При замене аккумулятора на аккумулятор иного типа возможно его возгорание. Утилизируйте аккумулятор в соответствии с инструкциями производителя. (Russian) Manufacturer ASUSTek COMPUTER INC. Address 4F, No. 150, LI-TE RD., PEITOU, TAIPEI 112, TAIWAN Authorized ASUS COMPUTER GmbH Representative in Europe Address HARKORT STR. 21-23, 40880 RATINGEN, GERMANY...
-
Page 116: Copyright And Warranty Information
Product warranty or service will not be extended if: (1) the product is repaired, modified or altered, unless such repair, modification of alteration is authorized in writing by ASUS; or (2) the serial number of the is defaced or missing. -
Page 117: Limitation Of Liability
ASUS. In each such instance, regardless of the basis on which you are entitled to claim damages from ASUS, ASUS is liable for no more than damages for bodily injury (including death) and damage to real property and tangible personal property;... - Page 120 15060-0LE2B000...