Husqvarna AUTOMOWER 420 Operator's Manual
Hide thumbs
Also See for AUTOMOWER 420:
- Technical manual (104 pages) ,
- Operator's manual (100 pages) ,
- Workshop manual (60 pages)

Related Manuals for Husqvarna AUTOMOWER 420


Summary of Contents for Husqvarna AUTOMOWER 420
- Page 1 Operator's manual ® HUSQVARNA AUTOMOWER 420/430X/440/450X EN, English Read the operator's manual carefully and make sure that you understand the instructions before you use the product.
-
Page 2: Table Of Contents
Contents 5.5 Winter service............. 37 1 Introduction 6 Troubleshooting 1.1 Introduction............3 1.2 Product overview ..........4 6.1 Introduction - troubleshooting......38 1.3 Symbols on the product........5 6.2 Fault messages...........38 1.4 Symbols on the display......... 5 6.3 Information messages.........43 1.5 Symbols on the battery......... 6 6.4 Indicator lamp in the charging station.... -
Page 3: Introduction
PIN code: The serial number is on the product rating plate and on the product carton. • Use the serial number to register your product on www.husqvarna.com. 1.1.1 Support The operator selects the operation settings with the keys For support about the product, speak to your Husqvarna on the keypad. -
Page 4: Product Overview
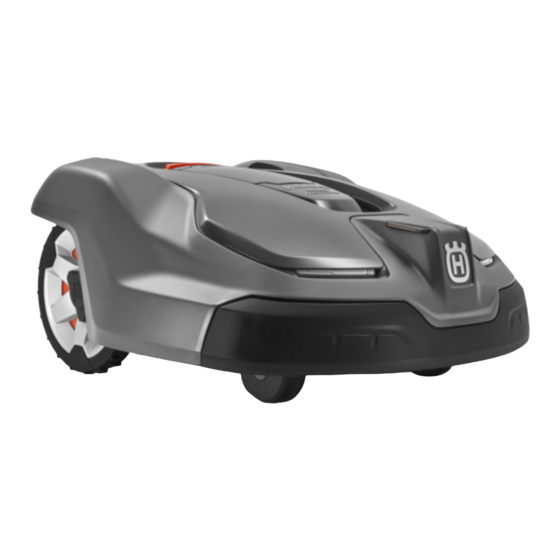
1.2 Product overview Automower 420/440 Automower 430X Automower 450X The numbers in the figure represent: 16. Blade disc 17. Skid plate Body 18. Contact plates Hatch to display and keypad 19. LED for operation check of the charging station Stop button... -
Page 5: Symbols On The Product
29. Couplers for the loop wire The chassis contains components which 30. Loop wire for boundary loop and guide wire are sensitive to electrostatic discharge 31. Stakes (ESD). The chassis must also be resealed in a professional manner. For these 32. -
Page 6: Symbols On The Battery
In the settings menu you can set the The signal strength of the GPRS general settings of the product. reception. Problem with the connection to the In the accessories menu you can set the settings for the accessories of the product. Internet server. -
Page 7: Menu Structure Overview 1
1.7 Menu structure overview 1 Schedule Overview Schedule settings Overview (per day) Period 1 Period 2 Copy to Reset Current All week days Cutting height Cutting height Security Advanced Security level New loop Change Duration Medium High Custom signal PIN code Duration Duration of alarm... -
Page 8: Menu Structure Overview 2
1.8 Menu structure overview 2 Weather timer Cutting time Medium High Installation Find charging station Advanced Lawn coverage Overview of search method GPS Auto 430X/450X Guide Boundary Charger Overview of lawn coverage Charging station range Area 1-5 Delay time Disable More How? Disable... -
Page 9: Menu Structure Overview 3
1.9 Menu structure overview 3 Settings ECO mode Profiles Spiral cutting Slope control General Profile A, B or C Country & Time & Language Unit Reset all About Timezone user setting date format Select Rename Save Set time Set date Time format Date format Intensity Low-... -
Page 10: Display
1.10 Display The display on the product shows information and settings of the product. To access the display, push the STOP button. 1.11 Keypad Use the keypad on the product to navigate in the menu. To access the keypad, push the STOP button. •... -
Page 11: Safety
2 Safety 2.1 Safety information 2.1.1 IMPORTANT. READ CAREFULLY BEFORE USE. KEEP FOR FUTURE REFERENCE The operator is responsible for accidents or hazards occurring to other people or property. This appliance is not intended for use by persons (including children) with reduced physical, sensory or mental capabilities (that could affect a safe handling of the product), or lack of experience and knowledge, unless they have been given supervision or instruction concerning use of the appliance by a person... -
Page 12: Safety Definitions
The appliance must be disconnected from the supply mains when removing the battery. WARNING: The product CAUTION: Used if there is a risk of damage to the product, other materials or can be dangerous if used the adjacent area if the instructions in the manual are not obeyed. - Page 13 ® • Husqvarna does not guarantee full compatibility • It is not permitted to modify the original design of between the product and other types of wireless the product. All modifications are made at your systems such as remote controls, radio own risk.
- Page 14 CAUTION: Never use a high-pressure washer or even running water to clean the product. Never use solvents for cleaning. Inspect the product weekly and replace any damaged or Maintenance on page 36 . worn parts. Refer to 2.3.5 In the event of a thunderstorm Set the main switch in position Carry the product by the handle with the blade disc away from the body.
-
Page 15: Installation
When the product has cut the grass for some time, the perceived sound level is much lower. Note: Refer to www.husqvarna.com for more information about installation. 3.4 Before the installation of the wires You can select to attach the wires with stakes or bury 3.2 Main components for installation... - Page 16 3.4.3 To examine where to put the • Put the charging station in an area with protection from the sun. boundary wire • If the charging station is installed on an island, make sure to connect the guide wire to the island. CAUTION: There must be a barrier of To make an island on page 18 .
- Page 17 " 10 cm / 4 " max 1 cm / 0.4 • If you have a paving stone path that is in level with the lawn, put the boundary wire below the paving stone. Note: If the paving stone is minimum 30 cm / 12 Drive Past in.
- Page 18 3.4.3.3 To make an island CAUTION: Do not put a section of boundary wire across the other. The >10% 0-25% sections of boundary wire must be parallel. CAUTION: Do not put the guide wire across the boundary wire. CAUTION: Isolate or remove obstacles •...
- Page 19 3.4.4 To examine where to put the guide wire • Put the guide wire in a line at a minimum of 2 m / 6.5 ft. in front of the charging station. • Make as much free area as possible to the left of the guide wire when facing the charging station.
-
Page 20: Installation Of The Product
21 . The product is only to be used with the power supply unit supplied by Connect the low-voltage cable to the charging Husqvarna. station. Put the power supply at a minimum height of 30 cm / 12 in. 20 - Installation... - Page 21 min 30 cm / 12” Cut the boundary wire 1-2 cm / 0.4-0.8 in. above each connector. Connect the power supply cable to a 100-240V Push the right connector onto the metal pin on the power outlet. charging station with the mark "AR". Note: When the charging station is connected, it Push the left connector onto the metal pin on the...
-
Page 22: To Put The Wire Into Position With Stakes
cause disruptions until several weeks or months later. Put the boundary wire and the guide wire on the ground. Put the stakes at a maximum of 75 cm / 30 in. distance from each other. Attach the stakes to the ground with a hammer or a plastic mallet. -
Page 23: After The Installation Of The Product
Note: Make a note of the PIN code. Refer to Introduction on page 3 . 3.9.3 Calibration The calibration process is automatic. After the basic settings are done, the product moves away from the charging station and stops, while it calibrates some of the product settings. -
Page 24: Product Settings With Keypad And Display
® Download the Automower Connect app on your Messages • mobile device. Weather timer • Sign up for a Husqvarna account in the • Installation ® Automower Connect app. Settings • An e-mail is sent to the registered e-mail address. - Page 25 Divide the m / ft of the lawn with the approximate Push the OK button. daily operation capacity. Refer to table below. 3.13.3 Cutting height The result is equal to the number of hours that the product must mow each day. The number of hours includes both mowing, searching and charging time.
- Page 26 3.13.4.1 To set the security level Use the arrow buttons and the OK button to move through the menu structure Security > Advanced > Select 1 of 3 security levels for your product. Duration > Duration of time lock . To get access to the menu in the Do steps 1–3 in Use the number buttons to select a time interval of...
- Page 27 3.13.6.1 To set the Weather timer Do steps 1–3 in To get access to the menu in the display of the product on page 24 . Use the arrow buttons and the OK button to move Weather timer > Use through the menu structure Weather timer .
- Page 28 The percentage is equal to the area in relation to To reset the Lawn Coverage settings the complete work area. You can reset the Lawn Coverage settings for each area and use the factory setting. Measure the area. Do steps 1–3 in To get access to the menu in the Divide the measured area with the total work display of the product on page 24 .
- Page 29 To do a test of the guide wire 3.13.7.3 Corridor width Do steps 1–3 in To get access to the menu in the The boundary wire corridor is the area adjacent to the display of the product on page 24 . boundary wire and the guide corridor is the area adjacent to the guide wire.
- Page 30 Use the number buttons to select how frequently To save settings to a profile the product must use each sector. Set in Do steps 1–3 in To get access to the menu in the percentage. display of the product on page 24 . Push the BACK button.
- Page 31 To set the Slope control Note: To start the product manually in the work area, Do steps 1–3 in To get access to the menu in the push the STOP button before you remove the product display of the product on page 24 . from the charging station.
- Page 32 3.13.9.1 Information Automower Connect > GeoFence . This menu handles accessories mounted on the Use the arrow buttons to select level of GeoFence product. Contact your local Husqvarna representative for more information on available accessories. sensitivity. Push the BACK button.
- Page 33 Network APN settings The product must specify APN settings to be able to use and send data via the mobile net. Settings for Husqvarna SIM is default. ® 3.13.9.3 Ultrasonic Automower 450X Ultrasonic function makes the product decrease speed when the product comes near an obstacle. The...
-
Page 34: Operation
4 Operation 4.1 Main switch Push the OK button. Close the hatch on the product. WARNING: Read the safety Note: instructions carefully before you start the If the product is parked in the charging station, product. the product will start to operate when the battery is fully charged and if the Schedule settings is set for operation. -
Page 35: To Park The Product
4.3.4 Spot cutting Spot cutting to cut a selected Use the operating mode area in a spiral pattern. You must move the product manually to the selected area before you start the Spot cutting operating mode. Note: After the product has operated in the operating Spot cutting , it will automatically start to cut in the mode Main area or Secondary area . -
Page 36: Maintenance
The product does not operate satisfactorily in slopes if the wheels are blocked with grass. Use a soft brush to clean the product. Husqvarna recommends to use a special cleaning and maintenance kit, available as accessory. Speak to your Husqvarna representative for more information. -
Page 37: Replace The Blades
5.5 Winter service Turn the product upside down. Put the product on a soft and clean surface to avoid scratching the Take your product to your Husqvarna central service for product. service prior to winter storage. Regular winter service Rotate the skid plate so that its holes align with the will maintain the product in good condition and create screws for the blade. -
Page 38: Troubleshooting
FAQ (Frequently Asked Questions) on www.husqvarna.com. 6.2 Fault messages The list below shows a number of fault messages that may be shown in the app. Speak to your local Husqvarna representative if the same message shows frequently. Message... - Page 39 An incorrect PIN code has been entered. 5 Enter the correct PIN code. Speak to your lo- tries are permitted, and the product is then cal Husqvarna representative if you forget blocked for a period of time. the PIN code.
- Page 40 Message Cause Action Outside work area The boundary wire connections to the charg- Make sure that the boundary wire is connec- ing station are crossed. ted correctly to the charging station. Refer to To install the boundary wire on page 21 . The boundary wire is too close to the edge of Make sure that the boundary wire is put To install the boun-...
- Page 41 Message Cause Action Charging station The contact between the charging strips and Put the product in the charging station and blocked contact strips may be poor and the product check that the charging plates and contact has made a number of attempts to charge. plates make good contact.
- Page 42 Message Cause Action Electronic problem Temporary electronic or firmware related is- Restart the product. sue in the product. Loop sensor prob- If the problem stays, speak to your approved lem, front/rear servicing dealer. Charging system problem Tilt sensor problem Temporary problem Wheel drive problem, right/left Invalid device combi-...
-
Page 43: Information Messages
6.3 Information messages Messages menu in the Automower ® The list below shows a number of information messages that may be found in the Connect app. Contact your local Husqvarna representative if the same message appears often. Message Cause Action Low battery The product cannot find the charging station. - Page 44 Restart the product. If there still is a connec- tion problem, try to unpair the product mowers) and then pair it again. If the prob- lem remains, contact your local Husqvarna representative. Connection settings Settings for wireless connectivity have been Check and revise settings if necessary.
-
Page 45: Indicator Lamp In The Charging Station
The indicator lamp in the charging station must show a solid or flashing green light for a correct installation. If not, follow the instructions in the troubleshooting guide below. Speak to your Husqvarna customer service for more information. Light Cause... -
Page 46: Symptoms
If your product does not work as expected, follow the symptoms guide below. There is a FAQ (Frequently Asked Questions) on www.husqvarna.com which provides more detailed answers to a number of standard questions. Contact Husqvarna customer service if you still cannot find the reason for the fault. Symptoms... -
Page 47: Find Breaks In The Loop Wire
Symptoms Cause Action The product is The hatch is closed but the START button is Push the STOP button to open the hatch. parked for hours in not pushed. Enter the PIN code and confirm with the OK the charging station. button. - Page 48 POWER Switch the connections between the guide wire and the boundary wire in the charging station. Start by switching connection and . If the indicator lamp has a solid green light, then the break is somewhere on the boundary wire between and the point where the guide wire is connected to the boundary wire (thick black line in the illustration).
- Page 49 Continue until only a very short section of the wire remains which is the difference between a solid green light and a flashing blue light. Then follow instruction in step 5 below. If indicator lamp still flashes blue in step 3 above: Put and back in their original positions.
-
Page 50: Transportation, Storage And Disposal
7.3.1 To remove the battery CAUTION: Only remove the battery when you dispose the product. When you remove the warranty seal, the Husqvarna warranty is no longer applicable. To switch off the Switch off the product. Refer to product on page 35 . -
Page 51: Technical Data
8 Technical data 8.1 Technical data ® ® ® ® Dimensions Automower Automower Automower Automower 430X 450X Length, cm / in. 72 / 28.3 72 / 28.3 72 / 28.3 72 / 28.3 Width, cm / in. 56 / 22.0 56 / 22.0 56 / 22.0 56 / 22.0... - Page 52 ® ® ® ® Electrical system Automower Automower Automower Automower 430X 450X Type of Power Supply Unit ADP-60JR XX, ADP-120DRXX, ADP-200JR XX, ADP-200JR XX, FW7438/28/D/X ADP-120FRXX, ADP-200MRXX, ADP-200MRXX, FW7448/28/D/X FW7458/28/D/X FW7458/28/D/X Average mowing time, min Average charging time, min ® ®...
-
Page 53: Registered Trademarks
Power Class 3 23 dBm Husqvarna AB does not guarantee full compatibility between the product and other types of wireless systems such as remote controls, radio transmitters, hearing loops, underground electric animal fencing or similar. The products are made in England or the Czech Republic. See information on the rating plate. Refer to... -
Page 54: Warranty
The blades and wheels are seen as disposable and are not covered by the warranty. If an error occurs with your Husqvarna product, please contact Husqvarna customer service for further instructions. Please have the receipt and the product’s serial number at hand when contacting Husqvarna customer service. - Page 55 1201 - 005 - 19.03.2021 Warranty - 55...
- Page 56 AUTOMOWER ® is a trademark owned by Husqvarna AB. © Copyright 2021 HUSQVARNA. All rights reserved. www.husqvarna.com Original instructions 1142330-95 2021-03-31...