Table of Contents
Available languages
Available languages
Quick Links
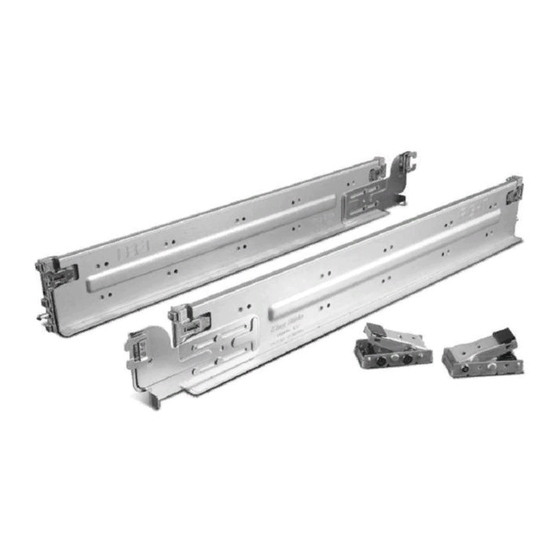
ThinkStation Static Rail Kit
http://www.lenovo.com/support
Important information about the ThinkStation
Static Rail Kit
This document provides important information about the ThinkStation Static Rail Kit.
If you want to install a ThinkStation
®
computer into a rack, you need one set of rails. The
set of rails is designed for fixing a 4U ThinkStation computer into a rack without the
flexibility of sliding in or out. ("U" is the unit of measurement for defining the vertical space
used by your ThinkStation computer and 1U is equivalent to 4.445 cm or 1.75 inches.)
Your rail kit package contains:
One set of rails
Two locking clips
One stopper
Two cage nuts
Two bolts
Documentation
If any item is missing or damaged, contact your place of purchase. Ensure that you retain
your proof of purchase and packing material. They might be required to receive warranty
service.
About the rack
CAUTION: Be sure to read and understand the documentation that comes with the
rack for safety and cabling information. Before you install a workstation into the
rack, also ensure that you read and understand all safety information and
guidelines in this document. Reading and understanding the information reduces
the risk of personal injury and damage to your product.
The rack must meet one of the following requirements:
Standard 4-post (square-hole), 19-inch rack configuration compliant with EIA-310-E
as defined by the Electronic Industries Alliance
Standard 4-post (unthreaded round-hole), 19-inch rack configuration compliant with
EIA-310-E as defined by the Electronic Industries Alliance
The dimensions of the rack must meet the following requirements:
Rear mounting flange
Front mounting flange
Rack front door
The following table explains the dimension requirements of the rack.
Item
Dimensions
Description
A
609.6 – 914.4 mm
Item A refers to the distance between the front
(24 – 36 inches)
mounting flange
and the rear mounting flange
The distance must be 609.6 mm (24 inches) in
minimum and 914.4 mm (36 inches) in maximum.
B
> 474 mm
Item B refers to the internal width of the rail kit. The
width must exceed 474 mm (18.66 inches).
(18.66 inches)
D
> 60 mm
Item D refers to the distance between the front
mounting flange
and the inside of the rack front
(2.36 inches)
door
. The distance must exceed 60 mm (2.36
inches). This clearance is required for the chassis pull
handles on the front of the ThinkStation computer as
well as air circulation through the rack.
L
> 950 mm
Item L refers to the distance between the front
mounting flange
and the rear of the rack. The
(37.4 inches)
distance must exceed 950 mm (37.4 inches).
Read these guidelines first
Before you install the ThinkStation computer into a rack, review the following guidelines.
The guidelines help you in your installation and avoid the risk of personal injury and
damage to your product.
Two or more people are required to lift a ThinkStation computer, move a ThinkStation
computer, or install a ThinkStation computer into a rack. You also can use a workstation
computer-lifting tool for help.
≥ 18 kg (39.7 lb)
≥ 32 kg (70.5 lb)
< 32 kg (70.5 lb)
< 55 kg (121.2 lb)
CAUTION
Use safe practices when lifting.
Before installing a ThinkStation computer into a rack, remove all media from the
drives and turn off all attached devices and the ThinkStation computer. Then,
disconnect all power cords from electrical outlets and disconnect all cables that are
connected to the ThinkStation computer.
Ensure that the room air temperature is below 35°C (95°F).
Do not block any air vents; usually 15 cm (6 inches) of space provides proper airflow.
Do not leave open spaces above or below an installed ThinkStation computer in your
rack. To help prevent damage to ThinkStation computer components, always install a
blank filler panel to cover the open space and to help ensure proper air circulation.
Install the ThinkStation computer only in a rack with perforated doors for both security
and proper airflow.
Start from the bottom of the rack for the ThinkStation computer or device installation.
Install the heaviest ThinkStation computer or device in the bottom of the rack.
Do not extend more than one ThinkStation computer or device out of the rack at the
same time.
If possible, remove the doors and side panels of the rack to provide easier access
during installation.
Do not overload the electrical outlet when you install multiple devices in the rack.
Connect all power cords to proper electrical outlets and properly manage all the
cables in the rack. Refer to the documentation that comes with the rack about
managing cables.
Do not place any object on top of rack-mounted devices.
When you move or ship the rack, remove the ThinkStation computer secured by the
rail kit from the rack first. Refer to the documentation that comes with the rack and the
documentation that comes with each rail kit for detailed information.
Installing a ThinkStation computer into a rack
(with static rail kit)
Before you begin, remove all the parts from the rail kit package and lay all the parts on a
working surface. Measure the rack before the installation to ensure that the rack can
accommodate the static rail.
Note: The holes in a mounting flange are separated into groups by measuring marks. The
three holes between two adjacent measuring marks form a group, which indicates 1U
space. Note the measuring marks on a mounting flange to help you correctly select a rack
mounting area for the ThinkStation computer. For more information about the placement
of the holes in a mounting flange, refer to the documentation that comes with the rack.
To install a ThinkStation computer into a rack, do the following:
1.
Install the rail kit by doing the following:
a. Select a proper rack mounting area for the left static rail. Position the rear end of
the left rail to the mounting area. Ensure that the tabs on the rear end of the rail
are aligned with the corresponding holes in the mounting area. Press the latch
and push the rail until the rear end of the left static rail is firmly secured to the
mounting flange.
If the holes in a mounting flange are round, the installation method is the same.
Press the latch
inserted into the corresponding holes. Then, the rear end of the rail is firmly
secured to the mounting flange.
b. Position the front end of the left static rail to the mounting flange. Ensure that the
front end and rear end of the left static rail are at the same horizontal level. Press
the latch
mounting flange.
If the holes in a mounting flange are round, the installation method is the same.
Press the latch
.
inserted into the corresponding holes. Then, the front end of the rail is firmly
secured to the mounting flange.
c. Repeat steps a through b to install the right static rail to the opposite side of the
rack.
2.
Depending on the type of the handles on the front of your computer, install a locking
clip or two cage nuts on the front mounting flange.
≥ 55 kg (121.2 lb)
• For the computer handle with a hole, install a locking clip. Remove the two screws
< 100 kg (220.5 lb)
on the side of the locking clip. Install the locking clip on the mounting flange
above the rail as shown. Then reinstall the two screws to secure the locking clip
to the mounting flange.
• For the computer handle without a hole, install the two cage nuts on the mounting
flange above the rail as shown.
Third Edition (December 2017)
© Copyright Lenovo 2015, 2017.
LIMITED AND RESTRICTED RIGHTS NOTICE: If data or software is delivered pursuant to a General Services Administration "GSA" contract, use, reproduction, or disclosure is subject to restrictions set forth in
Contract No. GS-35F-05925.
and push the rail until the inner round posts of the tabs are
and push the rail until the front end of the rail is firmly secured to the
and push the rail until the inner round posts of the tabs are
PN: SP40K32881
Printed in China
3.
Remove the four feet on the bottom of the computer.
4.
Position the computer onto the rails. Then slide the computer to the rear of the rack
until the hole in the computer handle is aligned with the locking clip.
5.
Secure the computer to the rack by either of the following:
• Press the button on each locking clip.
• Press the button on the locking clip
. Align the holes in the stopper with the
installed cage nuts and position the stopper onto the computer handle. Install the
two bolts to secure the stopper on the mounting flange
Legal notices
Lenovo
®
, the Lenovo logo, ThinkStation, and the ThinkStation logo are trademarks of
Lenovo in the United States, other countries, or both.
Other company, product, or service names may be trademarks or service marks of others.
.
Table of Contents

Related Manuals for Lenovo SW12041

Summary of Contents for Lenovo SW12041
- Page 1 Lenovo ® , the Lenovo logo, ThinkStation, and the ThinkStation logo are trademarks of and proper airflow. Lenovo in the United States, other countries, or both. Start from the bottom of the rack for the ThinkStation computer or device installation.
-
Page 2: Avisos Legais
Não deixe espaços abertos acima ou abaixo de um computador ThinkStation A Lenovo , o logotipo Lenovo, o ThinkStation e o logotipo ThinkStation são marcas instalado no rack. Para ajudar a evitar danos aos componentes do computador registradas da Lenovo nos Estados Unidos e/ou em outros países. - Page 3 bezpečnosti a správného proudění vzduchu. Lenovo ® , logo Lenovo, ThinkStation a logo ThinkStation jsou ochranné známky Při umísťování počítače ThinkStation nebo jiných zařízení začínejte odspodu racku. společnosti Lenovo ve Spojených státech a dalších zemích. Dolů umístěte nejtěžší počítač ThinkStation nebo zařízení.
-
Page 4: Mentions Légales
ThinkStation installé dans une armoire. Pour ne pas endommager les composants de ® Lenovo , le logo Lenovo, ThinkStation et le logo ThinkStation sont des marques de l'ordinateur ThinkStation, installez toujours un panneau obturateur pour recouvrir Lenovo aux États-Unis et/ou dans certains autres pays. -
Page 5: Rechtliche Hinweise
® ThinkStation-Computers. Damit die ThinkStation Computerkomponenten nicht Lenovo , das Lenovo Logo, ThinkStation und das ThinkStation Logo sind Marken von beschädigt werden, installieren Sie immer eine Abdeckblende, um Leerräume Lenovo in den USA und/oder anderen Ländern. abzudecken und eine ordnungsgemäße Luftzirkulation sicherzustellen. - Page 6 Non lasciare spazi aperti nel rack del computer ThinkStation installato. Per evitare il Lenovo , il logo Lenovo, ThinkStation e il logo ThinkStation sono marchi di Lenovo negli danneggiamento dei componenti del computer ThinkStation, installare sempre un Stati Uniti e/o in altri paesi.
- Page 7 通気口をふさがないでください。通常、15 cm (6 インチ) のスペースがあれば空気が 正しく流れます。 特記事項 ラックに ThinkStation コンピューターを搭載する場合は、上下にスペースを残さな ® いでください。スペースが残る場合は、ThinkStation コンピューターのコンポーネン Lenovo 、Lenovo ロゴ、ThinkStation、および ThinkStation ロゴは、Lenovo Corporation トの破損を防止するため換気用のブランク・フィラー・パネルを取り付けてそのスペ の米国およびその他の国における商標です。 ースを埋めてください。 他の会社名、製品名およびサービス名等はそれぞれ各社の商標です。 ThinkStation コンピューターは、セキュリティーおよび適切な換気の両方を確保する ため、穴の開いたカバー付きラックにのみ取り付けます。 第 3 版 (2017 年 12 月) © Copyright Lenovo 2015, 2017.
-
Page 8: Juridische Informatie
Let erop dat de luchttemperatuur in de ruimte niet hoger dan 35 °C is. ® Lenovo , het Lenovo-logo, ThinkStation en het ThinkStation-logo zijn handelsmerken van Lenovo in de Verenigde Staten en/of andere landen. Blokkeer geen luchtopeningen; normaal gesproken biedt een ruimte van 15 cm ... - Page 9 ® компьютером ThinkStation и под ним. Во избежание повреждения компонентов Lenovo , логотип Lenovo, ThinkStation и логотип ThinkStation являются товарными компьютера ThinkStation всегда устанавливайте панель-заглушку, чтобы закрыть знаками Lenovo в США и/или других странах. пустое пространство и обеспечить надлежащую циркуляцию воздуха.
- Page 10 < 100 千克(220.5 磅) • 对于没有孔的计算机把手,请如图所示,将两个锁紧螺母安装在导轨上方的安装凸 警告 缘上。 抬起机柜时请使用安全的做法。 法律声明 将 ThinkStation 计算机装入机架之前,请从驱动器中取出所有介质,关闭所有连接的 设备和 ThinkStation 计算机。然后从电源插座中拔出所有电源线,并拔下连接到 ® 、Lenovo 徽标、ThinkStation 和 ThinkStation 徽标是 Lenovo 在美国和/或其他国 Lenovo ThinkStation 计算机的所有线缆。 家或地区的商标。 请确保室内空气温度在 35°C(95°F)以下。 其他公司、产品或服务名称可能是其他公司的商标或者服务标记。 请勿挡住任何通风孔;通常情况下,留出 15 厘米(6 英寸)的空间可确保空气正常流通。 第三版(2017 年 12 月)...
- Page 11 primerané prúdenie vzduchu. ® Lenovo , logo Lenovo, ThinkStation a logo ThinkStation sú ochranné známky spoločnosti Nenechávajte otvorený priestor nad ani pod počítačom ThinkStation nainštalovaným Lenovo v USA alebo iných krajinách. do stojana. Ak nechcete, aby sa poškodili komponenty počítača ThinkStation, vždy Názvy iných spoločností, produktov alebo služieb môžu byť...
-
Page 12: Avisos Legales
35 °C (95 °F). ® Lenovo , el logotipo de Lenovo, ThinkStation y el logotipo de ThinkStation son marcas registradas de Lenovo en Estados Unidos o en otros países. No bloquee los conductos de ventilación; normalmente un espacio de 15 cm (6 ... - Page 13 所示。 警告 抬起時,請使用安全做法。 將 ThinkStation 電腦裝入機架之前,請從磁碟機中取出所有媒體,然後關閉所有連接 法律注意事項 裝置和 ThinkStation 電腦。接著拔下電源插座上的所有電源線,以及拔掉所有連接到 ThinkStation 電腦的纜線。 ® 、Lenovo 標誌、ThinkStation 和 ThinkStation 標誌是 Lenovo 在美國及(或)其 Lenovo 請確定室溫低於 35 °C (95 °F)。 他國家或地區的商標。 請勿擋住任何通風孔;通常情況下,保留 15 公分(6 吋)的空間即可確保適當的空氣 其他公司、產品或服務名稱,可能是第三者的商標或服務標誌。 流通。 第三版(2017 年 12 月)...
- Page 14 ThinkStation bilgisayarını hem güvenlik hem de uygun bir hava akışı sağlamak ® Lenovo , Lenovo logosu, ThinkStation ve ThinkStation logosu Lenovo'nun ABD'de amacıyla sadece delikli kapakları olan bir rafa kurun. ve/veya diğer ülkelerdeki ticari markalarıdır. Diğer şirket, ürün ya da hizmet adları ilgili şirketlerin ticari markaları ya da hizmet markaları...