Table of Contents
Table of Contents

Related Manuals for AEG 9000 Series


Summary of Contents for AEG 9000 Series
- Page 1 T9DEB969C User Manual Tumble Dryer USER MANUAL...
-
Page 2: Table Of Contents
1369/2017....................... 29 FOR PERFECT RESULTS Thank you for choosing this AEG product. We have created it to give you impeccable performance for many years, with innovative technologies that help make life simpler – features you might not find on ordinary appliances. Please spend a few minutes reading to get the very best from it. -
Page 3: Safety Information
ENGLISH SAFETY INFORMATION Before beginning the installation and use of this appliance, carefully read the supplied instructions. The manufacturer is not responsible for any injuries or damage that are the result of incorrect installation or usage. Always keep the instructions in a safe and accessible location for future reference. - Page 4 1.2 General Safety Do not change the specification of this appliance. • If the tumble dryer is put on top of a washing machine, • use the stacking kit. The stacking kit, available from your authorized vendor, can be used only with the appliance specified in the instructions supplied with the accessory.
-
Page 5: Safety Instructions
ENGLISH Items that have been soiled with substances such as • cooking oil, acetone, alcohol, petrol, kerosene, spot removers, turpentine, waxes and wax removers should be washed in hot water with an extra amount of detergent before being dried in the tumble dryer. Items such as foam rubber (latex foam), shower caps, •... - Page 6 • Always use a correctly installed • To replace the internal lighting, shockproof socket. contact the Authorised Service • Do not use multi-plug adapters and Centre. extension cables. 2.5 Care and cleaning • Do not pull the mains cable to disconnect the appliance.
-
Page 7: Product Description
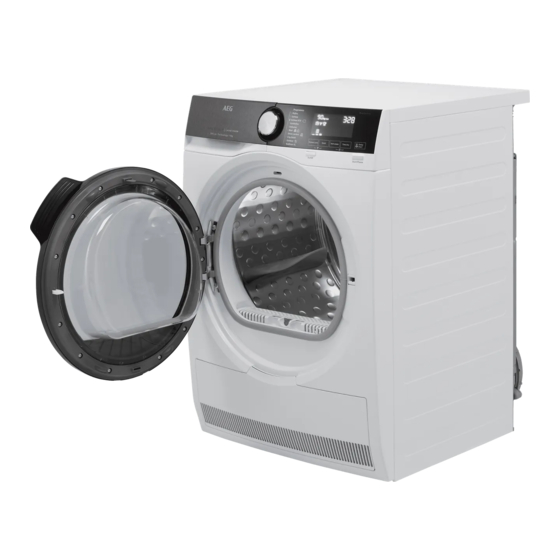
ENGLISH 3. PRODUCT DESCRIPTION Water container Airflow slots Control panel Condenser lid Internal lighting Condenser cover Appliance door Adjustable feet Filter Rating plate For ease of loading laundry or ease of installation the door is reversible. (see separate leaflet). -
Page 8: Control Panel
4. CONTROL PANEL Auto Off function Programme dial On/Off button with Display Programmes Start/Pause button Options 4.1 Display Symbol on the display Symbol description laundry maximum load delay start option on wireless connection remote control delay start selection (30min-20h) -
Page 9: Wi-Fi - Connectivity Setup
5.1 Installing and configuring To connect the appliance to enjoy the full My AEG range of features and services you need: • Wireless network at home with When connecting the tumble dryer to the application, stand near it with Your smart internet connection enabled. - Page 10 2. Download and install App My AEG . time for 3 seconds until a 'click' 3. Make sure you started a Wi-fi sounds. connection in the dryer. If not go to The symbols: appear on the section below. the display. After few seconds remains 4.
- Page 11 To enable the remote control: application My AEG 1. Check wireless connection between the appliance and smart device. My AEG allows you to The symbol must be on the display control your laundry through and your appliance must be accessible a mobile device.
-
Page 12: Programme
6. PROGRAMME Programme Load Properties / Fabric mark Everyday clothes made of cotton, cotton-synthetic blends and synthet‐ My Dry 5 kg ic. Suggested for routine drying what you wash without sorting. Cycle defined to dry cottons items of Cottons 9 kg different size / different weaving alto‐... - Page 13 ENGLISH 6.1 Woolmark Apparel Care - Blue The wool drying cycle of this machine has been approved by The Woolmark Company for the drying of wool garments labelled as "hand wash" provided that the garments are dried according to the instructions issued by the manufacturer of this machine.
-
Page 14: Options
Energy consump‐ Program Spun at / residual humidity Drying time tion 1400 rpm / 50% 190 min 1,54 kWh cupboard dry 1000 rpm / 60% 208 min 1,69 kWh Cottons 9 kg 1400 rpm / 50% 124 min 1,02 kWh... -
Page 15: Before First Use
ENGLISH 7.7 Delay Start 10 min to maximum of 2 hours (in 10 min steps). When this option is maximum, load indicator disappears. Lets to delay the start of a drying program from The cycle lasts as long as minimum of 30 minutes to set drying time regardless of maximum of 20 hours. -
Page 16: Daily Use
8.2 Noises Working fans. Different noises may be heard at different times during the drying cycle. They are perfectly normal operating sounds. Working compressor. Brrrr Working pump and transferring condensation to the tank. Rotating drum. 9. DAILY USE 9.1 Preparing the laundry •... - Page 17 ENGLISH to avoid moist places inside the fabric after the drying cycle. Fabric label Description Laundry is suitable for tumble drying. Laundry is suitable for tumble drying at higher temperatures. Laundry is suitable for tumble drying at low temperatures only. Laundry is not suitable for tumble drying.
- Page 18 9.6 Setting a programme buttons and the program dial (this option does not lock the On/Off button). You can activate the child lock option: • before you touch the Start/Pause button - the appliance cannot start • after you touch the Start/Pause button - programs and option selection is unavailable.
-
Page 19: Hints And Tips
ENGLISH 9.11 Programme end To remove the laundry: 1. Push the On/Off button for 2 seconds Clean the filter and drain the to turn the appliance off. water container after each 2. Open the appliance door. drying cycle. (See chapter 3. -
Page 20: Care And Cleaning
10.3 Deactivating the tank 4. Touch and hold down Time Dry and Delay Start buttons at the same indicator time. One of 2 configurations is possible: The water container indicator is activated by default. It illuminates at the end of the •... - Page 21 ENGLISH 2. Pull the plastic connection out and drain the water into a basin or equivalent receptacle. 3. Push the plastic connection back in and place the water container back into position. Throw the lint in the dustbin. 4. To continue the programme press 4.
-
Page 22: Troubleshooting
3. Turn the lever to unlock the 6. Close the condenser lid. condenser lid. 7. Turn the lever until it clicks into position. 8. Put the filter back. 11.4 Cleaning the drum WARNING! Disconnect the appliance before you clean it. - Page 23 ENGLISH WARNING! Deactivate the appliance before carrying out any check. In case of major problems, the acoustic signals operate, the display shows an alarm code and the Start/Pause button may flash continuously: Possible cause Possible cause Remedy Appliance Motor overloaded. The programme was not comple‐...
- Page 24 Problem Possible cause Remedy Incorrect programme selection. Select a suitable programme. The filter is clogged. Clean the filter. Dryness Level option was set to Change Dryness Level option to a higher level. iron dry . The load was too large.
- Page 25 ENGLISH Problem Possible cause Remedy The load size is small. Select a time programme. The time value must be related to the load. To dry one item or a small amount of laundry we recommend The drying cycle short drying times. is too short.
-
Page 26: Technical Data
Move the router closer to the appli‐ ance through ance. Equip your home network the My AEG ap‐ with wireless range extender. plication does Do not use at the same time micro‐ not work fre‐... - Page 27 ENGLISH Energy consumption on the standard cotton 0,85 kWh programme with the partial load. 194,40 kWh Annual energy consumption 0,05 W Left-on mode power absorption 0,05 W Off mode power absorption 2,00 W Power consumption in networked standby 15 min. Time to networked standby Type of use Household...
-
Page 28: Accessories
14. ACCESSORIES 14.1 Stacking kit For thorough draining of the condensed water into a basin, siphon, gully, etc. After installation, the water container is drained automatically. The water container must stay in the appliance. The installed hose must be minimum 50 cm to maximum 100 cm from floor level. -
Page 29: Product Information Sheet In Reference To E.u. Regulation 1369/2017
ENGLISH 15. PRODUCT INFORMATION SHEET IN REFERENCE TO E.U. REGULATION 1369/2017 Product Information Sheet Trade Mark Model T9DEB969C PNC916098769 Rated capacity in kg Air vented or condenser tumble dryer Condenser Energy efficiency class A+++ Energy consumption in kWh per year, based on 160 drying cy‐ 194,40 cles of the standard cotton programme at full and partial load, and the consumption of the low-power modes. - Page 30 Average condensation efficiency of the standard cotton pro‐ gramme at partial load as a percentage Weighted condensation efficiency for the 'standard cotton pro‐ gramme at full and partial load' Sound power level in dB Built in appliance Y/N The information given in the chart above is compliant with the EU Commission regulation...
- Page 31 ENGLISH 16. ENVIRONMENTAL CONCERNS appliances marked with the symbol Recycle materials with the symbol with the household waste. Return the Put the packaging in relevant containers product to your local recycling facility or to recycle it. Help protect the contact your municipal office. environment and human health by recycling waste of electrical and electronic appliances.
- Page 32 The software included in this product contains copyrighted software that is licensed under the BSD, Apache 2.0 and others. It is possible to display the complete copy of the licenses in the My AEG Care app that can be downloaded from the corresponding App store from the License menu section.