Philips EasyKey 5000 Series User Manual
Smart rim door lock
Hide thumbs
Also See for EasyKey 5000 Series:
- User manual (22 pages) ,
- User manual (22 pages) ,
- User manual (24 pages)

Related Manuals for Philips EasyKey 5000 Series


Summary of Contents for Philips EasyKey 5000 Series
- Page 1 Easy Key 5000 Series Smart Rim Door Lock 5100 User manual Register products and get support on the following site: www.philips.com/support details, please be subject to the actual product purchased.
-
Page 3: Table Of Contents
Contents 1 Important 5 How to use your EasyKey 14 information Security Unlock Caution Outside Unlocking Disposal of used -With a PIN code products and batteries -With a fingerprint(optional) -With a card 2 Install your EasyKey Inside Unlocking -With mechanical key Packaging list Exploded views Lock... -
Page 4: Important Information
◆Do not scrape the fingerprint sensor by Philips. The use of such accessories and with sharp objects, otherwise it may cause parts may void your warranty. permanent damage. -
Page 5: Install Your Easykey
2 Install your EasyKey Packaging list This packaging list is for reference only. Please refer to the actual packaging contents. ② ③ ④ ① Outside escutcheon Inside escutcheon Striker Striker cover (including silicone pad) (including silicone pad) EasyKey易锁 User Manual ⑤... -
Page 6: Exploded Views
Exploded views 1.Outside escutcheon (x1) 5.M4 tapping screw (x2) 9.M4X6 chamfer head screw (x4) 2.Outside escutcheon 6.Mounting plate (x1) silicone pad (x1) 10.Battery cover (x1) 7.M5 flat-head screw (x3) 3.Inside escutcheon silicone pad (x1) 8.Inside escutcheon (x1) 4.Inner plastic pad (x1) -
Page 7: Pre-Installation Instructions
Pre-installation instruction Step 1 | Check the door opening direction This product can be installed on doors of 4 opening directions: left-out pull, right-in push, right-out pull and left-in push. Left-handle open Right-handle open Indoor Indoor Left-in Right- push in push Outdoor Outdoor Indoor... -
Page 8: Installation Steps
Installation steps The following installation steps apply to Left -handle opening. If your door is left- handle opening, please turn the inside escutcheon upside down. Pass the connecting Fix the mounting Insert the cable cable of the outside plate with screws. into the inside escutcheon through the escutcheon. -
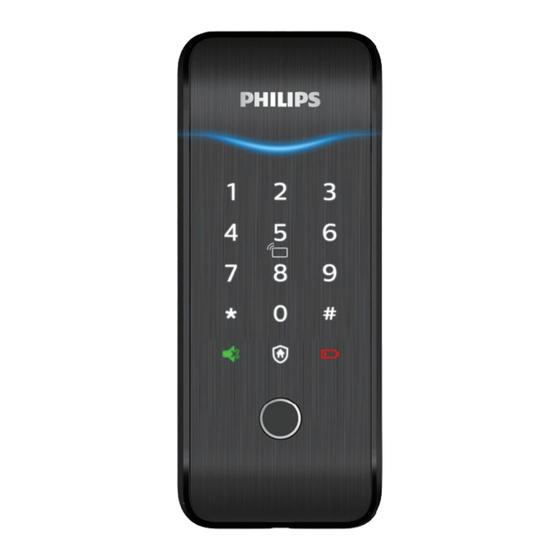
Page 9: Get To Know Your Easykey
3 Get to know your EasyKey Outside escutcheon Door status indicator Keypad Card reader area Fingerprint Emergency power interface Low battery indicator Outside forced lock button Mute button Inside escutcheon Sensor latch bolt Main dead bolt Battery cover Auto/Manual mode switch RES buttoon Mechanical key hole... -
Page 10: How To Set Up Your Easykey
4. How to set up your EasyKey Pre-setup Instructions: ◆There are 2 operating modes in the EasyKey: General mode and dual verification mode. General mode Dual verification mode Unlock with any registered Unlock with any two of PIN code,card identity information and fingerprint(optional) ◆User Number You can delete a single user information by its user... -
Page 11: Modify Master Pin Code
User settings ◆How to enter master mode: Add a user PIN code Light up the keypad. Enter [#], then enter master PIN code and confirm with [#]. Enter [2] to add a user record, then enter [1] to add a new user PIN code, and the system will automatically number it and generate a voice prompt. -
Page 12: Delete A User
Delete a User Record Add a Fingerprint(optional) Delete a single User PIN Code Enter [#], enter master PIN code and confirm with [#]. Enter [#], enter master PIN code and confirm with [#]. Enter [2] to add a user record, then enter [3] to add a user fingerprint, and the system will automatically number it and generate a voice prompt. - Page 13 Delete All Fingerprints(optional) Delete all One-time PIN Codes Enter [#], enter master PIN code and Enter [#], enter master PIN code and confirm with [#]. confirm with [#]. Enter [3] to delete a user record, then Enter [3] to delete a user record, then enter [2] to delete all one-time user PIN enter [3] to delete fingerprint record, and code.
-
Page 14: System Settings
System date initialization Volume Settings Enter [#], then enter master PIN code and confirm with [#]. Enter [4] to get into system settings, then enter [2] to enter into volume settings. Remove the battery cover, then double press the [RES] hole with a sharp object, after hearing a voice prompt of Choose the volume as needed: For “Restoring to default settings”, all user... -
Page 15: Extended Functions
To join a network, press [1]. To exit a Attention network, press [2]. Before setting up the Directly input 114# could enter into local query. extended functions, please download and open Philips EasyKey (APP) from App Stores via your phone. Bluetooth Settings Attention The extended functions are optional. -
Page 16: How To Use Your Easykey
5 How to use your EasyKey Unlock | Outside Unlocking With User PIN code With fingerprint With card (Optional) Enter a Touch PIN code keypad area 1 Touch and wake up 1 Place the finger of 1 Place the key tag/ the keypad, then enter a which the fingerprint has card that has been... - Page 17 Lock | Auto/Manual modes [A] represents automatic mode where the main deadbolt can automatically pop up to get the door locked after closing the door. [M] represents manual mode where the main deadbolt won’t automatically pop up after closing the door and the door will remain open status.
-
Page 18: Other Functions
6 Other functions Default Settings:One button to restore to factory settings Function: To empty all user information and restore to factory settings Use: Double press the [RES] with a sharp object, and all user records in the system will be emptied, and the system will restore to default settings. -
Page 19: Outside Forced Lock Function
Outside forced lock function Function: Unlocking from inside will trigger an alarm. Use: After the door is successfully locked, long press the functional button for 2 seconds to enter the outside forced lock mode. Attention Enabling the outside forced lock function will not affect unlocking from outside. -
Page 20: Meanings & Use Of Indicators
7 Meanings & Use of indicators Lock status indicator Colors of the light and the corresponding meanings: Blue: After the system wakes up, the light will glow blue, indicating that you can operate the lock. Green: After the door is unlocked, the light will glow green, indicating that the door has been opened. -
Page 21: Mute Mode Indicator
Inside Deadlock Indicator When the door is under inside deadlocking, the digital functions of the outside escutcheon will be locked. If the system wakes up manually, the keypad will show the combination of “15937 (X)” with a voice prompt of “inside deadlocking enabled”. Mute mode indicator Colors of the light and the corresponding meanings:... -
Page 22: Troubleshooting
8 Troubleshooting Types of alarms and alarm modes Inside unlocking alarm under outside forced lock mode Triggering: If the lock is under outside forced lock mode, unlocking from inside will trigger the alarm. Alarm mode: Continuous repeated alarms. Turning off: The alarm can be turned off by a successful verification of any type. -
Page 23: How To Apply An Emergency Power
How to apply an emergency power supply When the battery voltage is insufficient, and the door cannot be opened from the outside, you can power up the lock through the Micro USB interface by using a 5V power bank as an emergency power supply. - Page 24 Philips and the Philips Shield Emblem are registered trademarks of Koninklijke Philips N.V. and are used under license. This product has been manufactured by and is sold under the responsibility of Shenzhen Conex Intelligent Technology Co., Ltd., and Shenzhen Conex Intelligent Technology Co., Ltd. is the warrantor in...