Table of Contents
Quick Links
Table of Contents

Related Manuals for Honeywell RT10A


Summary of Contents for Honeywell RT10A
- Page 1 RT10A Rugged Tablet powered by Android™ User Guide...
- Page 2 Disclaimer Honeywell International Inc. (“HII”) reserves the right to make changes in specifications and other information contained in this document without prior notice, and the reader should in all cases consult HII to determine whether any such changes have been made. The information in this publication does not represent a commitment on the part of HII.
-
Page 3: Table Of Contents
Technical Assistance ......................ix Product Service and Repair ....................ix Limited Warranty ........................ix Chapter 1 - Tablet Features................1 RT10A Rugged Tablet ........................1 Tablet Features..........................2 About the Battery ........................... 4 Charge the Battery ........................4 Charge Before Use ........................4 Replace the Battery......................... - Page 4 Insert a microSD Card (Optional)..................15 How to Transfer Files........................16 Configure USB Connection and Transfer Files ............16 Accessories for the RT10A......................16 Chapter 2 - About the User Interface and Applications ......17 About the User Interface......................17 Navigation and Function Buttons ..................18 About Status Bar Icons .......................18...
- Page 5 About Network Communications ..................52 Connect to a Wi-Fi Network....................52 Connect to an Ethernet Network..................53 How to Connect to Virtual Private Networks...............54 About Wireless Security......................55 About Certificates........................55 About Bluetooth Communications ..................57 Connect a Bluetooth Device....................57 Rename the Computer ......................58 RT10A Rugged Tablet...
- Page 6 About Software Updates ......................67 About Transferring Files via USB Connection ............67 Install Software with AutoInstall....................68 Optional microSD Card Method..................68 About the Honeywell Upgrader ....................69 View the Installed OTA Version ..................69 Install OTA Updates......................70 Restart (Reboot) the Computer....................71 About Enterprise Data Reset....................72 Before You Begin ........................72...
- Page 7 Computer Agency Information ....................75 Label Locations........................75 Physical and Environmental Specifications ..............75 Barcode Symbologies Supported ..................76 N6703SR Ultra-Slim Imager ....................77 N6703 Imager Field of View/Resolution..............78 N6803 FlexRange Imager......................79 N6803FR Field of View/Resolution................80 Port and Connector Pinouts ....................81 Docking Connector .......................81 RT10A Rugged Tablet...
- Page 8 RT10A Rugged Tablet...
-
Page 9: Customer Support
Honeywell International Inc. provides service for all of its products through service centers throughout the world. To obtain warranty or non-warranty service, return your product to Honeywell (postage paid) with a copy of the dated purchase record. To learn more, go to www.honeywellaidc.com... - Page 10 RT10A Rugged Tablet...
-
Page 11: Chapter 1 - Tablet Features
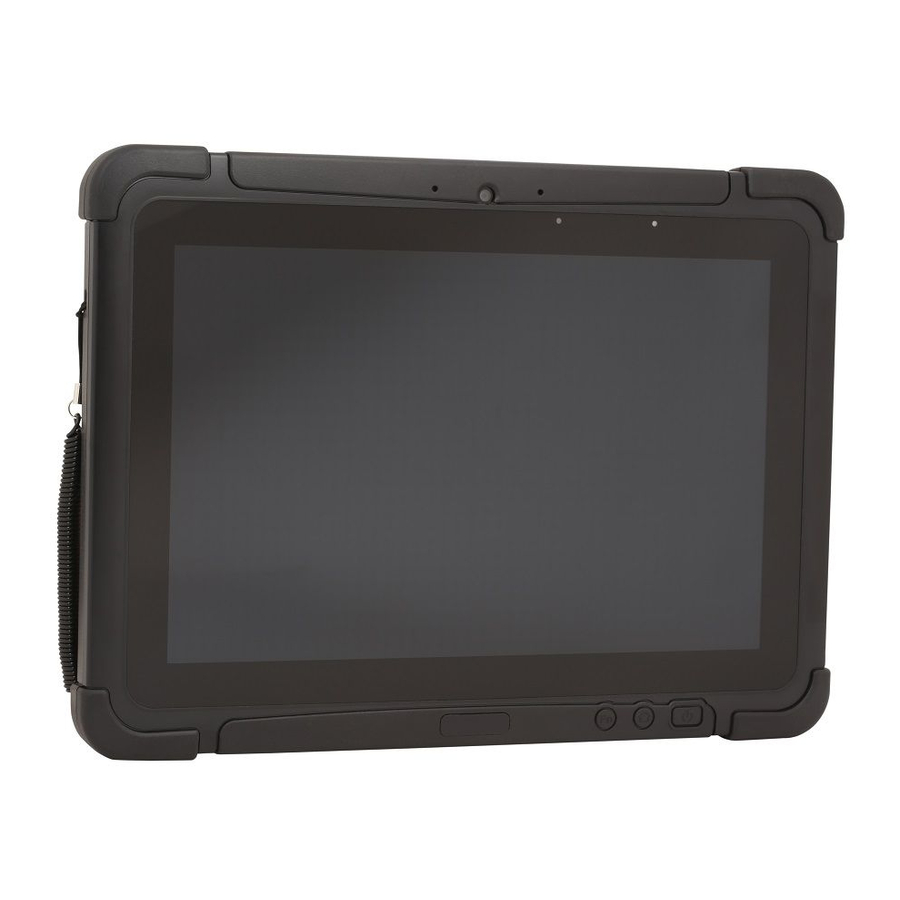
CHAPTER TABLET FEATURES This chapter introduces the RT10A Rugged Tablet with Android operating system. Use this chapter to learn about the basic tablet features, functions, and accessories. RT10A Rugged Tablet The Honeywell RT10A Rugged Tablet is designed for rapid user adoption, minimized total cost of ownership, and optimized device management. -
Page 12: Tablet Features
Kensington Lock Port Light Sensor and LED Indicators -Wi-Fi -Link -Battery -Power I/O Cover Touch Screen Fn1 Button Power Button Home Button I/O Panel (I/O cover open) Power Jack Audio Jack USB-A Port USB-C Port MicroSD Card Slot RT10A Rugged Tablet... - Page 13 Green - Indicates a connection to a Host. By default, the Link LED is disabled (see page 49). No light - Indicates no connection to a Host. Battery Behavior depends on Battery LED Setting (see page 6). Power Blue– Tablet is ON. No light– Tablet is OFF. RT10A Rugged Tablet...
-
Page 14: About The Battery
Charge the Battery RT10A tablets ship with the battery significantly discharged of power. Fully charge the battery before using your tablet for the first time. A fully discharged battery charges in approximately 6 hours. -
Page 15: Replace The Battery
Caution: We recommend the use of Honeywell accessories and power adapters. Use of any non-Honeywell accessories or power adapters may cause damage not covered by the warranty. Caution: Ensure all components are dry prior to mating the computers and batteries with peripheral devices. Mating wet components may cause damage not covered by the warranty. -
Page 16: About The Battery Status
The tablet is connected to external power and the battery is charging. There is a battery error. Install another battery. If the problem persists, contact Honeywell Technical Support. Along with the battery icon, there is a battery status LED above the touch screen (see next section). -
Page 17: Check The Battery Level And Usage
Honeywell Battery LED Behavior (Factory Default/Out-of-Box Configuration) Connected to Power LED State Description Blinking amber Battery level is below 15% Battery level is more than 15% Steady amber Battery level is between 0% and 60% Blinking green Battery level is between 60% and 95%... -
Page 18: Battery Life And Conservation
Battery Life and Conservation If you store the batteries outside the tablet for long periods of time, they slowly discharge. Honeywell recommends storing the battery in a charger to maintain battery performance. When you want to: Do this to save battery power Use the tablet, and Connect the tablet to an external power source to charge. -
Page 19: Enable Airplane Mode
Contact your Honeywell sales representative or distributor if this battery is no longer available. Version Battery Model Number Standard RT10-BAT-STD1 Extended RT10-BAT-EXT1 • Discarded batteries may create a safety hazard. Before disposal, cover the battery contacts with electrical insulating tape. -
Page 20: Welcome Screen
(e.g., include numbers, characters, special characters, and mix character case). 1. Swipe up from the bottom of the Home screen to access all apps. 2. Tap Settings > Security & location > Screen lock. RT10A Rugged Tablet... -
Page 21: Select A Touch Screen Profile To Optimize Performance
Note: Maximum glove thickness of 2 mm (0.08 inches) for touch screen response. 1. Swipe up from the bottom of the Home screen to access all apps. 2. Tap Settings > Honeywell Settings > Touch Screen Profile. 3. Choose one of the following options: •... -
Page 22: Screen Blanking
On. 1. Swipe up from the bottom of the Home screen to access all apps. 2. Tap Settings > Honeywell Settings > Zoom Zone. Motion Detection Action Determine what to do when motion is detected: •... -
Page 23: About The Audio Features
Turn the screen lock sounds on or off. Advanced Select to expand the settings menu. Other sounds and vibrations Turn sounds On or Off for: • Dial pad tones • Screen locking sounds • Charging sounds • Touch sounds • Touch vibration RT10A Rugged Tablet... -
Page 24: Adjust Volume
Warning: To avoid possible hearing damage, do not listen at high volume levels for long periods. Install a Micro SIM Card Only RT10AL1N (WWAN) models support micro SIM card use for cellular phone features. Note: Always power off the tablet before attempting to install or remove a card. RT10A Rugged Tablet... -
Page 25: Insert A Microsd Card (Optional)
You can use a microSD card to increase file storage capacity or to install software. Honeywell recommends the use of Single Level Cell (SLC) industrial-grade microSD™ or microSDXC™ memory cards with RT10A Rugged Tablets for maximum performance and durability. Note: Format memory card before initial use. -
Page 26: How To Transfer Files
640 Mbps. 1. Connect the RT10A to your workstation. 2. On the RT10A, swipe down from the top of the screen to see the notifications. 3. Tap the Android System notification twice to open the options menu. -
Page 27: Chapter 2 - About The User Interface And Applications
ABOUT THE USER INTERFACE AND APPLICATIONS Use this chapter to learn about the user interface and how to interact with the screen. You can also use this chapter to learn about the Honeywell applications on the computer. About the User Interface The Android operating system provides a touch-friendly and easy-to-navigate user interface. -
Page 28: Navigation And Function Buttons
Status and notification icons show you the current status of your network, the battery, notifications, and sounds. Use the table below to understand some of the most common icons. Status and Notification Icons Icon Description Icon Description Pending alarm and Alarm is set Airplane mode is turned On. RT10A Rugged Tablet... -
Page 29: Remap A Button Or Key
1. Swipe up from the bottom of the Home screen to access all apps. 2. Tap Settings > Honeywell Settings > Key Remap. 3. Tap the plus sign (+). 4. Press the button you want to remap or select one of the virtual buttons. -
Page 30: Restore Default Button Action
To restore the button default action: 1. Swipe up from the bottom of the Home screen to access all apps. 2. Tap Settings > Honeywell Settings > Keyremap. 3. Tap the clean icon 4. Choose the remapped button(s) you want restored to the default setting. -
Page 31: Open Quick Settings
Note: If you tap and hold an app but don’t move it, a shortcut menu appears. The content of the menu depends on the app selected. To add widgets or customize the look of the Home screen: 1. Tap and hold an empty section of the screen. 2. Select either Wallpapers, Widgets, or Home settings. RT10A Rugged Tablet... -
Page 32: Customize The Favorites Tray
Lift your finger off the screen to drop the item in place. • Swipe Quickly move your finger across the screen, without pausing when you first touch. For example, you can swipe a Home screen left or right to view the other Home screens. RT10A Rugged Tablet... -
Page 33: Set The Time Zone
1. Swipe up from the bottom of the Home screen to access all apps. 2. Tap Settings > System > Date & time. 3. Tap Automatic time zone to turn Off the feature. 4. Tap Select time zone and choose the time zone for your location. RT10A Rugged Tablet... -
Page 34: About Honeywell Applications
Honeywell applications help you troubleshoot and connect your computer to other devices and networks. Some of the applications in this table are located in the Power Tools app. To learn more about Honeywell Power Tools, go to www.honeywellaidc.com to download the Power Tools User Guide. -
Page 35: Applications You Can Download To The Tablet
Applications You Can Download to the Tablet You can download Honeywell applications to extend the capabilities of the tablet. You may need to purchase a license to run some applications. To learn more about the applications described in this section and other Honeywell software solutions, go to www.honeywellaidc.com... -
Page 36: Unlock Developer Options
You can also use Honeywell Launcher together with Honeywell Enterprise Browser to create a single-purpose device configuration. If Launcher is not included on your computer model, you can download a trial version of the software for evaluation. After the evaluation period expires, you need to purchase a license. -
Page 37: Chapter 3 - Use The Image Engine
You can modify the Default Profile or create new profiles for custom applications from Settings > Honeywell Settings > Scanning. Use the imager as a camera to capture black and white images, such as signatures or pictures of damaged inventory. -
Page 38: Change The Scanner Settings
Changes you make to the Default profile apply to all applications with no profile assigned. 1. Swipe up from the bottom of the Home screen to access all apps. 2. Tap Settings >Honeywell Settings > Scanning. 3. Tap Internal Scanner > Default Profile. 4. Select from the following: •... -
Page 39: Default Scan Settings
Data Editing Plugin Specify a data editing plug-in and edit plug-in settings. None Symbology Prefix Specify a symbology identifier prefix to the barcode data. None Options include: • None • Honeywell • RT10A Rugged Tablet... - Page 40 Tap the symbology name to view and modify additional configuration parameters for the symbology selected. To view a list of default settings for supported symbologies, see page Decode Settings Adjust the Decode Settings when scanning barcodes that are densely packed or poor quality. RT10A Rugged Tablet...
- Page 41 • Tap the check box to toggle the feature On or Off. • Select Center Decode to adjust the Window dimensions. Honeywell recommends leaving the settings at 50 (default) to define the “center” area for the barcode. Configurable parameters: •...
- Page 42 Set the minimum amount of time in seconds before the scanner can read another barcode. Decode timeout Set the number of seconds before the scanner automatically turns off if the scan button is pressed and nothing has successfully decoded. RT10A Rugged Tablet...
-
Page 43: Add A Scan Setting Profile
To create a scan setting profile for a custom app on the computer: 1. Swipe up from the bottom of the Home screen to access all apps. 2. Tap Settings > Honeywell Settings > Scanning > Internal Scanner. 3. Tap in the upper right corner of the app screen. -
Page 44: Delete A Scan Setting Profile
1. Swipe up from the bottom of the Home screen to access all apps. 2. Tap Settings > Honeywell Settings > Scanning > Internal Scanner. 3. Tap and hold the profile you want to delete. 4. Tap Delete, and then OK. -
Page 45: Scan Barcodes
(360°) barcode scanning and an aiming beam is provided to help assist with targeting barcodes. Before you start scanning barcodes, go into Settings > Honeywell Settings > Scanning > Internal Scanner and modify the scan profile to enable only the barcode symbologies that you need. -
Page 46: About Scanning Configuration Barcodes
3. Swipe left or right on the screen until Scan Demo appears under the turntable. Tap the center of the box image to open the app. 4. Point the scanner window at the barcode. 5. Press and hold the Fn2 button or tap and hold the on-screen SCAN button. RT10A Rugged Tablet... -
Page 47: Change The Scan Demo Symbology Settings
Tap the check box next to a symbology name to enable (check mark) or disable (no check mark) decoding for that symbology. • Tap the symbology name to view and modify additional configuration parameters for the symbology selected. 4. Tap Back to return to the Scan Demo app. RT10A Rugged Tablet... - Page 48 RT10A Rugged Tablet...
-
Page 49: Chapter 4 - Use The Camera
About the Color Camera The RT10A comes equipped with two color cameras: an 8-megapixel camera located on the front, and a 13-megapixel camera on the rear. The RT10A offers 4K video support with image stabilization and advanced software features for enhanced exposure control when taking pictures and videos. -
Page 50: Record A Video
You can change the camera settings for best results when taking pictures. The camera settings are adjustable from within the Camera app. 1. Open the Camera app 2. From the toolbar, select any of the following to adjust the settings. RT10A Rugged Tablet... -
Page 51: Use The Camera As A Flashlight
Use the Camera as a Flashlight To use the rear camera as a flashlight. 1. Open Quick Settings (see page 21). 2. Tap the Flashlight icon to turn the flashlight on. • Select the icon again to turn the flashlight off. RT10A Rugged Tablet... - Page 52 RT10A Rugged Tablet...
-
Page 53: Chapter 5 - Configure The Computer
Note: The Settings app varies by computer model and OS version. Your computer may not include all the features outlined in this section. When you open the Setting app, suggestions appear at the top of the list. RT10A Rugged Tablet... - Page 54 In the Settings app, select Connected devices to access the following settings. Setting Description Pair new device • Connect a Bluetooth Device. • Lists Bluetooth-enabled devices in range. • View and rename the computer. • View the computer Bluetooth address. Previously View previously connected devices. connected devices RT10A Rugged Tablet...
- Page 55 Cast (project) audio and screen content to a secondary device such as a television. Printing Set up a printer connection with the RT10A. Connection options include cloud print services, Wi-Fi printing via a router or printing via NFC. Received Files View statistics and received files.
- Page 56 Ambient display Set how the screen in sleep mode responds when new notifications are received (e.g., wake or do not wake). Device theme Set the theme of the device. Options are: Automatic (based on wallpaper), Light, and Dark. RT10A Rugged Tablet...
- Page 57 Screen pinning Enable or disable the screen pinning feature. When enabled you can pin the device screen to a recently used app where it stays until you unpin the app via the security method chosen. RT10A Rugged Tablet...
- Page 58 Automatically sync data Turn auto-sync On or Off for accounts. Turning the feature On allows apps to refresh data automatically. Honeywell Settings In the Settings app, select Honeywell Settings to access the following settings. Setting Description Battery LED Configures the battery LED behavior. To learn more see,...
- Page 59 Options include: Keep awake on motion, Wake on motion, Face down suspend. Staging Hub Use this agent and settings to connect the computer to the Honeywell Staging Agent Hub Foundation software platform; a centralized software platform IT integrators and administrators can use as a solution for managing, monitoring and deploying Honeywell devices in a connected workspace environment.
- Page 60 High contrast text Turn High contrast text On/Off. Digital Wellbeing In the Settings app, select Digital Wellbeing. See https://wellbeing.google for more information. Google In the Settings app, select Google to set up and manage your Google accounts and services. RT10A Rugged Tablet...
- Page 61 Unlock Developer Options on page 26. About Phone In the Settings app, select About Phone to view device-specific information including the model number, operating system version, software patch version, radio versions, build number and legal information. RT10A Rugged Tablet...
-
Page 62: About Network Communications
About Network Communications You can easily add the mobile computer to your wireless or wired data collection network. Connect the RT10A your computer using: • 802.11 a/b/g/n/ac radio communications • Ethernet communications • Bluetooth communications • USB and serial communications Connect to a Wi-Fi Network The computer contains an 802.11 a/b/g/n/ac radio to transfer data using wireless... -
Page 63: Connect To An Ethernet Network
5. Tap Open network notification to toggle the setting On or Off. Connect to an Ethernet Network To connect the computer to an Ethernet network, you need a RT10A Ethernet Home Base or a RT10A Net Base. 1. Make sure the base is connected to your Ethernet network. -
Page 64: How To Connect To Virtual Private Networks
1. Swipe up from the bottom of the Home screen to access all apps. 2. Tap Settings > Network & Internet > VPN. 3. Type the name of the VPN in the list. 4. Enter any necessary credentials when prompted. RT10A Rugged Tablet... -
Page 65: About Wireless Security
Wi-Fi Protected Access (WPA) • 802.1x Honeywell recommends WPA2 security with PSK (Personal) or 802.1x (Enterprise) key management. Before you set security, you need to enable the radio, set the date, and set the SSID on your computer. To use 802.1x security, you need to load a root certificate on your computer. - Page 66 The trusted credentials screen has two tabs: • System shows Certificate Authorities (CA) certificates permanently installed on the computer. They can only be disabled. • User shows CA certificates you have installed yourself. You can remove these certificates. RT10A Rugged Tablet...
-
Page 67: About Bluetooth Communications
Paired devices. The word “Connected” appears under the paired device name. The status icon changes from • To disconnect a paired device, tap the name of the paired device and then tap OK when the “Disconnect?” screen appears. RT10A Rugged Tablet... -
Page 68: Rename The Computer
3. If necessary, tap Off to toggle the Bluetooth radio On Connect a Bluetooth Scanner To connect to a Bluetooth scanner, the Bluetooth radio must be turned on and then scan a pairing barcode with the Bluetooth scanner. RT10A Rugged Tablet... -
Page 69: About Serial And Usb Communications
4. Tap Honeywell or Intermec. 5. Scan the Disconnect Barcode displayed on screen. About Serial and USB Communications You can use these optional RT10A accessories to transmit data to and receive data from another device through serial or USB communications: •... -
Page 70: About Near Field Communication (Nfc)
About Near Field Communication (NFC) NFC technology provides the ability for short-range, wireless data transfer between the RT10A and NFC tags or other NFC enabled devices placed in close proximity to the back of the computer. All RT10A mobile computers support the following modes of operation: •... -
Page 71: About Provisioning Mode
About Wi-Fi Staging Overview You can use the Honeywell Wi-Fi Staging app to quickly set up new devices by configuring one device and using it to stage others. Wi-Fi Staging can also be used to enroll devices in an Mobile Device Management (MDM) system by connecting units to a specified network and downloading and installing the specified MDM client app. - Page 72 Basic configuration includes the most common system settings. 1. Launch the Wi-Fi Staging app on the server device by tapping Settings > Honeywell Settings > Wi-Fi Staging. 2. Tap Basic Configs to start the configuration wizard. 3. System language: Tap to add a language.
- Page 73 Note: If you included a file’s hash in Step 8, Wi-Fi Staging will validate that the hash of the file downloaded to a device matches what you specified. If the downloaded file’s hash does not match, the file will be removed from the device. RT10A Rugged Tablet...
- Page 74 Note: Do not change the default names of .xml files. (For example, DeviceConfig.xml is acceptable, but DeviceConfig1.xml is not.) 1. Choose one device to act as the server. 2. Launch Wi-Fi Staging app on the server by tapping Settings > Honeywell Settings > Wi-Fi Staging. 3. Tap Advanced Configs.
-
Page 75: Log Files
1. Set up a server device (see page 62). 2. Turn on the client device and launch the Wi-Fi Staging app by tapping Settings > Honeywell Settings > Wi-Fi Staging. 3. Tap To be Staged. 4. A message will display notifying you that the Wi-Fi settings on the client device will be reset as part of the staging process. - Page 76 RT10A Rugged Tablet...
-
Page 77: Chapter 6 - Manage And Maintain The Computer
2. Create an account if you have not already created one. You must login to download the software. 3. Install the Honeywell Download Manager tool on your workstation (e.g., laptop or desktop computer) prior to trying to download any files. -
Page 78: Install Software With Autoinstall
Install Software with AutoInstall Important: The RT10A must have power for the entire length of the install process or it could become unstable. Do not attempt to remove the battery during the process. 1. Swipe up from the bottom of the Home screen to access all apps. -
Page 79: About The Honeywell Upgrader
\honeywell\autoinstall folder on the root of the card. 7. Save the upgrade file (*.zip or *.apk) file in the autoinstall folder. 8. Install the microSD card in the RT10A, and then turn on the computer. The computer automatically runs the upgrade found in the autoinstall folder on the card. -
Page 80: Install Ota Updates
2. Tap Settings > Honeywell Settings > Provisioning mode. 3. Tap the toggle button to turn Provisioning mode On. 4. Save the OTA file (*.zip) in the following folder on the RT10A computer: • Internal shared storage\Download 5. Tap HUpgrader to open the Honeywell Updater app. -
Page 81: Restart (Reboot) The Computer
2. Press and hold the Power button until the options screen appears. 3. Tap Restart. If the touch panel display is unresponsive: • Press and hold the Power button for approximately 8 seconds until the computer reboots. RT10A Rugged Tablet... -
Page 82: About Enterprise Data Reset
1. Swipe up from the bottom of the Home screen to access all apps. 2. Select Settings > System > Reset options. 3. Tap Enterprise data reset. 4. Tap Reset Phone. 5. If prompted, type your screen lock security pattern, PIN, or password and tap next ( RT10A Rugged Tablet... -
Page 83: About Erase All Data (Factory Reset)
1. Swipe up from the bottom of the Home screen to access all apps. 2. Select Settings > System > Reset options. 3. Tap Erase all data (factory reset). 4. Tap Reset Phone. 5. If prompted, type your screen lock security pattern, PIN, or password and tap next ( RT10A Rugged Tablet... -
Page 84: Repairs
Solvents may damage the tablet finish, the windows or touch screen. Caution: Ensure all components are dry prior to mating the tablet with charging accessories or other peripheral devices. Mating wet components may cause damage not covered by the warranty. RT10A Rugged Tablet... -
Page 85: Appendix A - Specifications
SPECIFICATIONS Computer Agency Information RT10A Rugged Tablets meet or exceed the requirements of all applicable standards organizations for safe operation. The best way to ensure safe operation is to use the mobile computer according to the agency guidelines on the product regulatory sheet, quick start guide, battery insert and in this user guide. -
Page 86: Barcode Symbologies Supported
Standard 2 of 5 Disabled Interleaved 2 of 5 Enabled ISBT 128 Disabled Matrix 2 of 5 Disabled Disabled NEC 2 of 5 Telepen Disabled Trioptic Code Disabled UPC-A Enabled UPC-A/EAN-13 Disabled Extended UPC-E Enabled UPC-E1 Disabled RT10A Rugged Tablet... -
Page 87: N6703Sr Ultra-Slim Imager
13 mils 100% UPC-A 1.73 202.7 15 mils Code 128 1.65 22.52 10 mils Data Matrix 3.27 9.29 5 mils PDF 417 4.68 6.97 6.7 mils PDF 417 3.78 9.29 7 mils QR 4.84 5.79 15 mils QR 1.54 15.35 RT10A Rugged Tablet... -
Page 88: N6703 Imager Field Of View/Resolution
Vertical Field Angle (degrees) 31 ± 2° DPI can be calculated based on the following formula: Horizontal DPI = 1280 pixels/width of horizontal field of view (inches) Vertical DPI = 800 pixels/width of vertical field of view (inches) RT10A Rugged Tablet... -
Page 89: N6803 Flexrange Imager
6546 55 mils Code 39 1, 2 9843 100 mils Code 39 Minimum distance depends on the length of the barcode. Typical code wide- to-narrow elemental ratio is 3:1. Minimum 100 mils code height of 3 inches. RT10A Rugged Tablet... -
Page 90: N6803Fr Field Of View/Resolution
Horizontal FOV: 48° • Vertical FOV: 21° Note: DPI can be calculated based on the following formula: Horizontal DPI = 1920 pixels/width of horizontal field of view (inches) Vertical DPI = 800 pixels/width of vertical field of view (inches) RT10A Rugged Tablet... -
Page 91: Port And Connector Pinouts
Vertical DPI = 800 pixels/width of vertical field of view (inches) Port and Connector Pinouts Docking Connector Description RF_GND 11 12 13 14 DOCK_DET# 15 16 17 18 19 GPS ANT RF_GND RF_GND DETECT+ Power Power Power USB+ USB- DETECT- RT10A Rugged Tablet... - Page 92 RT10A Rugged Tablet...
- Page 94 Honeywell 9680 Old Bailes Road Fort Mill, SC 29707 www.honeywellaidc.com ™ RT10A-EN-UG-01 Rev A 8/20...