Sony Vision Exchange PEQ-C100 Help Manual
Hide thumbs
Also See for Vision Exchange PEQ-C100:
- System integration & services manual (117 pages) ,
- System integration & services manual (77 pages) ,
- Instructions before use (2 pages)
Table of Contents
Quick Links
Help Guide (for end users)
Vision Exchange Version 1.3
PEQ-C100/PEQ-C130/PES-C10
This guide describes how to use the Vision Exchange system central to the PEQ-C100 or PEQ-C130.
It describes the required steps for active learning and other tasks, how to connect a computer and other devices, and
various configuration and operation items.
Overview
System Features
Licenses and Software
Names of Parts of the Main Unit
Screen Layout
Getting Started
Turning on the Main Unit
Activating Option Functions
Personal Note Taker Function
Overview of Personal Note Taker Function
User Devices That Support the Personal Note Taker Function
Accessing the Personal Note Taker Function on a User Device
Using the Personal Note Taker Function
Disabling the Personal Note Taker Function on the Main Unit or a Pod
Pod Sharing Function
Pod Sharing Overview
Starting Pod Sharing
Conducting a Discussion in Each Group
Presentation by an Instructor
Presentation by a Group of Participants
Skype for Business Integration Function
Overview of Skype for Business Integration Function
Signing In to Skype for Business
1
Table of Contents

Related Manuals for Sony Vision Exchange PEQ-C100


Summary of Contents for Sony Vision Exchange PEQ-C100
- Page 1 Help Guide (for end users) Vision Exchange Version 1.3 PEQ-C100/PEQ-C130/PES-C10 This guide describes how to use the Vision Exchange system central to the PEQ-C100 or PEQ-C130. It describes the required steps for active learning and other tasks, how to connect a computer and other devices, and various configuration and operation items.
- Page 2 Starting Video Conferencing Using Skype for Business Conducting a Presentation Adjusting the Camera Video and Audio Reading a Chat H.323/SIP Function Starting Video Conferencing Using H.323/SIP Function Sharing Content Adjusting the Camera Video and Audio Using the Call History Using the Address Book External Control Function Overview of External Control Function User Devices That Support the External Control Function...
- Page 3 Displaying the Video from a User Device on the Main Unit or Pod (Mirroring) Operating the Main Unit and Pods from a User Device Downloading a Snapshot Configuring the Vision Exchange App Others Frequently Asked Questions Usage Precautions Specifications Trademarks 5-011-887-11(1) Copyright 2019 Sony Corporation...
-
Page 4: System Features
Help Guide (for end users) Vision Exchange Version 1.3 PEQ-C100/PEQ-C130/PES-C10 System Features Vision Exchange runs sessions where multimedia content is shown on displays connected to a PEQ-C100 or PEQ-C130 (referred to as the “main unit”) or devices running PES-C10 (referred to as “Pod PC Software”). During a session, in addition to conducting presentations and discussions using displayed content, the system can also support active learning through participation of a large number of users, and also conduct video conferencing between other devices using option functions available by purchasing a license. - Page 5 Streaming output Video output from the main unit or a Pod can be streamed to preconfigured devices. Note A Streaming Output License must be purchased and activated to enable streaming output. 5-011-887-11(1) Copyright 2019 Sony Corporation...
- Page 6 Help Guide (for end users) Vision Exchange Version 1.3 PEQ-C100/PEQ-C130/PES-C10 Licenses and Software Option functions can be used without limitations with Vision Exchange by purchasing a license and activating the license on the main unit. Convenient software that can be installed on user devices is also available. About license trials If an option function is used without activation of a license, a notification alert will appear when first started.
- Page 7 5-011-887-11(1) Copyright 2019 Sony Corporation...
-
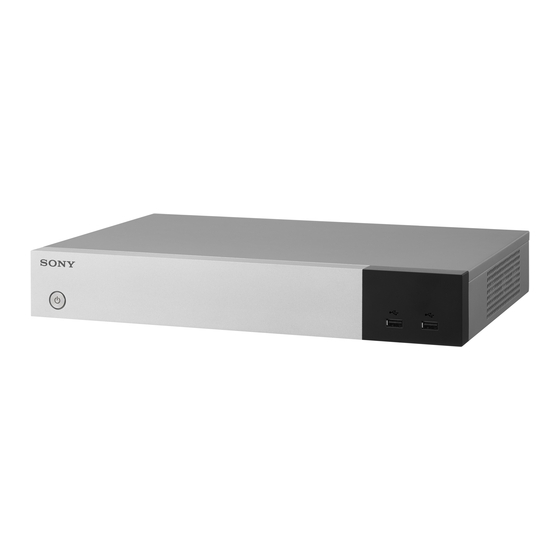
Page 8: Front Panel
Help Guide (for end users) Vision Exchange Version 1.3 PEQ-C100/PEQ-C130/PES-C10 Names of Parts of the Main Unit Front panel Power switch Supplies power to the main unit. When power is turned on, the LED around the switch is lit green. USB connectors (USB 2.0) Use to connect to a mouse (sold separately) or USB flash drive (sold separately). - Page 9 Connect to the DisplayPort input connector of a display, projector, or other video device to display the video from the main unit. 19.5V (19.5 V DC power supply) jack Connect to the supplied AC adapter. 5-011-887-11(1) Copyright 2019 Sony Corporation...
-
Page 10: Screen Layout
Help Guide (for end users) Vision Exchange Version 1.3 PEQ-C100/PEQ-C130/PES-C10 Screen Layout Home screen Version number Displays the installed version number of Vision Exchange. [Start] button Switches the display to the Session screen. (Administrator Menu) The [Administrator Password] dialog box appears. Enter the administrator password, and press [Login] to switch to the [Administrator Menu] screen. - Page 11 Content area Displays the selected content. Main toolbar Press the buttons to control operation within the content area. (Read permission): Displays contents of the content area on user devices with the Personal Note Taker function enabled. When pressed, is displayed, and the Personal Note Taker function is disabled on user devices. (Side toolbar display control): Hides the side toolbar.
- Page 12 Full Screen 2 Displays the content only. The tab at the top of the screen and appear in response to mouse or touch operation, and then are hidden again after 3 seconds. You can also display the information area by pressing the tab at the top of the screen.
- Page 13 Video conferencing area Displays the video of the camera connected to the main unit and the video of the cameras of participants. Displayed only during video conferencing. 5-011-887-11(1) Copyright 2019 Sony Corporation...
-
Page 14: Turning On The Main Unit
Press the power switch on the front panel of the main unit. When power is turned on, the LED around the switch is lit green. To shut down Press in the bottom right of the screen to display the [Shut down] dialog box, and press [OK]. 5-011-887-11(1) Copyright 2019 Sony Corporation... - Page 15 Help Guide (for end users) Vision Exchange Version 1.3 PEQ-C100/PEQ-C130/PES-C10 Activating Option Functions Option functions can be used without limitations with Vision Exchange by purchasing a license and activating the license on the main unit or a Pod. Purchase a license and obtain a purchase code before performing the following procedure. Note For details about purchasing a license, contact your dealer.
- Page 16 URL: https://ulms.sony.net When registering a purchase code, you can issue an installation key for as many licenses as you have purchased. Enter the Device Unique ID of the main unit in the “Upgrade and License Management Suite.”...
- Page 17 5-011-887-11(1) Copyright 2019 Sony Corporation...
- Page 18 The Personal Note Taker function displays content shown in the content area on the main unit or a Pod on a user device. It allows you to download the content area display as an image, and to write on and attach sticky notes to that image. 5-011-887-11(1) Copyright 2019 Sony Corporation...
- Page 19 Web browser: Safari OS: iOS 12 OS language: English, Japanese, Chinese, French, German, Spanish Web browser: Safari Android OS OS: Version 7/8/9 OS language: English, Japanese, Chinese, French, German, Spanish Web browser: Google Chrome (latest version) 5-011-887-11(1) Copyright 2019 Sony Corporation...
- Page 20 Enter the passcode displayed at the top right of the screen of the main unit or Pod, select [Viewer] for the login mode, and press [Login]. The Personal Note Taker function becomes enabled after logging in to the main unit or a Pod. To exit the Personal Note Taker function Press 5-011-887-11(1) Copyright 2019 Sony Corporation...
- Page 21 Help Guide (for end users) Vision Exchange Version 1.3 PEQ-C100/PEQ-C130/PES-C10 Using the Personal Note Taker Function To take a note On a user device logged in to the main unit or a Pod in Viewer mode, press on the right side of the screen to invoke note mode.
- Page 22 Press the button to remove all drawn objects and sticky notes. To save the content of a note Press in note mode. The content area display is downloaded as image data, and the entry in the text area is downloaded as text data. 5-011-887-11(1) Copyright 2019 Sony Corporation...
- Page 23 PEQ-C100/PEQ-C130/PES-C10 Disabling the Personal Note Taker Function on the Main Unit or a Pod Press on the main toolbar, changing the display to , to disable viewing of the content area from a user device. 5-011-887-11(1) Copyright 2019 Sony Corporation...
-
Page 24: Basic Usage
Help Guide (for end users) Vision Exchange Version 1.3 PEQ-C100/PEQ-C130/PES-C10 Pod Sharing Overview Pod sharing is a function for connecting a main unit and Pods, via a network, and sending video between them. Using the Pod sharing function allows a large number of users, determined by the number of user devices connected to the main unit and Pods, to simultaneously participate in a discussion or presentation. -
Page 25: Number Of Supported Devices
Up to ten Pods can be connected to the main unit by network connection. Related Topic Licenses and Software Activating Option Functions Conducting a Discussion in Each Group Presentation by an Instructor Presentation by a Group of Participants 5-011-887-11(1) Copyright 2019 Sony Corporation... - Page 26 Help Guide (for end users) Vision Exchange Version 1.3 PEQ-C100/PEQ-C130/PES-C10 Starting Pod Sharing Note The IP address configured for a device is displayed on the top right of the screen on the main unit and Pods. When configuring main unit and Pod connections, check and specify the displayed IP address. When using Pod sharing for the first time, configure the connection between the main unit and each Pod.
- Page 27 The main unit reboots. Boot a Pod whose connection was configured in the main unit, and do steps 1 to 3 above to open the [Pod Sharing] page. Enter the IP address of the main unit in [Main Unit Address], and press [OK]. The Pod reboots.
- Page 28 [Close Session] dialog box, and press [OK]. Related Topic Activating Option Functions Displaying the Video from a User Device on the Main Unit or Pod (Mirroring) Using a Whiteboard Using Annotations Using Snapshots 5-011-887-11(1) Copyright 2019 Sony Corporation...
- Page 29 Help Guide (for end users) Vision Exchange Version 1.3 PEQ-C100/PEQ-C130/PES-C10 Conducting a Discussion in Each Group This is a basic session using the Pod sharing function. A group discussion is conducted within the group of participants connected to the same Pod. Press [Start] on the Home screen of the main unit.
- Page 30 Displaying the Video from a User Device on the Main Unit or Pod (Mirroring) Operating the Main Unit and Pods from a User Device Switching the Display in the Content Area Using a Whiteboard Using Annotations Using Snapshots Deleting Content 5-011-887-11(1) Copyright 2019 Sony Corporation...
- Page 31 The display of each Pod returns to normal display mode in group discussion state. Related Topic Operating the Main Unit and Pods from a User Device Switching the Display in the Content Area Using a Whiteboard Using Annotations Using Snapshots Conducting a Discussion in Each Group 5-011-887-11(1) Copyright 2019 Sony Corporation...
- Page 32 The display of each Pod returns to normal display mode in group discussion state. Related Topic Operating the Main Unit and Pods from a User Device Switching the Display in the Content Area Using a Whiteboard Using Annotations Using Snapshots Conducting a Discussion in Each Group 5-011-887-11(1) Copyright 2019 Sony Corporation...
- Page 33 You can conduct video conferencing or online chat using Skype for Business by enabling the Skype for Business integration function. Note To enable the Skype for Business integration function, setup is required. For details, contact your sales representative. Use of the Skype for Business Online function is supported in Vision Exchange. 5-011-887-11(1) Copyright 2019 Sony Corporation...
-
Page 34: Signing In To Skype For Business
Help Guide (for end users) Vision Exchange Version 1.3 PEQ-C100/PEQ-C130/PES-C10 Signing In to Skype for Business Note On Pods that are logged in to Windows by an Active Directory domain user, the user accounts of those Pods are automatically signed in to Skype for Business. Set the clock of the main unit to the correct time beforehand. - Page 35 The cache is retained by placing a check mark in [Save Account Info]. Be aware of the risk of unauthorized use if you place a check mark in [Save Account Info]. Use the sign-in account designated for the user. To sign out Press [Sign Out]. 5-011-887-11(1) Copyright 2019 Sony Corporation...
- Page 36 Help Guide (for end users) Vision Exchange Version 1.3 PEQ-C100/PEQ-C130/PES-C10 Starting Video Conferencing Using Skype for Business The main unit can conduct video conferencing sessions with other devices using Skype for Business. During video conferencing, the content shown in the content area is shared with the video conferencing participants. Note If a user has deleted the cache, synchronization of address books is required.
- Page 37 Note While the [Skype for Business] is displayed, you cannot respond to calls from other devices. A notification message appears if a call is received while the [Skype for Business] window is displayed. Select the remote party that you want to call using video conferencing, and click [Call]. The remote party is called.
- Page 38 When video conferencing is being held with multiple parties, only the camera image of the speaker is displayed on the main unit. To end video conferencing Press To receive a video conferencing call The [Incoming] dialog box appears. Press [Accept]. If you do not want to accept the call, press [Reject]. 5-011-887-11(1) Copyright 2019 Sony Corporation...
- Page 39 During video conferencing, display the content you want to show the remote party in the content area. Press The content shown in the content area is sent to the remote device. To stop sharing content Press Related Topic Viewing the Participants 5-011-887-11(1) Copyright 2019 Sony Corporation...
- Page 40 Drag the camera picture to adjust the pan and tilt of the camera. Drag the sliders to adjust other items. Press Close the window to apply the adjustments. The audio volume settings are saved. The same settings are used subsequently. 5-011-887-11(1) Copyright 2019 Sony Corporation...
- Page 41 You can read the chat among the participants during a video conference using Skype for Business. Press A chat appears in the content area. Check the message. Note You cannot send a chat from Vision Exchange. To hide the chat Press 5-011-887-11(1) Copyright 2019 Sony Corporation...
- Page 42 Help Guide (for end users) Vision Exchange Version 1.3 PEQ-C100/PEQ-C130/PES-C10 Starting Video Conferencing Using H.323/SIP Function The main unit can conduct video conferencing sessions with other devices using the H.323 and SIP protocols. During video conferencing, the content shown in the content area is shared with the video conferencing participants. Note A Remote Communication License must be purchased and activated to support video conferencing, but currently purchasing of this license has been discontinued.
- Page 43 Select [H.323] or [SIP], enter the address of the video conferencing remote party, and press [Call]. The remote party is called. Video conferencing begins when the remote party answers and connects. In addition to entering an address directly, video conferencing can also be started by calling a remote party in the call history or a remote party registered in the address book.
- Page 44 To receive a video conferencing call The [Incoming] dialog box appears. Press [Accept]. If you do not want to accept the call, press [Reject]. Related Topic Licenses and Software Activating Option Functions Using the Call History Using the Address Book 5-011-887-11(1) Copyright 2019 Sony Corporation...
-
Page 45: Sharing Content
Related Topic Displaying the Video from a User Device on the Main Unit or Pod (Mirroring) Switching the Display in the Content Area Using a Whiteboard Using Annotations Using Snapshots 5-011-887-11(1) Copyright 2019 Sony Corporation... - Page 46 Drag the sliders to adjust other items. Press Close the window to apply the adjustments. The audio volume settings are saved. The same settings are used subsequently. Related Topic Names of Parts of the Main Unit 5-011-887-11(1) Copyright 2019 Sony Corporation...
-
Page 47: Using The Call History
Help Guide (for end users) Vision Exchange Version 1.3 PEQ-C100/PEQ-C130/PES-C10 Using the Call History You can initiate a video conferencing connection using the call history. You can also register a remote party from the call history in the address book. Press [Start] on the Home screen of the main unit. - Page 48 You can also press to use the software keyboard. To delete a remote party from the call history Select the remote party you want to delete on the call history page in the [Video Conferencing] window, and press 5-011-887-11(1) Copyright 2019 Sony Corporation...
-
Page 49: Using The Address Book
Help Guide (for end users) Vision Exchange Version 1.3 PEQ-C100/PEQ-C130/PES-C10 Using the Address Book You can register contacts in the address book and then use the address book to start video conferencing. Press [Start] on the Home screen of the main unit. Press The [Video Conferencing] window appears. - Page 50 In the displayed address registration window, change the registered details, and press [OK] to apply the edits for that contact. To delete a contact from the address book Select the contact you want to delete on the address book page in the [Video Conferencing] window, and press 5-011-887-11(1) Copyright 2019 Sony Corporation...
- Page 51 This function allows you to switch the content displayed, and to draw lines and figures during a session, even when separated from the main unit and Pods. Note Accessing the Administrator menu and changing settings is not available using remote operation. Also, is not displayed. 5-011-887-11(1) Copyright 2019 Sony Corporation...
- Page 52 Web browser: Safari OS: iOS 12 OS language: English, Japanese, Chinese, French, German, Spanish Web browser: Safari Android OS OS: Version 7/8/9 OS language: English, Japanese, Chinese, French, German, Spanish Web browser: Google Chrome (latest version) 5-011-887-11(1) Copyright 2019 Sony Corporation...
- Page 53 Operate the main unit or Pod using the buttons displayed on the screen. Note The passcode is an identifier to prevent incorrect connection, not an access control item. To apply access controls, use user token authentication. 5-011-887-11(1) Copyright 2019 Sony Corporation...
- Page 54 If the microphone input of a monaural microphone connected to the microphone input connector of the main unit is streamed, one side of the stereo audio is transmitted without sound. Use of a stereo microphone or USB microphone is recommended. Related Topic Licenses and Software Activating Option Functions 5-011-887-11(1) Copyright 2019 Sony Corporation...
- Page 55 When two displays are connected and the video from HDMI devices is displayed in both content areas, the audio from each HDMI device is combined and played back. To play the audio from a single HDMI device, stop the audio output from the other HDMI device. Related Topic Names of Parts of the Main Unit 5-011-887-11(1) Copyright 2019 Sony Corporation...
- Page 56 When multiple displays are connected, a drop area for the secondary display is shown on the primary display when dragging content. Drop the content in that area to switch the display of the contents area on the secondary display. Related Topic Screen Layout 5-011-887-11(1) Copyright 2019 Sony Corporation...
-
Page 57: Using A Whiteboard
Help Guide (for end users) Vision Exchange Version 1.3 PEQ-C100/PEQ-C130/PES-C10 Using a Whiteboard You can draw lines and figures, or paste sticky notes and images on a whiteboard. You can hold a discussion or give a presentation more fluidly by utilizing the functions of the whiteboard. To open a whiteboard Press on the side toolbar during a session to create a new whiteboard. - Page 58 When multiple displays are connected to the main unit, the content on the secondary display may appear small in comparison to the content on the primary display. To make the display appear larger, switch the content to the primary display. Emoji characters cannot be entered in a sticky note. Related Topic Using Snapshots 5-011-887-11(1) Copyright 2019 Sony Corporation...
-
Page 59: Using Annotations
Help Guide (for end users) Vision Exchange Version 1.3 PEQ-C100/PEQ-C130/PES-C10 Using Annotations You can draw lines and pictures and paste sticky notes on the content shown in the content area using the annotation function to highlight important locations of the displayed content or add supplementary descriptions. To use the annotation function Press in the main toolbar during a session. - Page 60 Note Emoji characters cannot be entered in a sticky note. Related Topic Displaying the Video from a User Device on the Main Unit or Pod (Mirroring) Displaying Video from an External Device Using Snapshots 5-011-887-11(1) Copyright 2019 Sony Corporation...
-
Page 61: Using Snapshots
Help Guide (for end users) Vision Exchange Version 1.3 PEQ-C100/PEQ-C130/PES-C10 Using Snapshots A snapshot is a function that captures the content shown in the content area as an image. A captured snapshot can be displayed as content in Vision Exchange and used as content for a session. Snapshot images can also be saved to a USB flash drive. - Page 62 USB flash drives in the main unit and all Pods that participated in the session. Related Topic Logging In to the Main Unit or Pod from Vision Exchange App Installing Vision Exchange App on a User Device Downloading a Snapshot 5-011-887-11(1) Copyright 2019 Sony Corporation...
-
Page 63: Deleting Content
Snapshot images cannot be deleted using this method. Delete from [Snapshot List]. Mirroring must be re-established in order to redisplay images which have been deleted and which originate from mirrored user devices. Related Topic Using Snapshots 5-011-887-11(1) Copyright 2019 Sony Corporation... - Page 64 [Participants] window. A list of users participating in the video conference using Skype for Business is displayed. You can also add participants to the video conference. Related Topic Screen Layout 5-011-887-11(1) Copyright 2019 Sony Corporation...
-
Page 65: Checking Notifications
To delete a notification Select a notification to delete in the [Notifications] window, and press [Delete]. To delete all notifications Press [Delete All] in the [Notifications] window. Related Topic Screen Layout 5-011-887-11(1) Copyright 2019 Sony Corporation... - Page 66 Vision Exchange App. The languages supported by Vision Exchange App are English, Japanese, Chinese, French, German, and Spanish. Hint The screen reader function of Android and iOS is supported within Vision Exchange App. 5-011-887-11(1) Copyright 2019 Sony Corporation...
- Page 67 Logging In to the Main Unit or Pod from Vision Exchange App Displaying the Video from a User Device on the Main Unit or Pod (Mirroring) Operating the Main Unit and Pods from a User Device Using Snapshots 5-011-887-11(1) Copyright 2019 Sony Corporation...
- Page 68 Help Guide (for end users) Vision Exchange Version 1.3 PEQ-C100/PEQ-C130/PES-C10 Logging In to the Main Unit or Pod from Vision Exchange App You can log in to the main unit or Pod from a user device using Vision Exchange App. Launch Vision Exchange App.
- Page 69 If a room name has been configured for the main unit or a Pod, you can also log in using a room name instead of an IP address. If connection using tokens is configured on the [Setting] screen, entry is not required. Log in to the specified main unit or Pod to display the [Home] screen.
- Page 70 To return to the Home screen from the screen of another function in Vision Exchange App, press displayed at the top left of the screen. Related Topic Installing Vision Exchange App on a User Device Configuring the Vision Exchange App 5-011-887-11(1) Copyright 2019 Sony Corporation...
- Page 71 For macOS user devices, macOS must be configured separately to output audio played on the user device from the main unit or a Pod. Refer to the following link for information about configuration. https://helpguide.sony.net/peq/mac_audiomirror/v1/en/contents/TP0002431098.html If a user device is a Surface, the audio output may stop completely if the audio source is stopped and restarted during mirroring, depending on the version of the audio driver.
- Page 72 You can select whether the mirrored video is shown in the content area or in full-screen mode by pressing [Content area] or [Full screen] in Vision Exchange App. If multiple displays are connected, select the display on which to show the mirrored image.
- Page 73 Set the switch to [Off] on the [Mirroring] screen of Vision Exchange App. Related Topic Logging In to the Main Unit or Pod from Vision Exchange App Installing Vision Exchange App on a User Device 5-011-887-11(1) Copyright 2019 Sony Corporation...
- Page 74 Help Guide (for end users) Vision Exchange Version 1.3 PEQ-C100/PEQ-C130/PES-C10 Operating the Main Unit and Pods from a User Device Log in to the main unit or Pod from Vision Exchange App, and press [Control] on the [Home] screen. The same content shown on the main unit or Pod to which you are logged in is displayed. Operate the main unit or Pod using the buttons displayed in Vision Exchange App.
- Page 75 (2018 model): Up to 25 Galaxy S10: Up to 25 Galaxy Tab S4: Up to 15 Related Topic Logging In to the Main Unit or Pod from Vision Exchange App Installing Vision Exchange App on a User Device 5-011-887-11(1) Copyright 2019 Sony Corporation...
- Page 76 Help Guide (for end users) Vision Exchange Version 1.3 PEQ-C100/PEQ-C130/PES-C10 Downloading a Snapshot You can download a snapshot image captured on the main unit or a Pod on a user device. Log in to the main unit or Pod from Vision Exchange App, and press [Download] on the [Home] screen. A list of snapshots captured on the main unit or Pod to which you are logged in is displayed.
- Page 77 Select [Photos] on the application selection screen, open the [Albums] tab on the Photos screen, and select the “VisionExchangeAppDownload” folder. You can check the downloaded snapshot images. Related Topic Using Snapshots 5-011-887-11(1) Copyright 2019 Sony Corporation...
- Page 78 Help Guide (for end users) Vision Exchange Version 1.3 PEQ-C100/PEQ-C130/PES-C10 Configuring the Vision Exchange App Launch Vision Exchange App. Press on the [Login] screen. The [Setting] screen appears.
- Page 79 Configure the settings. Item [Name] Set the name that is displayed when connected to the main unit or a Pod. [User Token Authentication] Select whether to use token authentication when logging in to the main unit or a Pod. [User Token] Specify the user token used for logging in to the main unit or a Pod.
- Page 80 5-011-887-11(1) Copyright 2019 Sony Corporation...
-
Page 81: Frequently Asked Questions
The answers to some frequently asked questions are available on the following website. (English) https://pro.sony/en_GB/solutions/active-learning/solutions-active-learning-vision-exchange-faqs To display the page in another language, click [Change country, region or language] at the bottom of the page and select the desired country and language combination. 5-011-887-11(1) Copyright 2019 Sony Corporation... -
Page 82: Usage Precautions
If McAfee Embedded Control is disabled, security problems may occur, such as access by a third party, infection by virus, data leakage, and remote hijacking via the network. Sony will not be liable for any damages of any kind resulting from such network security problems. - Page 83 If you do not want such technical data to be used at all, do not set up the wireless internet function nor connect to the Internet via a cable. 5-011-887-11(1) Copyright 2019 Sony Corporation...
-
Page 84: Specifications
Help Guide (for end users) Vision Exchange Version 1.3 PEQ-C100/PEQ-C130/PES-C10 Specifications Dimensions 370 mm × 56 mm × 245 mm (14 in × 2 in × 9 in) (w / h / d) (excluding protrusions and rubber feet) Mass Approx. 3.4 kg (7 lb 8 oz) Power supply Power supply voltage 19.5 V DC... -
Page 85: Video Inputs
WARRANTY PERIOD OR AFTER EXPIRATION OF THE WARRANTY, OR FOR ANY OTHER REASON WHATSOEVER. SONY WILL NOT BE LIABLE FOR CLAIMS OF ANY KIND MADE BY USERS OF THIS UNIT OR MADE BY THIRD PARTIES. SONY WILL NOT BE LIABLE FOR THE LOSS, REPAIR, OR REPRODUCTION OF ANY DATA RECORDED ON THE INTERNAL STORAGE SYSTEM, RECORDING MEDIA, EXTERNAL STORAGE SYSTEMS OR ANY OTHER MEDIA OR STORAGE SYSTEMS. - Page 86 HDMI Licensing LLC in the United States and other countries. All other product names and brand names are registered trademarks or trademarks of their respective owners. Trademarked items are not indicated by ® or ™ symbols in this Help. 5-011-887-11(1) Copyright 2019 Sony Corporation...