Available languages
Available languages
Quick Links
D D
o o
o o
r r
L L
o o
c c
k k
I I
n n
s s
t t
a a
l l
l l
a a
t t
i i
o o
n n
K K
i i
t t
D D
o o
o o
r r
L L
o o
c c
k k
I I
n n
s s
t t
a a
l l
l l
a a
t t
i i
o o
n n
K K
i i
t t
INSTRUCTION MANUAL
Catalog # 79-362
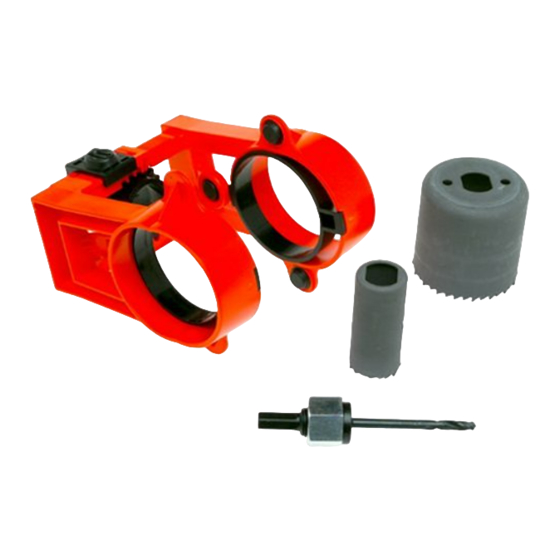
INCLUDED IN THIS KIT:
2-1/8 in. Wood Hole Saw
1 in. Wood Hole Saw
Wood Chisel
Guide
Mandrel
TOOLS REQUIRED:
3/8 in. or larger
Drill
Screwdriver
Hammer
Tape Measure
Wood Chisel
BACKSET
DOOR
THICKNESS
REFERENCE
GUIDE:
FACE
BORE
LATCH
BORE
WARNING: Failure to read and follow all instructions
listed below may result in serious injury or property
damage.
• Read and follow all instructions in drill manual and on hand tools.
• Always use proper eye, respiratory and hearing protection.
• For use only on wood doors. DO NOT use on metal doors.
1. Locate and tighten guide on door
Steps to Install Door Lock Kit:
• Determine location of door lock by measuring up from bottom of
door and making a mark on the latch bore side of door.
*Exact measurement depends on door lock, consult door
lock manual.
• Hold guide with black latch face
up, closest to you. Using 2
hands, pull open guide. Slide the
black latch from right to left until it
clicks. Line up the black cylinder
on the latch bore side of door so
your mark is in the middle. Be
sure the black cylinder is flush
against the door. Using 2 hands,
clamp the guide securely on the
door.
NOTE: Clamping the guide will
automatically center the latch bore cylinder.
2. Drill Face and Latch Bore Holes
FACE BORE
• The guide provides the ability to drill your face bore hole at 2
different backsets of 2-3/8 in. (60mm) and 2-3/4 in. (70mm)). The
guide is set at 2-3/8 in. (60mm).
*If this is not your preference, pull out the inserts and rotate them
90 degrees and re-insert.
• Assemble the 2-1/8 in. hole saw
by screwing the mandrel into the
hole saw.
• Drill the face bore hole using
the guide as a reference.
Continue drilling until the mandrel
has drilled through to the other
side of the door (do not push the
hole saw through to the other
side, it could splinter the door).
• Drill hole on other side using
the pilot hole as a starting point.
LATCH BORE
• Disassemble 2-1/8 in. hole saw and assemble 1 in. hole saw.
• Drill hole with 1 in. hole saw through latch bore guide hole.
Drill hole completely through to face bore hole.
• Remove guide from door by sliding black latch to the right and
pulling guide apart.
3. Install Door Lock
• Follow instructions provided
with door lock for lock set
installation.

Related Manuals for Black & Decker 79-362


Summary of Contents for Black & Decker 79-362
- Page 1 NOTE: Clamping the guide will INSTRUCTION MANUAL automatically center the latch bore cylinder. Catalog # 79-362 2. Drill Face and Latch Bore Holes INCLUDED IN THIS KIT: FACE BORE 2-1/8 in. Wood Hole Saw •...
- Page 2 MODE D’EMPLOI gauche jusquʼà ce quʼil sʼen- clenche fermement. Aligner le cylindre noir avec le logement du # 79-362 N° de catalogue verrou de manière à placer la marque au centre, en sʼassurant que le cylindre noir repose à plat LA TROUSSE contre la porte.
- Page 3 “clic”. MANUAL DE INSTRUCCIONES Alinee el diámetro del cilindro Catálogo N° # 79-362 negro en el lado de la puerta donde va el pestillo de manera que su marca quede en el medio.