Table of Contents
Available languages
Available languages
LG Electronics Monterrey, México S.A. de C.V.
PART NUMBER: MFL69347702
DESCRIPTION: OWNER'S MANUAL
Product: Top Mount Refrigerator
Brand: LG
1. Trim Size (mm): 148 (W), 210 (H)
2. Printing Color: Black
3. Paper Type:
- Cover: Bond 63 gr
- Content : Bond 63 gr
1. The part should not contain prohibited substances (Pb, Cd, Hg, Cr+6, PBB, PBDE) and should comply
with standard LG (61)-A-9101.
2. Blank sheets should be distributed as follows: 1st Blank sheet after cover.
3. For Owner's Manuals with less than 100 pages the bindery type will be Saddle Stitch, those with more
than 100 pages can use Perfect Bind. CONSIDERING NO VARIATION ON PRICE BETWEEN SADDLE
STITCH AND PERFECT BIND.
The Owner's Manual specifcation must be the same according to First Parts Approval (FPA). Owners
Manual quality must not be modifed.
DESCRIPCIÓN: MANUAL DE USUARIO
DESCRIPCIÓN: MANUAL DE USUARIO
Producto: Refrigerador con Congelador Superior
Marca: LG
1. Dimensiones (mm): 148 (A), 210 (L)
2. Color de Impresión: Negro
3. Tipo de Papel:
- Portada: Papel Bond 63 gr
- Contenido: Papel Bond 63 gr
1. Esta pieza no debe contener sustancias prohibidas (Pb, Cd, Hg, Cr+6, PBB, PBDE) y los detalles deben
de cumplir con el estándar LG (61)-A-9101.
2. Las páginas en blanco deben distribuirse de la siguiente manera: 1ra página en blanco después de la
portada.
3. Para Manuales de Usuario con menos de 100 páginas el método de unión será de Engrapado, aquellos
con más de 100 páginas pueden usar Engomado. CONSIDERANDO QUE NO HAY VARIACIÓN EN EL
PRECIO ENTRE ENGRAPADO Y ENGOMADO.
Mantener especifcación de Manual de Usuario de acuerdo a Aprobación de Primeras Partes (FPA). La
calidad del Manual no debe de ser modifcada.
Part No. MFL69347702
MODEL DESCRIPTION:
Project: Icemaker SVC Kit manual
Customer:
PRINTING SPECIFICATION:
4. Printing Method: Off Set
5. Bindery Type: Saddle Stitch
6. Language: English & French.
7. Number of Pages: 28
8. Number of Sheets: 7
NOTES:
Número de Parte: MFL69347702
DESCRIPCIÓN DEL MODELO:
DESCRIPCIÓN DEL MODELO:
Proyecto: Icemaker SVC Kit manual
Cliente:
ESPECIFICACIONES DE IMPRESIÓN:
ESPECIFICACIONES DE IMPRESIÓN:
4. Método de Impresión: Off Set
5. Modo de Unión: Engrapado.
6. Idioma: Ingles y Francés.
7. Número de Páginas: 28
8. Número de Pliegos: 7
NOTAS:
NOTAS:
DATE: OCT 20th, 2017
LGEUS & LGECI
LGEUS & LGECI
Chapters
Table of Contents

Related Manuals for LG LK65C


Summary of Contents for LG LK65C
- Page 1 LG Electronics Monterrey, México S.A. de C.V. PART NUMBER: MFL69347702 DATE: OCT 20th, 2017 DESCRIPTION: OWNER’S MANUAL Part No. MFL69347702 MODEL DESCRIPTION: Product: Top Mount Refrigerator Project: Icemaker SVC Kit manual Brand: LG Customer: LGEUS & LGECI PRINTING SPECIFICATION: 1. Trim Size (mm): 148 (W), 210 (H) 4.
- Page 2 MANUEL D'UTILISATEUR MACHINE À GLAÇONS Veuillez lire ce manuel en entier avant de mettre en marche l unite et conservez-le à la portée de la main pour consulter à tout moment. www.lg.com P/No. MFL69347702...
-
Page 4: Table Of Contents
TABLE OF CONTENTS Warranty Important Safety Instructions Before you Begin Replacing the Icemaker Introduction to the Automatic Icemaker Contents of Kit 8 - 9 Icemaker Installation Before You Begin Tools You Will Need 8 - 9 Installation Instructions 10 - 11 Water Valve Installation Before You Begin Tools You Will Need... -
Page 5: Warranty
LG Canada will at its option repair or replace the Product upon receipt of proof of original retail purchase. This warranty is valid only to the original retail purchaser of the product and applies only to a Product distributed in Canada by LG Canada or an authorized Canadian distributor. -
Page 6: Important Safety Instructions
IMPORTANT SAFETY INSTRUCTIONS This guide contains many important safety messages. Always read and obey. This is the safety alert symbol. It alerts you to safety messages that inform you of hazards that can kill or hurt you or others, or cause damage to the product. -
Page 7: Before You Begin
BEFORE YOU BEGIN Read these instructions completely and carefully. • IMPORTANT : Save these instructions for local servicer’s use. • IMPORTANT: Observe all governing codes and ordinances. • Note to Installer: Be sure to leave these instructions with the consumer. •... -
Page 8: Introduction To The Automatic Icemaker
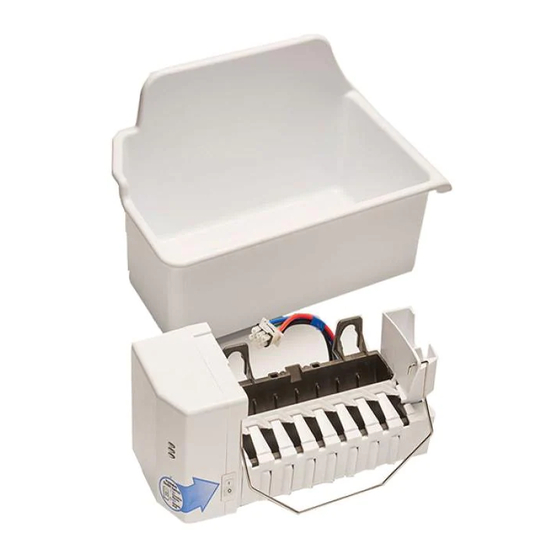
INTRODUCTION TO THE AUTOMATIC ICEMAKER WARNING Personal Injury Hazard Avoid contact with the moving parts. DO NOT place fingers or hands on the automatic icemaking mechanism while the refrigerator is plugged in. A newly installed refrigerator may take 12 to 24 hours to begin making ice. Icemaker Ice detecting sensor (feeler arm) -
Page 9: Contents Of Kit
Icemaker Screw 2 EA Veuillez lire ce manuel en entier avant de mettre en marche l unite et conservez-le à la portée de la main pour consulter à tout moment. www.lg.com P/NO.MFL63725902 (0.55 in WHITE) Icemaker Owner’s Manual Water Valve Assembly... -
Page 10: Icemaker Installation
ICEMAKER INSTALLATION BEFORE YOU BEGIN Read each step thoroughly before proceeding. CAUTION: Unplug the refrigerator power cord from the outlet. TOOLS YOU WILL NEED Flat blade and Phillips screwdrivers INSTALLATION INSTRUCTIONS 1. TURN OFF THE ICEMAKER Turn the icemaker switch to O (off). Leave the icemaker off until the refrigerator is connected to the water supply to prevent premature operation. - Page 11 ICEMAKER INSTALLATION 3. PLUG IN THE ICEMAKER Plug the icemaker wire harness into the connector located in the freezer wall until you hear a click sound. NOTE: Secure the icemaker to the freezer using 1 screw 4. INSTALL THE ICE BUCKET Before installing the ice bucket, install Icemaker the freezer shelf.
-
Page 12: Water Valve Installation
WATER VALVE INSTALLATION BEFORE YOU BEGIN Read each step thoroughly before proceeding. CAUTION: Unplug the refrigerator power cord from the outlet. TOOLS YOU WILL NEED Flat blade and Phillips screwdrivers INSTALLATION INSTRUCTIONS 1. REMOVE THE BACK COVER Remove the back cover of the refrigerator using a Phillips screwdriver. - Page 13 WATER VALVE INSTALLATION 4. REMOVE THE ICEMAKER FILL TUBE COVER Remove and discard the icemaker fill tube opening cover located on the upper right side of the refrigerator; insert the icemaker fill tube all the way into the opening until it stops.
-
Page 14: Care
CARE WHEN SHOULD YOU SET THE ICEMAKER SWITCH TO O (OFF) • When the ice storage bin is removed for more than a few minutes. • When the water supply will be shut off for several hours. • When the refrigerator will not be used for several days. NORMAL SOUNDS YOU MAY HEAR •... -
Page 15: Troubleshooting Guide
TROUBLESHOOTING GUIDE AUTOMATIC ICEMAKER DOES NOT WORK Check if... Then... Icemaker switch in the O (off) position. Move the switch to the I (on) position. Water supply turned off or not connected. See Connecting the Water Line. After installing icemaker, wait 24 hours for Freezer compartment too warm. - Page 16 TABLE DES MATIERES Garantie Consignes de sécurité importantes Avant de commencer Remplacement de la machine à glaçons Introduction à la Machine à Glaçons Automatique Contenu de la Trousse 20 - 21 Installation de la Machine à Glaçons Avant de commencer Outils nécessaires 20 - 21 Consignes d'installation...
-
Page 17: Garantie
GARANTIE: Si votre Machine à glaçons s’avère être défectueux en raison d’un défaut de matériel au ou de fabrication, lors d’une utilisation correcte à domicile, pendant la période de garantie spécifiée ci-après, LG Electronics réparera ou remplacera le produit sur réception de la preuve d’achat d’origine fournie par le détaillant. -
Page 18: Consignes De Sécurité Importantes
CONSIGNES DE SÉCURITÉ IMPORTANTES Veuillez lire et respecter les messages de sécurités inclus dans ce guide. Symbole d'alerte. Il indique un message de sécurité concernant les risques relatifs à l'endommagement du produit, aux blessures ou à la mort. Tous les messages de sécurité sont dotés de ce symbole et d'un mot (DANGER, AVERTISSEMENT, ATTENTION). -
Page 19: Avant De Commencer
AVANT DE COMMENCER Lire attentivement la totalité de cette notice avant la première utilisation. • IMPORTANT: Conservez ces instructions pour l'utilisation du réparateur local. • IMPORTANT: Respectez les codes et normes en vigueur. • À l'intention de l'installateur: Assurez vous de donner ces instructions au consommateur. -
Page 20: Introduction À La Machine À Glaçons
INTRODUCTION À LA MACHINE À GLAÇONS AUTOMATIQUE AVERTISSEMENT Risque de blessure Éviter de toucher les parties mobiles. NE PAS introduire les doigts ou mécanismes de la machine pendant que le réfrigérateur est branché. Un réfrigérateur installé récemment nécessite un délais de 12 à 24 heures avant de faire de la glace. -
Page 21: Contenu De La Trousse
Veuillez lire ce manuel en entier avant de mettre en marche l unite et conservez-le à la portée de la main pour consulter à tout moment. P/NO.MFL63725902 www.lg.com 2 pce (0.55 BLANC) Manuel de l’utilisateur Assemblage robinet d’eau Support 3 pce Bac à... -
Page 22: Installation De La Machine À Glaçons
INSTALLATION DE LA MACHINE A GLAÇONS AVANT DE COMMENCER Lire attentivement les instructions avant de procéder à l'installation. ATTENTION: Débrancher la prise murale du réfrigérateur avant de commencer. OUTILS NÉCESSAIRES Tournevis plats et cruciformes CONSIGNES D'INSTALLATION 1. METTRE LA MACHINE À GLAÇONS HORS TENSION Placez l’interrupteur en position O (hors tension). - Page 23 INSTALLATION DE LA MACHINE A GLAÇONS 3. BRANCHER LA MACHINE À GLAÇONS Branchez le faisceau électrique de la machine à glaçons au connecteur situé dans le mur du congélateur jusqu'à ce que vous entendiez un son de clic. REMARQUE: Fixez la machine à glaçons au congélateur en utilisant 1 vis de machine à...
-
Page 24: Installation Du Robinet D'eau
INSTALLATION DU ROBINET D’EAU AVANT DE COMMENCER Lire attentivement les instructions avant de procéder à l'installation. ATTENTION: Débrancher la prise murale du réfrigérateur avant de commencer. OUTILS NÉCESSAIRES Flat blade and Phillips screwdriver CONSIGNES D'INSTALLATION 1. RETIREZ LE PANNEAU ARRIÈRE Enlevez le panneau arrière en utilisant un tournevis cruciforme. - Page 25 INSTALLATION DU SYSTÈME D'ARRIVÉE D'EAU 4. ENLEVER LE COUVERCLE DU TUBE DE REMPLISSAGE DE LA MACHINE À GLAÇONS Retirer et jeter le couvercle d'ouverture du tube de remplissage de la machine à glaçons situé en haut à droite du réfrigérateur; insérez le tube de remplissage de la machine à...
- Page 26 INSTALLATION DU SYSTÈME D'ARRIVÉE D'EAU 7. AMARER LE CACHE ARRIERE DU RÉFRIGERATEUR Replacer et amarrer le cache arrière en utilisant les vis précédemment retirées. 8. SYSTÈME D'ARRIVÉE D'EAU INSTALLÉ Pour connecter le réfrigérateur à l'arrivée d'eau, se référer la section Conditions de canalisation d'eau dans le Manuel d´...
-
Page 27: Entretien
ENTRETIEN QUAND METTRE LA MACHINE À GLAÇONS HORS TENSION, INTERRUPTEUR EN POSITION "O" • Quand vous retirez le bac à glaçons pour plus que quelques minutes. • Si vous fermez l’approvisionnement en eau pour plusieurs heures. • Si le réfrigérateur est placé hors d’usage pour plusieurs jours. SONS NORMAUX QUE VOUS RISQUEZ ENTENDRE •... -
Page 28: Guide De Dépannage
GUIDE DE DÉPANNAGE LA MACHINE À GLAÇONS NE FONCTIONNE PAS Vérifiez si... Alors... Mettre l'interrupteur sur la position I (on). L'interrupteur est en position O ( éteint Le système d'arrivée d'eau est éteint Voir Conditions de canalisation d'eau. ou déconnecté. Après l'installation de la machine à... - Page 29 LG Customer Information Center Centre d’appels pour clientèle LG 1-800-243-0000 USA, Consumer User 1-888-865-3026 USA, Commercial User 1-888-542-2623 CANADA Register your Product Online! Enregistrez votre produit enligne! www.lg.com...