
Related Manuals for Toshiba SD-R6472


Summary of Contents for Toshiba SD-R6472
-
Page 1: User Manual
TOSHIBA AMERICA INFORMATION SYSTEMS STORAGE DEVICE DIVISION IRVINE, CALIFORNIA SD-R6472 DVD REWRITEABLE MOBILE DRIVE USER MANUAL... -
Page 2: Table Of Contents
CONTENTS Introduction...1 Setup ...4 Using the DVD Rewriteable Drive ...5 Troubleshooting...7 Specifications ...8 Drive Connectors...12... -
Page 3: Introduction
INTRODUCTION – SD-R6472 General Features Reads and records digital data on DVD-R/-RW, DVD+R/+RW and CD-R/-RW discs.. Read Write DVD-R/+R DVD-RW/+RW DVD-ROM DVD-RAM CD-ROM CD-R CD-RW HS CD-RW US CD-RW 3-way Disc Eject (eject button, software, emergency eject hole) Average Random Access Time... - Page 4 Types of Disc Formats Supported - Write Applicable Write Format DVD-R Disc at once, incremental write DVD-RW Disc at once, incremental write, restricted overwrite DVD+R Sequential Recording DVD+RW Sequential Recording, Random Write CD-R/-RW Disc at once, Track at once, Session at once, Packet write Applicable Write disc DVD-R DVD-R (Ver 2.0 &...
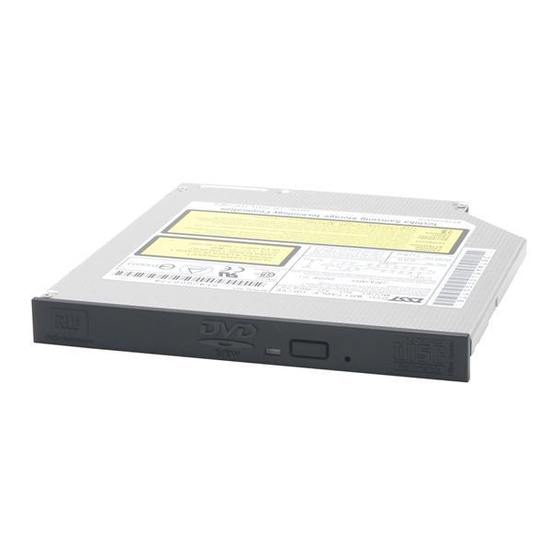
- Page 5 Front Panel Figure 1.SD-R6472 DVD Writeable Drive Front Panel Load disc using tray. Loading Tray The LED lights green or amber when the drive is operating (LED is amber when drive is Busy writing.) Indicator Eject The Eject button is used to open the disc tray so you can install or remove a disc.
-
Page 6: Setup
Toshiba's SD-R6472 drive does not require any unique device drivers for Windows '98/2000/XP/NT. After installing your drive and re-booting, your system should recognize your drive. Win '98/2000/XP/NT Operating Systems support all Toshiba's ATAPI drives natively. If you prefer using DOS, download the ATAPI driver from our web site. -
Page 7: Using The Dvd Rewriteable Drive
USING THE DVD REWRITEABLE DRIVE – SD-R6472 Drive Operation Inserting Media To insert media perform the following steps: 1. Open the drive's loading tray by pressing the Eject Button and pulling out the tray. 2. Place media disc into drive's loading tray, and lightly press down on the inner portion of the disc. - Page 8 Emergency Ejection CAUTION: The following procedure is intended only as a last resort when pressing the eject button fails to open the Loading Tray. 1. Turn computer power OFF by properly shutting down system. 2. Insert a solid bar (i.e. large paper clip) into Emergency Eject hole and push in as shown in the picture below.
-
Page 9: Troubleshooting
TROUBLESHOOTING – SD-R6472 Problem Disc tray cannot be opened Drive is not recognized by system Drive is not recognized by system during Boot process, recognized Operating System (i.e. XP, Win2000, Win98, Win NT, etc.) BUSY Indicator LED flashes slowly BUSY Indicator LED is constantly... -
Page 10: Specifications
SPECIFICATIONS –SD-R6472 General Interface: ATAPI Applicable Write Format DVD-R Disc at once, Incremental write DVD-RW Disc at once, Incremental write, Restricted overwrite DVD+R Sequential Write DVD+RW Sequential Write, Random Write CD-R/-RW Disc at once, Track at once, Session at once, Packet write... - Page 11 Data Disc Capacities DVD-ROM DVD-R (Ver 1) DVD-R (Ver 2.0) DVD-RW DVD+R DVD+RW DVD-RAM (Ver 2.1) Performance Rotational Speed DVD-ROM (single layer) DVD-ROM (dual layer) DVD-R (Ver. 1.0) DVD-R (Ver. 2.X) DVD-RW (Ver 1.X) DVD+R DVD+RW DVD-RAM (Ver 2.1) DVD-R (Ver 2.1) (Write) DVD-RW (Ver 1.1) (Write) DVD+R (Write) DVD+RW (Write)
- Page 12 Transfer Rate DVD (Single) DVD (Dual) DVDR DVDRW DVD-RAM (Ver 2.1) CD-RW Random Access Time DVD-RAM Data Error Rate DVD-ROM CD-ROM Data Buffer Reliability MTBF Power ON Hours ON/OFF Cycles Number of Access Operating Duty Cycle MTTR Environmental Ambient Temperature Operating Storage Shipping...
- Page 13 DC Voltage and Current Requirements Physical Height Width Depth Weight Connectors IDE Interface Connector Regulatory The SD-R6472 DVD Writeable drive has been certified by the following regulatory agencies: • UL 1950 • CSA C22.2 No. 950 • TUV (EN60950I) •...
-
Page 14: Drive Connectors
Drive Connectors –SD-R6472 Figure 1.SD-R6472 DVD Writeable Drive Rear Panel – Connector A 50-pin ATAPI interface connector is found at the rear of the SD-R6472 DVD rewriteable ATAPI drive. Connecting cable should use Japan Aviation Electronics Industry Limited KX14- Connector 50Series L or equivalent connector.