Table of Contents
Quick Links
Table of Contents

Related Manuals for Toshiba 2032SP


Summary of Contents for Toshiba 2032SP
- Page 1 Online User’s Guide Dual-Band PCS Phone Model 2032SP by TOSHIBA...
-
Page 2: Table Of Contents
Table of Contents Welcome to Sprint ......... . .1 Introduction to this Online User’s Guide . - Page 3 Entering Text Using the Input Panel ..........33 Writing on the Screen .
- Page 4 Creating a Task ..............100 Using the Summary Screen .
-
Page 5: Welcome To Sprint
Using Call Forwarding ............156 Messaging . -
Page 6: Introduction To This Online User's Guide
Introduction to this Online User’s Guide his Online User's Guide introduces you to PCS Service and all the features of your new device. It's divided into four sections: Getting Started Section 1: Understanding Your Device Section 2: Using PCS Service Features Section 3: Safety and Warranty Information Section 4:... -
Page 7: Section 1: Getting Started
Section 1 Getting Started Section 1 Getting Started... -
Page 8: Setting Up Service
Section 1A Setting Up Service In This Section Getting Started With PCS Service Getting Help his section walks you through the basics of setting up service for the phone function on your device, including unlocking and activating the phone function, and how to contact Sprint for assistance with your PCS Service. -
Page 9: Getting Started With Pcs Service
Getting Started With PCS Service Determine if the Phone Function is Already Activated If you received your device in the mail or purchased it at a Sprint Store, it probably has been activated. All you need to do is unlock the phone function. If the phone function is not activated, please refer to the Start Here Guide included with your device. -
Page 10: Section 2: Understanding Your Device
PCS Directory Assistance PCS Directory Assistance provides a variety of services, including residential, business and government listings; assistance with local or long-distance calls; movie listings; hotel, restaurant and shopping information and major local event information. There is a per-call charge and you will be billed for airtime. -
Page 11: Your Device: The Basics
Section 2A Your Device: The Basics In This Section Part Names and Function Battery Charging Initial Setup Setup Options Connecting to a Computer Today Screen Programs Navigation Bar and Command Bar Pop-up Menus Notifications Entering Information Entering Text Using the Input Panel Finding and Organizing Information Customizing Your Device his section will guide you through the basics of your device and you’ll be... -
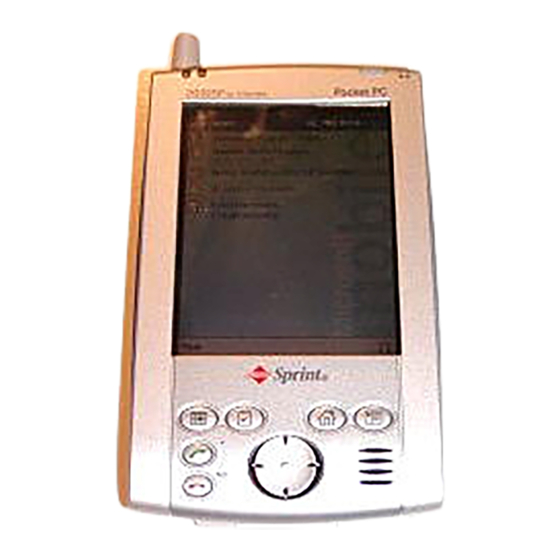
Page 12: Part Names And Function
Part Names and Function Incoming Call / System Notification LED Charging LED Power Button / Front Light Button Fixed Antenna Record Button (Program Button 5) Radio Standby Switch Program Button 1, 2, 3 & 4 (From the Left) TALK Button END Button AC Adapter Jack Cradle Connection Port... -
Page 13: Power Button / Front Light Button
Power Button / Front Light Button Press this to turn the device and the front light on/off. Power button When the power is off Press it quickly. The power turns on. Press and hold. The power turns on. Even if the power is turned off, pressing the program button turns the power on and the program screen is displayed. -
Page 14: Charging Led
Charging LED Steady orange ...Built-in battery charging If the battery is completely drained, the device will have to charge (LED will display orange) for a period of time prior to use. Flashing yellow...Charging has stopped due to extreme temperatures. Charge at a temperature of approximately 41°F - 95°F (5°C and 35°C). -
Page 15: Phone Headset
Phone Headset The supplied Phone Headset can be used to make or receive phone calls. When the Phone Headset is inserted into the device, the microphone and speaker on the main unit will become inactive. Also, this microphone can be used as a recorder. Microphone Clip You can attach the... -
Page 16: Battery Charging
strongly recommended against. Please use the device with the Phone Headset/Remote Control Unit or in speakerphone mode. For instructions on how to use the device with the Phone Headset/Remote Control Unit or as a speakerphone, please refer to page 60 of this guide. Battery Charging When using the device for the first time, set the Battery Switch to the supply side (see page 16), then fully charge the battery. -
Page 17: Initial Setup
It is strongly recommended that you save the device’s memory data to your computer or a storage card. The manufacturer is not responsible for data changed or lost due to battery discharge. For back up, see “Backing Up” on page 137. Initial Setup When using your device for the first time, completely charge the battery then follow the initial setup procedures below:... -
Page 18: Setup Options
Setup Options Method of Setting Card into SD Card Slot Inserting a card: Turn off the power. Insert the card with its contact surface (metal contact surface) facing backward into the device. Contact surface Note: An SD dummy card is loaded in the SD card slot at purchase. Remove the SD dummy card before inserting the card. -
Page 19: Today Screen
Make sure that the connector on the cradle is inserted into the port on the bottom of the device. Data can not be transferred if the connection is not made. When your device is properly inserted into the cradle, your device will turn on automatically and ActiveSync ®... -
Page 20: Programs
Programs Switch from one program to another by using the programs not listed on the drop down menu, tap desired program. You can also switch to another program by pressing any of the five program buttons located on the front and side of the device. The icons above the buttons identify the factory set programs (from left to right) –... -
Page 21: Pop-Up Menus
Pop-up Menus Pop-up menus provide quick access to select an action for an item, and vary with each program. To access a pop-up menu, tap and hold the stylus on the item you want to perform the action on. When the menu appears, lift the stylus and tap the desired action. - Page 22 When you use the input panel, your device anticipates the word you are typing or writing and displays it above the input panel. When you tap the displayed word, it is inserted into your text at the insertion point. The more you use your device, the more words it learns to anticipate.
-
Page 23: Writing On The Screen
Writing on the Screen To write on the screen, write the same way do on paper. The text can be edited, formatted or converted at a later time. Writing on the screen: To switch to the writing mode, tap the on the screen to help you write. -
Page 24: Drawing On The Screen
If the word conversion is incorrect, you can select an alternative word by tapping and holding down on the wrong word. On the pop-up menu tap and browse the list. Either tap the word you want to use, or tap Alternates the writing at the top of the menu to return to the original writing. -
Page 25: Recording A Message
Recording a Message A message can also be recorded on any program where you can write or draw on screen. In Calendar, tasks and Contacts, you can include a recording in the tab. In the Notes program, you can either create a Notes stand-alone recording or include a recording with a written note. -
Page 26: Finding And Organizing Information
Finding and Organizing Information To quickly locate information using the Find menu. Note: To quickly find information that is taking up storage space on your Larger than 64 KB Type device, select File Explorer can also find files on your device and organize them into folders. -
Page 27: Adding Or Removing Programs
Adding or Removing Programs Programs installed on your device at the factory are stored on ROM (read- only memory) and cannot be removed or accidentally lost. ROM programs can be updated using special installation programs with a *.xip extension. Any programs and files added after factory installation are stored in RAM (random access memory). - Page 28 Adding a program to the Start menu: , the Settings Menus Start Menu program. If you do not see the program listed, you can either use File Explorer on the device to create a shortcut the program to the Start Menu folder or use ActiveSync ®...
-
Page 29: Setting The Front Light
Note: You can automatically receive a call when the Auto-Answer is activated. However, you cannot disconnect without entering the password. Setting the Front Light , then . On the Settings System Set the Front Light. Set the time that elapses until the front light automatically turns off if the device is not used. -
Page 30: Setting Memory
Setting Memory Memory for the device is automatically managed. You can adjust data storage memory and program running memory, and confirm the amount of free space on a storage card. Changing memory allocation: , then . On the Settings System Memory setting screen. -
Page 31: Viewing The Display Screen
Section 2B Phone Function: The Basics In This Section Viewing the Display Screen Turning the Phone Function ON and OFF Talking on the Device Displaying Your Phone Number Making and Answering Calls KeyGuard Lock Scratch Pad our device is packed with features that simplify your life and expand your ability to stay connected to the people and information that are important to you. -
Page 32: Main Screen
Viewing the Display Screen Main Screen VOICE tab Receiving Signal Strength Indicator Contacts Scratch Pad Volume Buttons Speaker Icon Button TALK Button END Button BACK Button Keypad Admin menu Tools menu DATA tab In Use Indicator Coverage Indicator Icons Status box displays information about the current call and any status messages. -
Page 33: Keypad Operation List
Keypad Operation List Regardless of the program in use, pressing the button while phone function is open displays the function’s screen. Even if the power is turned off, pressing the on and displays the tab screen. (However, the setting can be VOICE changed not to turn the power on.) When the phone function’s screen is displayed, the... -
Page 34: Turning The Phone Function On And Off
Tools menu: The following items can be selected from the tabs: VOICE Displays the Messaging screen. Displays Contacts. Displays screen for storing numbers. Displays a list of incoming calls, outgoing calls, missed calls. Displays the Connections setting screen. Protects against accidental operation. -
Page 35: Talking On The Device
Talking on the Device Here explains how to use your device when you talk on the phone. Keep the device from your face more than 1 inch (2.5 cm). Using the Microphone and Speaker: Using the Phone Headset: To use the supplied Phone Headset, insert it into the headset jack. For the Phone Headset, see page 20. -
Page 36: Volume Control
Answering Calls Make sure the phone function is on. When a call comes in, answer the call by tapping your settings, your PCS Device notifies you of incoming calls in the following ways: The device rings or vibrates. The LED flashes. The screen displays an incoming call message. -
Page 37: Missed Call Notification
Missed Call Notification When an incoming call is not answered, the Missed Call icon missed call message are displayed on your screen. to turn off the missed call message. Returning Missed Calls To return the last missed call, tap . When appears. -
Page 38: Display Settings
Section 2C Controlling the Phone Function’s Settings In This Section Sounds Settings Security Settings Voice Settings Massaging Settings General Settings Display Settings his section describes how you can change the phone function settings to best suit your requirements. Take a few moments to review these options and add or adjust the settings that are right for you. -
Page 39: Sounds Settings
Sounds Settings Use to select the sounds for incoming calls, voicemail and messages. on the menu, then tap Options Tools Sounds Tap “>” to play selected sound. Tap “...” to select a sound file. Select a receiving type from “Ringer Only”, “Ring and Vibe”, “Vibrate Only”... -
Page 40: Messaging Settings
Voice Settings on the menu, then tap Options Tools Voice Determines when auto-answer function answers phone in the “Auto- Answer” section. Ideal to use while driving. Determines when to retry a call that did not connect in the “Auto- Retry” section. When is checked, automatically adds hyphenation Auto-Hyphenation... -
Page 41: Setting Your Device's Security
tab of can be set to display warning before line is Display Options disconnected.) Select the number of calls to be retained in the Call Log in the“Call Logging Retain” section. Calls exceeding this number are automatically deleted. System selection is possible in an area that permits roaming in the “System Select”... -
Page 42: Locking Your Device
Locking Your Device See “Setting Password” on page 47. Locking the Phone Function When the phone function is locked, you can only receive incoming calls or make calls to 911, PCS Customer Solutions or special numbers. To lock the phone function: on the menu, then tap Options... -
Page 43: Controlling Your Roaming Experience
Section 2E Controlling Your Roaming Experience In This Section Understanding Roaming Setting Your Device’s Roam Mode Controlling Roaming Charges Using Call Guard oaming is the ability to make or receive calls while you’re off the Sprint Nationwide PCS Network. Your new dual band anywhere on the enhanced Sprint Nationwide PCS Network and allows you to roam on... -
Page 44: Understanding Roaming
Understanding Roaming Recognizing Icons on the Display Screen The phone function’s display screen always lets you know when you’re off the Sprint Nationwide PCS Network. The following chart indicates what you’ll see depending on where you’re using your device. Roaming Indicator Sprint Nationwide PCS Network Other Digital Networks... -
Page 45: Managing Call History
To Place Roaming Calls With Call Guard On: Place a call. when the message screen appears. Continue To Answer Incoming Roaming Calls With Call Guard On: in the message screen. Continue Section 2: Understanding Your Device 2E: Controlling Your Roaming Experience Section 2F Managing Call History In This Section... -
Page 46: Viewing History
Viewing History Call Log screen displays a list of incoming, outgoing and missed calls, including caller information and call time. To display, tap menu or press right on the navigation button. Tools When you tap and hold a log entry a pop-up menu displaying Delete Add to New Contact Add to Existing Contact... -
Page 47: Microsoft Activesync
Section 2G Microsoft ® ActiveSync In This Section Using Microsoft ® ActiveSync ® y connecting your device to your computer using ActiveSync will be synchronized and transmitted. This section explains how to install ActiveSync ® to your computer and the procedure for connecting your device and your computer. -
Page 48: Using Microsoft Activesync
Using Microsoft ® ActiveSync Microsoft ® ActiveSync ® synchronizes the information on your computer with the information on your device. Synchronization compares data between the two and updates both with the most recent information. For example: Keep Pocket Outlook ® data up-to-date by synchronizing your device with your computer’s Microsoft ®... -
Page 49: Using The Microsoft Pocket Outlook
After this initial synchronization, view your device’s Calendar, Contacts and Tasks. Everything stored in Microsoft ® should now be on your device. Disconnect the device from your computer and you’re ready to go. To initiate ActiveSync ® on your device, tap For information about using ActiveSync ®... -
Page 50: Contacts: Tracking Friends And Colleagues
Contacts: Tracking Friends and Colleagues Contacts maintains an easily accessible list of friends and colleagues (See note). The device’s infrared (IR) port allows you to quickly share Contacts information with other device users. To access Contacts, tap . Or, press the Contacts Program button on the front of the device. Contacts You can also access Contacts with the following method from the phone function’s screen. -
Page 51: Finding A Contact
Finding a Contact There are four ways to find a contact from the contact list: Enter a name in the box under the navigation bar. To view all contacts, clear text from the box or tap the button to the right of the box. Tap the category list (labeled All Contacts type of contact you want displayed. -
Page 52: Speed Dial
Speed Dial Using speed dial simplifies calling. Turn the Radio Standby Switch on when using Speed Dial. Storing Open Contacts. Tap and hold the contact you want to add to the Speed Dial. When the pop-up menu appears, tap Add to Speed Dial Tap the phone number you want to add to the Speed Dial. -
Page 53: Calendar: Scheduling Appointments And Meetings
Calendar: Scheduling Appointments and Meetings Use Calendar to schedule appointments, including meetings and other events. You can check your appointments in one of several views (Agenda, Day, Week, Month, and Year) and easily switch views by tapping one of the 5 view icons at the bottom of the screen or by pressing the Calendar Program (button#1 on front of your device). -
Page 54: Using The Summary Screen
Note: Remind me If you select in an appointment, your device will remind you according to the options set in the menu, Sounds & Notifications Using the Summary Screen Tap an appointment to display the summary screen. To make changes, Edit Creating Meeting Requests Calendar can set up meetings with Outlook... -
Page 55: Creating A Task
Creating a Task to return to the task list (the task is saved automatically). in the subject section to choose from predefined subjects. Notes is a good place for maps and drawings. Enter a description. Enter a start and due date or other information by tapping the field. To see all available fields, hide the input panel. -
Page 56: Creating A Note
Notes: Capturing Thoughts and Ideas Notes quickly captures thoughts, reminders, ideas and phone numbers. You can also create a recording to include with the entry. Tap Name to change the sort order of the list. Tap on a note to open the note or to play a recording. Tap and hold to display a pop-up menu of actions. -
Page 57: Inbox: Sending And Receiving Email Messages
Inbox: Sending and Receiving Email Messages Use Inbox to send and receive email messages in either of these ways: Synchronize email messages with Microsoft Outlook ® on your computer. Send and receive email messages by connecting directly to an email server through PCS Connection. -
Page 58: Composing Messages
to select the sort order for messages. Received Data Tap on a message to open the message. Tap and hold to display a pop-up menu of actions. to connect to the selected service. to connect and to send and receive email. When you receive a message, tap it to open it. -
Page 59: Managing Email Messages And Folders
Managing Email Messages and Folders Messages are displayed in one of five folders: Inbox, Deleted Items, Drafts, Outbox and Sent Items. The Deleted Items folder contains messages that have been deleted on the device. The behavior of the Deleted and Sent Items folders depends on the options you have chosen. -
Page 60: Typing Mode
Companion programs include Microsoft ® Excel, Windows Media Player for Pocket PC, and Microsoft To switch to a companion program, tap program name. Pocket Word Pocket Word works with Microsoft ® Word on your computer, providing easy access to copies of documents. You can also create new documents on your device or copy documents from your computer. -
Page 61: Drawing Mode
writing and selecting writing, see “Entering Text Using the Input Panel” on page 33. Note: If you cross three ruled lines in a single stylus stroke, the writing becomes a drawing, and can be edited and manipulated as described in the following section. -
Page 62: Pocket Excel
Pocket Excel Pocket Excel works with Microsoft ® Excel on your computer, providing easy access to copies of spreadsheets. You can also create new spreadsheets on your device or copy spreadsheets from your computer. To create a new file, tap Programs Pocket Excel from the Today screen, tap... -
Page 63: Working With Contacts
Setting Up Before you can connect, you must enter Passport or Exchange account information. To set up an account and sign in: In the menu, tap Tools Options On the tab, enter your Passport or Exchange account Accounts information. Tap the sign-in screen and tap Sign in Note: If you use MSN... -
Page 64: Microsoft Reader
For more information on using MSN ® Messenger, tap Windows Media™ Player for Pocket PC Use Microsoft ® Windows Media Player for Pocket PC to play digital audio and video files that are stored on your device or on a network. To switch to Windows Media Player for Pocket PC, tap Media... -
Page 65: Using The Library
Using the Library The Library is your Reader home page; it displays a list of all books stored on your device or storage card. To open the Library: On the Reader command bar, tap Library. On a book page, tap the book title, and then tap pop-up menu. -
Page 66: Removing A Book
Highlights: When text is highlighted, it appears with a colored background. Notes: Enter text in the note that appears on top of the page. To show or hide the note, tap the Note icon displayed in the left margin. Drawing: When you add a drawing, a Drawing icon appears in the top-right corner of the page along with tools on the bottom of the page. -
Page 67: Using Avantgo Channels
Synchronize your device and computer and the Mobile Favorites folder will be downloaded to your device. Note: If a scheduled update was not specified in step 3, content will have to be manually downloaded to update both computers. To see the last time content was downloaded to the computer, click Synchronize from the Internet Explorer window. -
Page 68: Getting Connected
Viewing mobile favorites: Tap the button to display your list of favorites. Favorites to add or delete a folder or favorite link. Add/Delete Tap the page you want to view. The version of the page that was downloaded the last time you synchronized will be displayed. -
Page 69: Accessing The Internet Using Pcs Connection
Your device can exchange information with other mobile devices as well as your computer, a network, or the Internet. The connection options include the following: The device’s infrared (IR) port can send and receive files from another device. See “Transferring Items Using Infrared” below for more information. -
Page 70: Connecting Directly To An Email Server
Connecting Directly to an Email Server You can set up a connection to an email server so that you can send and receive email messages by using a modem or network connection and Inbox on your device. Note: The ISP or network must use a POP3 or IMAP4 email server and an SMTP gateway. -
Page 71: Home
Home To easily launch the built-in or installed applications, tap the icon displayed on the Home screen. Launching an Application From Home , then to display the Home screen. Programs Home You can also launch the Home by pressing the device Home Program button. -
Page 72: Display Icon List
Display Icon List The following list shows the tabs and icons for the initial setup. Tabs Icons Applications Tabs Running Programs Main PCS Connection Pocket Internet Explorer Windows Media ™ Player Notes Tasks Games Inbox Calendar Contacts Pocket Word Pocket Excel Calculator Moving an Application Icon into Another Tab A moved icon appears next to the last icon in its new location. -
Page 73: Tab Setting
Note: A new icon cannot be added if the Application file is not designated or if the Application name is not entered. Note: An icon added from a storage card cannot be launched unless the same card is inserted in the device. Tab Setting A tab can be added, deleted, or removed from the Tab Settings screen. -
Page 74: Making A Backup
Note: Stored data, such as the password in Note: Before backing up, restoring, or deleting a backup file, connect an AC Adapter to your device, set the Radio Standby Switch to OFF and close all applications. Do not press any button or slide the switch while the backup or restore is in progress. -
Page 75: Deleting A Backup File
, then to display the Backup screen. Programs Backup Select from Restore Functionality to display the screen confirming all the applications are closed. to display the Restore password input screen. Enter the password that was established for the backed up data. If you backed up without a password, you do not need to enter one. -
Page 76: Additional Information
Section 2L Additional Information In This Section Resetting Clearing Memory (Initialization) Specifications his section describes how to reset and initialize your device. Section 2: Understanding Your Device 2L: Additional Information 143... -
Page 77: Resetting
Resetting Reset is equal to “Restart” on a computer. Reset only in unusual circumstances such as when the screen freezes and doesn’t respond to tapping. Information not saved prior to resetting will be deleted. When your device is reset, phone functions are ended. To reset, press and release the Reset Switch while the power is on. -
Page 78: Section 3: Using Pcs Service Features
Section 3 Although the display is manufactured using an extremely high order of technology, there may be a case that some dots do not light or always light. It is not a malfunction. Using PCS Service Features Section 2: Understanding Your Device Section 3 146 2L: Additional Information Using PCS Service Features 147... -
Page 79: Pcs Service Features: The Basics
Section 3A PCS Service Features: The Basics In This Section Using Voicemail Using Caller ID Responding to Call Waiting Making a Three-Way Call Using Call Forwarding Messaging ow that you’ve mastered the phone function’s fundamentals, it’s time to explore the calling features that enhance your PCS Service. Section 3: Using PCS Service Features 3A: The Basics 149... -
Page 80: Using Voicemail
Using Voicemail Setting Up Your Voicemail All unanswered calls to your PCS Device are automatically transferred to voicemail, even if your device is in use or turned off. Therefore, you will want to set up your PCS Voicemail and personal greeting as soon as your PCS Device is activated. -
Page 81: Voicemail Options
Voicemail Options Your PCS Device offers several options for organizing and accessing your voicemail. Setting Up Group Distribution Lists Create up to 20 separate group lists, each with up to 20 customers. Tap and hold to access your voicemail. Following the system prompts, tap Personal Options. -
Page 82: Using Caller Id
Using Caller ID Caller ID lets you know who’s calling by displaying the number of the person calling when your device rings. Similarly, if you call someone who has this feature, your phone number displays on their phone. If the caller’s name and number are already stored in your Contacts, the corresponding name appears with the number. -
Page 83: Using Call Forwarding
Using Call Forwarding Call Forwarding lets you forward all your incoming calls to another phone number – even when your phone function is turned off. You can continue to make calls from your device with Call Forwarding activated. To Activate Call Forwarding , followed by the area code and phone number to which your calls should be forwarded. -
Page 84: Pcs Vision
Section 3B PCS Vision In This Section PCS Business Connection Messaging Voice ith PCS Vision services, you will have access to additional features, better performance, faster Internet connections and a wider variety of online services. Section 3: Using PCS Service Features 3B: PCS Vision 159... -
Page 85: Pcs Business Connection Personal Edition
PCS Business Connection Personal Edition PCS Business Connection Personal Edition is designed to offer secure wireless access to both Microsoft Outlook and Lotus Notes. PCS Business Connection Personal Edition delivers the following features: Read, reply to, forward, delete and compose Business email access: your company email. -
Page 86: Pcs Voice Command
Section 3C PCS Voice Command In This Section PCS Voice Command ith Sprint, the first wireless provider to offer innovative PCS Voice Command technology, reaching your friends, family, co-workers and teammates has never been easier – especially when you’re on the go. You can even listen to Web-based information such as news, stock quotes, weather, sports and much more. -
Page 87: Getting Started With Pcs Voice Command
Getting Started With PCS Voice Command With PCS Voice Command: You can store all your contact’s phone numbers, so you can simply say the name of the person you want to call. There’s no need to punch in a lot of numbers, memorize voicemail passwords or try to dial while you’re driving. -
Page 88: Section 4: Safety Guidelines And Warranty Information
Section 4 Safety Guidelines and Warranty Information Section 4 Safety Guidelines and Warranty Information 167... -
Page 89: Safety
Section 4A Safety In This Section Getting the Most Out of Your Reception Maintaining Safe Use of and Access to Your Device Safety Instructions Acknowledging Special Precautions and the FCC Notice SAR Information Consumer Update on Wireless Phones Owner’s Record User Guide Proprietary Notice art of getting the most out of your device is knowing where and how it works at optimum efficiency. -
Page 90: Getting The Most Out Of Your Reception
Getting the Most Out of Your Reception Keeping Tabs on Signal Strength The quality of each call you make or receive depends on the signal strength in your area. Your device informs you of the current signal strength by displaying a number of bars next to the signal strength icon. The more bars displayed, the stronger the signal. -
Page 91: Safety Instructions
Do not engage in stressful or emotional conversations that may divert your attention from the road. Dial to report serious emergencies. It’s free from your device. Use your device to help others in emergencies. Call roadside assistance or a special non-emergency wireless number when necessary. - Page 92 Never use your device while walking. Usage while walking could result in bodily injury caused by inattention to automobile traffic or other pedestrian hazards. WARNING Never allow metallic objects, such as staples and paper clips, to enter inside your device. Metallic objects, such as staples and paper clips, if allowed to enter your device, could cause the generation of excess heat or fire.
- Page 93 CAUTION Never raise the sound volume level too high when using your device with headset. An excessive sound volume level could cause damage to your hearing. Never touch the liquid that might leak from a broken liquid crystal display. Contact with this liquid could cause a skin rash. If the crystal display liquid should come into contact with the skin or clothing, wash it immediately with clean water.
-
Page 94: Safe Use Of Ac Adapter
When the device is operating, do not insert or remove the “SD memory card” into or out of the SD card slot or connect or disconnect the device from the cradle as this may cause loss of stored data, or product failure/malfunction. Never connect cradle terminals with metallic objects, such as wires. -
Page 95: Acknowledging Special Precautions And The Fcc Notice
Acknowledging Special Precautions and the FCC Notice FCC Notice "Declaration of Conformity Information" Product Name: 2032SP Model Number(s): CET0200B (PDA2032SP) This equipment has been tested and found to comply with the limits for a Class B digital device, pursuant to part 15 of the FCC Rules. These limits are designed to provide reasonable protection against harmful interference in a residential installation. -
Page 96: Safe Use And Operation Of Device (Wireless Handheld Phone)
expressly approved by us or parties authorized by us could void the user’s authority to operate the equipment. This device complies with part 15 of the FCC Rules. Operation is subject to the following two conditions: (1) This device may not cause harmful interference, and (2) this device must accept any interference received, including interference that may cause undesired operation. - Page 97 PHONE OPERATION When speaking into the Microphone or the Phone Headset, a minimum separation distance of 1 inch (2.5 cm) must be maintained between the user's face and the device, including its antenna, to comply with the FCC exposure limits. This particular device has not been designed for held-to-ear use and should never be used against the ear.
-
Page 98: Sar Information
the air bag deployment area. If in-vehicle wireless equipment is improperly installed and the air bag inflates, serious injury could result. CAUTION Hearing Aids Some digital wireless phones may interfere with some hearing aids. In the event of such interference, you may want to consult your service provider [or call the customer service line to discuss alternatives]. -
Page 99: Consumer Update On Wireless Phones
The FCC has granted an Equipment Authorization for this model phone with all reported SAR levels evaluated as in compliance with the FCC RF exposure guidelines. SAR information on this model phone is on file with the FCC and can be found under the Display Grant section of http://www.fcc.gov/oet/fccid after searching on FCC ID CJ6CET0200MT. - Page 100 FDA belongs to an interagency working group of the federal agencies that have responsibility for different aspects of RF safety to ensure coordinated efforts at the federal level. The following agencies belong to this working group: • National Institute for Occupational Safety and Health •...
- Page 101 epidemiological studies is hampered by difficulties in measuring actual RF exposure during day-to-day use of wireless phones. Many factors affect this measurement, such as the angle at which the phone is held, or which model of phone is used. 6. What is FDA doing to find out more about the possible health effects of wireless phone RF? FDA is working with the U.S.
- Page 102 source of the RF, since the exposure level drops off dramatically with distance. For example, you could use a headset and carry the wireless phone away from your body or use a wireless phone connected to a remote antenna. Again, the scientific data do not demonstrate that wireless phones are harmful.
-
Page 103: Owner's Record
Record the serial number in the space provided below. This will be helpful if you need to contact us about your device in the future. Model: PCS Device 2032SP Serial No.: User Guide Proprietary Notice... -
Page 104: Manufacturer's Warranty
Manufacturer’s Warranty ONE YEAR LIMITED WARRANTY Audiovox Communications Corp. (“Audiovox”) warrants to the original retail purchaser (“Purchaser”) that this Audiovox from defects in materials and workmanship under normal consumer use for one year from the date of original purchase from Audiovox or an Audiovox authorized reseller. - Page 105 SOFTWARE THIS AUDIOVOX ® PRODUCT MAY INCLUDE THIRD PARTY SOFTWARE, THE USE OF WHICH IS GOVERNED BY THE APPLICABLE SOFTWARE LICENSE, END-USER LICENSE OR PROGRAM LICENSE AGREEMENT. THIS LIMITED WARRANTY DOES NOT APPLY TO SUCH THIRD PARTY SOFTWARE AND SUCH SOFTWARE IS PROVIDED “AS IS”. FOR THE APPLICABLE WARRANTY, PLEASE REFER TO THE SOFTWARE LICENSE, END-USER LICENSE OR PROGRAM LICENSE GOVERNING THE USE OF SUCH SOFTWARE OR THE DOCUMENTATION ACCOMPANYING SUCH...
- Page 106 Copyright © 2002 Sprint Spectrum L.P. All rights reserved. No reproduction in whole or in part allowed without prior written approval. Sprint, PCS Business Connection and the diamond logo are trademarks of Sprint Communications Company L.P. Microsoft, ActiveSync,Outlook, Pocket Outlook, Windows, Windows NT, and the Windows logo are either registered trademarks or trademarks of Microsoft Corporation in the United States and /or other countries.