Siemens SINAMICS S120 System Manual
High frequency drive
Hide thumbs
Also See for SINAMICS S120:
- Function manual (1094 pages) ,
- Diagnostic manual (947 pages) ,
- Manual (848 pages)

Related Manuals for Siemens SINAMICS S120


Summary of Contents for Siemens SINAMICS S120
- Page 3 ___________________ High Frequency Drive Foreword Fundamental safety ___________________ instructions SINAMICS System overview High Frequency Modules, ___________________ line connection S120 High Frequency Drive ___________________ High Frequency Modules Voltage Protection Module ___________________ (VPM) System Manual ___________________ Braking Modules Braking resistors Control Supply Module ___________________ (CSM) ___________________...
- Page 4 Note the following: WARNING Siemens products may only be used for the applications described in the catalog and in the relevant technical documentation. If products and components from other manufacturers are used, these must be recommended or approved by Siemens. Proper transport, storage, installation, assembly, commissioning, operation and maintenance are required to ensure that the products operate safely and without any problems.
-
Page 5: Foreword
(mailto:[email protected]). My Documentation Manager At the following address (http://www.siemens.com/mdm), you can find information on how to create your own individual documentation based on Siemens' content, and adapt it for your own machine documentation. Training At the following address (http://www.siemens.com/sitrain), you can find information about SITRAIN (Siemens training on products, systems and solutions for automation and drives). - Page 6 Equipment for Machine Tools (Catalog NC 61) SINUMERIK 840D sl Type 1B • Equipment for Machine Tools (Catalog NC 62) Installation/assembly SINAMICS S120 Manual for Control Units and Additional • System Components SINAMICS S120 Manual for Booksize Power Units •...
- Page 7 Technical Support Country-specific telephone numbers for technical support are provided in the Internet at the following address (https://support.industry.siemens.com/sc/ww/en/sc/2090) in the "Contact" area. EC Declaration of Conformity, certificates, certifications, manufacturers declarations You can find the EC Declaration of Conformity for the relevant directives as well as the relevant certificates, prototype test certificates, manufacturers declarations and test certificates for functions relating to functional safety ("Safety Integrated") in the Internet at...
- Page 8 Foreword You can obtain an up-to-date list of currently certified components on request from your local Siemens office. If you have any questions relating to certifications that have not yet been completed, please ask your Siemens contact person. Note You can find certificates for the North American market on the Internet page of the certifier: •...
- Page 9 EMC limit values are ensured. Spare parts Spare parts are available on the Internet at the following address (https://support.industry.siemens.com/sc/ww/en/sc/2110). Ground symbols Table 2 Symbols...
- Page 10 Foreword High Frequency Drive System Manual, (SH2), 04/2015, 6SL3097-4AH10-0BP3...
-
Page 11: Table Of Contents
Handling electrostatic sensitive devices (ESD) ..............21 Industrial security ........................22 Residual risks of power drive systems ..................23 System overview ........................... 25 SINAMICS S120 High Frequency Drive components ............25 Overview ..........................26 System data ..........................27 High Frequency Modules, line connection ..................... 29 High Frequency Modules ........................ - Page 12 Table of contents 4.4.3.3 X200-X203 DRIVE-CLiQ interfaces ..................50 4.4.3.4 Busbars ..........................51 4.4.4 Meaning of the LEDs ......................51 4.4.5 Dimension drawings ....................... 53 4.4.5.1 HF Choke Module ........................53 4.4.5.2 HF Damping Module ......................54 Installation ..........................55 Electrical connection ......................
- Page 13 Table of contents Braking Module Booksize Compact ..................99 6.2.1 Description ..........................99 6.2.2 Safety instructions for Braking Modules Booksize Compact ..........102 6.2.3 Interface description ......................103 6.2.3.1 Overview ..........................103 6.2.3.2 X1 braking resistor connection ..................... 104 6.2.3.3 X21 digital inputs/outputs ......................
- Page 14 Table of contents Interface description ......................143 9.3.1 Overview ..........................143 9.3.2 DC link connection ....................... 143 Dimension drawing ......................144 Installation ..........................145 Electrical connection ......................146 9.6.1 Preparing the cables ......................146 9.6.2 Fixing the cables to the rear cabinet panel ................147 9.6.3 Cable connection and shield support ...................
- Page 15 Table of contents Service and maintenance ........................177 12.1 Replacing the fan ........................177 12.1.1 Safety instructions for replacing a fan ................... 177 12.1.2 Replacing the fan at the HF Choke Module ................177 12.1.3 Replacing the fan at the HF Damping Module ..............179 12.2 Recycling and disposal ......................
- Page 16 Table of contents High Frequency Drive System Manual, (SH2), 04/2015, 6SL3097-4AH10-0BP3...
-
Page 17: Fundamental Safety Instructions
Fundamental safety instructions General safety instructions DANGER Danger to life due to live parts and other energy sources Death or serious injury can result when live parts are touched. • Only work on electrical devices when you are qualified for this job. •... - Page 18 Fundamental safety instructions 1.1 General safety instructions WARNING Danger to life when live parts are touched on damaged devices Improper handling of devices can cause damage. For damaged devices, hazardous voltages can be present at the enclosure or at exposed components;...
- Page 19 Fundamental safety instructions 1.1 General safety instructions WARNING Danger to life due to fire spreading if housing is inadequate Fire and smoke development can cause severe personal injury or material damage. • Install devices without a protective housing in a metal control cabinet (or protect the device by another equivalent measure) in such a way that contact with fire is prevented.
- Page 20 Fundamental safety instructions 1.1 General safety instructions WARNING Danger of an accident occurring due to missing or illegible warning labels Missing or illegible warning labels can result in accidents involving death or serious injury. • Check that the warning labels are complete based on the documentation. •...
-
Page 21: Safety Instructions For Electromagnetic Fields (Emf)
Fundamental safety instructions 1.2 Safety instructions for electromagnetic fields (EMF) Safety instructions for electromagnetic fields (EMF) WARNING Danger to life from electromagnetic fields Electromagnetic fields (EMF) are generated by the operation of electrical power equipment such as transformers, converters or motors. People with pacemakers or implants are at a special risk in the immediate vicinity of these devices/systems. -
Page 22: Industrial Security
Siemens recommends strongly that you regularly check for product updates. For the secure operation of Siemens products and solutions, it is necessary to take suitable preventive action (e.g. cell protection concept) and integrate each component into a holistic, state-of-the-art industrial security concept. -
Page 23: Residual Risks Of Power Drive Systems
Fundamental safety instructions 1.5 Residual risks of power drive systems Residual risks of power drive systems The control and drive components of a drive system are approved for industrial and commercial use in industrial line supplies. Their use in public line supplies requires a different configuration and/or additional measures. - Page 24 Fundamental safety instructions 1.5 Residual risks of power drive systems 3. Hazardous shock voltages caused by, for example, – Component failure – Influence during electrostatic charging – Induction of voltages in moving motors – Operation and/or environmental conditions outside the specification –...
-
Page 25: System Overview
● Active Line Module that has the function of centrally supplying the power to the DC link. ● Braking Module (optional) ● Control Supply Module (optional) The SINAMICS S120 High Frequency Drive is exclusively intended for installation in a control cabinet. Cooling methods The SINAMICS S120 High Frequency Motor Module is available with liquid cooling. -
Page 26: Overview
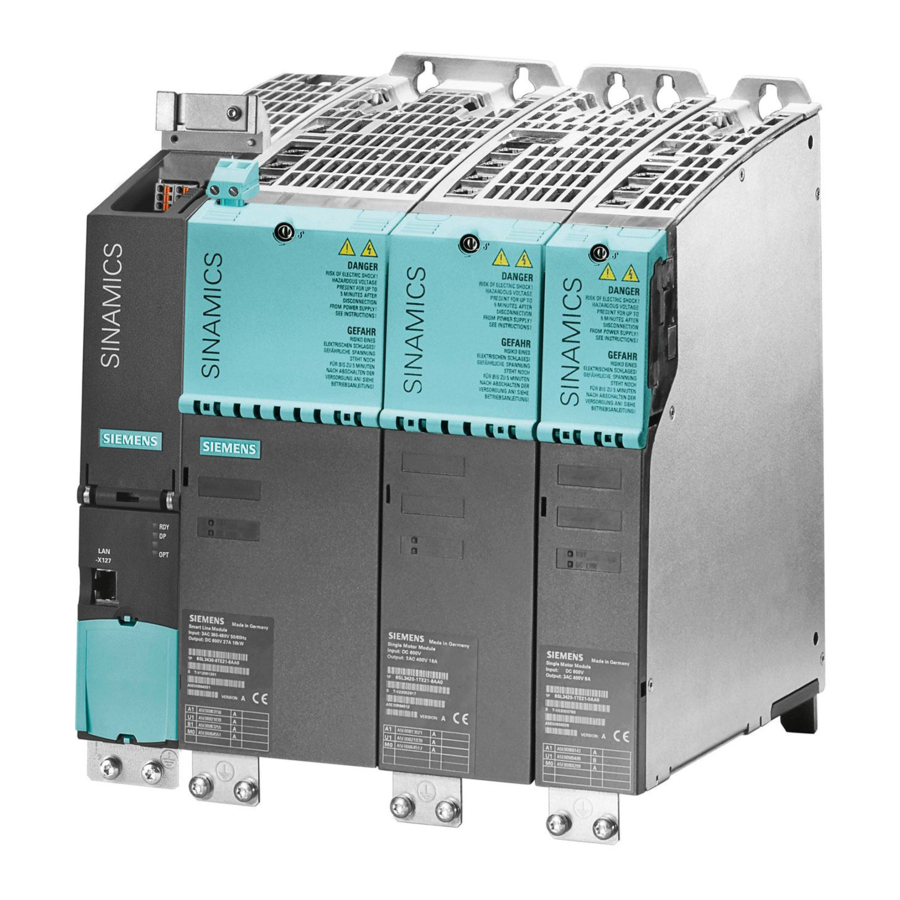
System overview 2.2 Overview Overview ① Active Interface Module booksize ② Control Unit NX15.3 ③ Active Line Module booksize ④ HF Motor Module ⑤ HF Choke Module ⑥ 〉HF Sine Filter Module HF Damping Module ⑦ Control Supply Module (optional) ⑧... -
Page 27: System Data
System overview 2.3 System data System data Unless explicitly specified otherwise, the following technical data are valid for components of the SINAMICS S120 drive system. Table 2- 1 Electrical data Line voltage 3-phase 380 … 480 VAC ±10% Line frequency 47 …... - Page 28 System overview 2.3 System data Shock stressing Long-term storage in the transport packaging Class 1M2 in accordance with EN 60721-3-1 Transport in the transport packaging Class 2M3 in accordance with EN 60721-3-2 Operation Test values: 15 g / 11 ms Climatic environmental conditions Long-term storage in the transport packaging Class 1K4 acc.
-
Page 29: High Frequency Modules, Line Connection
High Frequency Modules, line connection To connect the SINAMICS S120 High Frequency Drive drive line-up to the line supply these components are used: ● Overcurrent protection device (line fuse or circuit breaker) ● Line contactor, line disconnector device (optional) ● Line filter ●... - Page 30 High Frequency Modules, line connection Chassis The line interface for a SINAMICS S120 High Frequency Drive with an Active Line Module Chassis comprises, in addition to the regionally stipulated protective devices, an Active Interface Module – and depending on the frame size of the Active Interface Module, an additional bypass contactor.
-
Page 31: High Frequency Modules
High Frequency Modules Introduction The SINAMICS S120 High Frequency Drive is an inverter with integrated output filter (HF Sine Filter Module) to control motors with high output frequencies (up to 2400 Hz). The High Frequency Drive is operated with a pulse frequency of 16 kHz or 32 kHz, and a current controller clock cycle of 62.5 μs or 31.25 μs. - Page 32 High Frequency Modules 4.1 Introduction ① HF Motor Module ② DC link busbar (behind the protective cover) ③ HF Choke Module ④ HF Damping Module ⑤ Busbar connector, HF Damping Module - HF Choke Module ⑥ Motor connection ⑦ Shield connection plate ⑧...
- Page 33 High Frequency Modules 4.1 Introduction In addition, these components are required to operate a High Frequency Drive: ● Active Line Module in the booksize or chassis format in conjunction with an Active Interface Module ● Control Unit ● Voltage Protection Module (for synchronous motors) ●...
-
Page 34: Safety Instructions For High Frequency Modules
High Frequency Modules 4.2 Safety instructions for High Frequency Modules Safety instructions for High Frequency Modules WARNING Danger to life if the fundamental safety instructions and remaining risks are not carefully observed The non-observance of the fundamental safety instructions and residual risks stated in Chapter 1 can result in accidents with severe injuries or death. - Page 35 Damage or malfunctions can occur on the devices or system when DRIVE-CLiQ cables are used that are either incorrect or have not been approved for this purpose. • Only use suitable DRIVE-CLiQ cables that have been approved by Siemens for the particular application.
-
Page 36: Hf Motor Module
High Frequency Modules 4.3 HF Motor Module HF Motor Module 4.3.1 Description An HF Motor Module is a power unit (inverter) that provides the power for the motor connected to it. An Active Line Module provides the power supply. From the 3-phase line voltage, this generates a regulated constant DC voltage in the DC link of the HF drive lineup. -
Page 37: Interfaces
High Frequency Modules 4.3 HF Motor Module 4.3.2 Interfaces 4.3.2.1 Overview Figure 4-2 Interface overview of HF Motor Modules Liquid Cooled High Frequency Drive System Manual, (SH2), 04/2015, 6SL3097-4AH10-0BP3... -
Page 38: X21 Ep Terminals/Temperature Sensor Motor Module
EP terminal The filter times to debounce terminals X21.3 and X21.4 are set using parameters (see SINAMICS S120/S150 List Manual). Additional parameter settings are also required in order to prevent discrepancy errors when performing bit pattern tests (light/dark tests). For comprehensive information, see the SINAMICS S120 Safety Integrated Function Manual, Chapter "Controlling the safety functions". - Page 39 High Frequency Modules 4.3 HF Motor Module Temperature sensor WARNING Danger to life due to electric shock caused by voltage flashovers to the temperature sensor cable Voltage flashovers to the signal electronics can occur for temperature sensors without safe electrical separation. •...
-
Page 40: X200-X202 Drive-Cliq Interfaces
High Frequency Modules 4.3 HF Motor Module 4.3.2.3 X200-X202 DRIVE-CLiQ interfaces Table 4- 4 X200-X202 DRIVE-CLiQ interfaces Name Technical data Transmit data + Transmit data - Receive data + Reserved, do not use Reserved, do not use Receive data - Reserved, do not use Reserved, do not use + (24 V) -
Page 41: Meaning Of The Leds
Red/orange Both options depend on the LED status when activated. See SINAMICS S120/S150 List Manual for the parameters to activate the recognition of components via LED DANGER Danger to life as a result of electric shock when coming into contact with the DC link voltage Irrespective of the state of the LED "DC LINK", hazardous DC link voltages can always be... -
Page 42: Dimension Drawing
High Frequency Modules 4.3 HF Motor Module 4.3.4 Dimension drawing Figure 4-3 Dimension drawing of HF Motor Modules Liquid Cooled in mm and (inches) High Frequency Drive System Manual, (SH2), 04/2015, 6SL3097-4AH10-0BP3... -
Page 43: Hf Sine Filter Module
High Frequency Modules 4.4 HF Sine Filter Module HF Sine Filter Module 4.4.1 Description The HF Sine Filter Module is the output filter (sine-wave filter) in the High Frequency Drive. It limits the harmonics and switching edges generated by the switching operations of the inverter to values that are permissible for the motor and can be tolerated. -
Page 44: Hf Choke Module Interfaces
High Frequency Modules 4.4 HF Sine Filter Module 4.4.2 HF Choke Module interfaces 4.4.2.1 Overview Figure 4-4 Interface overview, HF Choke Module High Frequency Drive System Manual, (SH2), 04/2015, 6SL3097-4AH10-0BP3... -
Page 45: X21 Outputs For Temperature Monitoring
High Frequency Modules 4.4 HF Sine Filter Module 4.4.2.2 X21 outputs for temperature monitoring Table 4- 8 X21 outputs for temperature monitoring Terminal Function Technical data + KTY Temperature HF Choke Module analog: KTY84-1C130 temperature sensor - KTY + Temp switch Temperature monitoring for the HF Choke Module using the integrated bimetallic switch - Temp switch... -
Page 46: Voltage Protection Module Connection
High Frequency Modules 4.4 HF Sine Filter Module 4.4.2.4 Voltage Protection Module Connection Table 4- 10 Voltage Protection Module Connection Terminals Technical data Threaded bolts: M8 Tightening torque: 13 Nm For ring cable lugs without insulation (Page 173) PE connection Threaded hole: M8 Tightening torque: 13 Nm For ring cable lugs without insulation (Page 173) -
Page 47: Motor Connection
High Frequency Modules 4.4 HF Sine Filter Module 4.4.2.5 Motor connection Table 4- 11 Motor connection Terminals Technical data Threaded bolts: M8 Tightening torque: 13 Nm For ring cable lugs without insulation (Page 173) PE connection Threaded hole: M8 Tightening torque: 13 Nm For ring cable lugs without insulation (Page 173) Connection photograph, see Chapter Electrical connection (Page 62) -
Page 48: Busbars
High Frequency Modules 4.4 HF Sine Filter Module 4.4.2.7 Busbars Table 4- 13 Busbars to the HF Motor Module Technical data Threaded hole: M5 Tightening torque: 3 Nm Table 4- 14 Busbars to the HF Damping Module Technical data Threaded hole: M5 Tightening torque: 3 Nm High Frequency Drive System Manual, (SH2), 04/2015, 6SL3097-4AH10-0BP3... -
Page 49: Hf Damping Module Interfaces
High Frequency Modules 4.4 HF Sine Filter Module 4.4.3 HF Damping Module interfaces 4.4.3.1 Overview Figure 4-5 HF Damping Module interface overview High Frequency Drive System Manual, (SH2), 04/2015, 6SL3097-4AH10-0BP3... -
Page 50: X21 Inputs For Temperature Monitoring
High Frequency Modules 4.4 HF Sine Filter Module 4.4.3.2 X21 inputs for temperature monitoring Table 4- 15 X21 inputs for temperature monitoring Terminal Function Technical data + Temp Temperature HF Choke Module analog: KTY84-1C130 temperature sensor - Temp + Temp Temperature Choke Module digital: Bimetallic switch - Temp... -
Page 51: Busbars
High Frequency Modules 4.4 HF Sine Filter Module 4.4.3.4 Busbars Table 4- 17 Busbars to the HF Choke Module Technical data Threaded hole: M5 Tightening torque: 3 Nm 4.4.4 Meaning of the LEDs Meaning of the LEDs on the HF Choke Module Table 4- 18 Meaning of the LEDs State... - Page 52 Red/orange Both options depend on the LED status when activated. See SINAMICS S120/S150 List Manual for the parameters to activate the recognition of components via LED DANGER Danger to life as a result of electric shock when coming into contact with the DC link voltage Irrespective of the state of the LED "DC LINK", hazardous DC link voltages can always be...
-
Page 53: Dimension Drawings
High Frequency Modules 4.4 HF Sine Filter Module 4.4.5 Dimension drawings 4.4.5.1 HF Choke Module Figure 4-6 Dimension drawing HF Choke Module, all data in in mm (inches) High Frequency Drive System Manual, (SH2), 04/2015, 6SL3097-4AH10-0BP3... -
Page 54: Hf Damping Module
High Frequency Modules 4.4 HF Sine Filter Module 4.4.5.2 HF Damping Module Figure 4-7 Dimension drawing HF Damping Module, all data in mm (inches) High Frequency Drive System Manual, (SH2), 04/2015, 6SL3097-4AH10-0BP3... -
Page 55: Installation
HF Motor Module. Mounting position in the control cabinet Always mount the SINAMICS S120 components in the control cabinet in a vertical position. Other permissible mounting positions are listed in the descriptions for the individual components. - Page 56 High Frequency Modules 4.5 Installation Use of the mounting aid To lift the HF Choke Module from the transport pallet using a crane, shackles according to EN 13889 must be attached to the lifting lugs of the mounting aid. ① Shackles according to EN 13889 with a bolt diameter of approx.
- Page 57 High Frequency Modules 4.5 Installation Heat dissipation It is not necessary to install a separate cold plate cooling to cool the HF Choke Module and HF Damping Module. The modules are cooled through the mounting plate. The mounting plate cooling assumes the internal cooling circuit in the cold plate of the HF Motor Module. Drilling patterns The drilling patterns shown below apply to the High Frequency drive with and without Active Line Module, booksize format.
- Page 58 High Frequency Modules 4.5 Installation Figure 4-10 Drilling pattern for the High Frequency Drive without Active Line Module booksize, all data in mm and (inches) High Frequency Drive System Manual, (SH2), 04/2015, 6SL3097-4AH10-0BP3...
- Page 59 High Frequency Modules 4.5 Installation Mounting on the mounting plate 1. Individually mount the HF Modules one after the other on the mounting plate. Start with the left-hand component. First mount all of the modules of the DC link and the 24 V busbars before connecting them up.
- Page 60 High Frequency Modules 4.5 Installation ① Mounting plate ② M6 hexagon screw ③ Washer ④ Spring washer ⑤ M6 nut, SW10 Tightening torque 10 Nm Figure 4-12 Mounting the High Frequency Drive with a Active Line Module in the booksize format on a mounting plate High Frequency Drive System Manual, (SH2), 04/2015, 6SL3097-4AH10-0BP3...
- Page 61 High Frequency Modules 4.5 Installation ① Mounting plate ② M6 hexagon screw ③ Washer ④ Spring washer ⑤ M6 nut, SW10 Tightening torque 10 Nm Figure 4-13 Mounting the High Frequency Drive on a mounting plate High Frequency Drive System Manual, (SH2), 04/2015, 6SL3097-4AH10-0BP3...
-
Page 62: Electrical Connection
• Only connect safety extra low voltages (PELV or SELV) to 24 V busbars. Additional information and diagrams can be found in the SINAMICS S120 Manual for "Booksize Power Units" (Chapter: Electrical connection for Line Modules and Motor Modules). -
Page 63: Connecting The Busbars
High Frequency Modules 4.6 Electrical connection 4.6.2 Connecting the busbars Before commissioning the drive line-up, connect the busbars between: ● HF Motor Module and HF Choke Module ● HF Choke Module and HF Damping Module Mounting steps 1. Remove the busbar connections from the accessories pack. 2. -
Page 64: Protective Conductor Connection Of The Hf Module
High Frequency Modules 4.6 Electrical connection 4.6.3 Protective conductor connection of the HF module Protective conductor connections for Voltage Protection Module and the motor The protective conductor of the power cables to the Voltage Protection Module and motor are connected to the HF Choke Module as shown below. ①... - Page 65 High Frequency Modules 4.6 Electrical connection Protective conductor connection via the equipotential bonding bar The protective conductor connection between the HF modules must be established using the equipotential bonding bar supplied. The equipotential bonding bar is provided in the accessories pack. The protective conductor connection of the HF module to the equipotential bonding bar of the control cabinet is established through a grounding cable, which is attached at the HF Motor Module.
-
Page 66: Connection Examples
High Frequency Modules 4.7 Connection examples Connection examples 4.7.1 High Frequency Drive with components in the booksize format Figure 4-18 Example for connecting a High Frequency Drive to the line supply via an Active Line Module in the booksize of format with Active Interface Module High Frequency Drive System Manual, (SH2), 04/2015, 6SL3097-4AH10-0BP3... - Page 67 High Frequency Modules 4.7 Connection examples Figure 4-19 Connection example for a High Frequency Drive with booksize infeed High Frequency Drive System Manual, (SH2), 04/2015, 6SL3097-4AH10-0BP3...
-
Page 68: High Frequency Drive With Components In The Chassis Format
High Frequency Modules 4.7 Connection examples 4.7.2 High Frequency Drive with components in the chassis format Figure 4-20 Connection example for a High Frequency Drive with chassis infeed High Frequency Drive System Manual, (SH2), 04/2015, 6SL3097-4AH10-0BP3... -
Page 69: Technical Data
High Frequency Modules 4.8 Technical data Technical data Table 4- 21 Technical data of HF modules Liquid Cooled High Frequency Drive Liquid Cooled 6SL3125-1UE32-2AD0 Output current Rated current (I ACrms Base load current (I Intermittent duty current (I ) 40 % ACrms(Is6) Peak current (I ACrms... -
Page 70: Characteristics
High Frequency Modules 4.8 Technical data High Frequency Drive Liquid Cooled 6SL3125-1UE32-2AD0 Sound pressure level HF Choke Module dB(A) < 73 HF Damping Module dB(A) < 60 Weight HF Motor Module 30.5 HF Choke Module 48.5 HF Damping Module 14.0 = 1.3 x I Default for 400 V line supplies;... - Page 71 High Frequency Modules 4.8 Technical data Figure 4-23 S6 duty cycle with initial load with a duty cycle duration of 600 s Figure 4-24 S6 duty cycle with initial load for a duty cycle duration of 60 s Note The overload factor is a maximum of 1.3 x I Derating characteristics H module Figure 4-25 Output current as a function of the ambient temperature...
- Page 72 High Frequency Modules 4.8 Technical data Figure 4-26 Output current as a function of the installation altitude Figure 4-27 Output current as a function of the coolant temperature If a 225 A HF drive is operated with a pulse frequency of 32 kHz, then the output current must be derated down to 60 % (135 A).
-
Page 73: Voltage Protection Module (Vpm)
Voltage Protection Module (VPM) Description The Voltage Protection Module (VPM) is used to limit the voltage when using synchronous motors. It is directly connected to the HF Choke Module. If the line voltage fails at the maximum motor speed or the pulses at the HF Motor Module are canceled as a result of the power failure, the motor regenerates at a high voltage into the DC link. -
Page 74: Safety Instructions For Voltage Protection Modules
Voltage Protection Module (VPM) 5.2 Safety instructions for Voltage Protection Modules Safety instructions for Voltage Protection Modules WARNING Danger to life if the fundamental safety instructions and remaining risks are not carefully observed The non-observance of the fundamental safety instructions and residual risks stated in Chapter 1 can result in accidents with severe injuries or death. - Page 75 • Please observe the following when using third-party motors: – Carry out a risk analysis. – Ensure that the third-party motors correspond to the electrical properties of the specified Siemens components. – Check the correct functioning of the VPM. WARNING Danger to life when the drive automatically starts up in an uncontrolled fashion If a drive inadvertently starts, this can result in accidents and possibly death.
-
Page 76: Interfaces
Voltage Protection Module (VPM) 5.3 Interfaces Interfaces 5.3.1 Overview Figure 5-1 Interface overview, Voltage Protection Module VPM200 Dynamic (without cover) Note The housing is closed during operation to ensure the electrical terminals are covered. High Frequency Drive System Manual, (SH2), 04/2015, 6SL3097-4AH10-0BP3... - Page 77 Voltage Protection Module (VPM) 5.3 Interfaces Figure 5-2 VPM 200 Dynamik connection points Table 5- 2 Short designations Short designation Explanation Cable 1 or 2 from the HF Choke Module Connection bolts at the busbar U Connection bolts at the busbar V Connection bolts at the busbar W , PE , PE...
-
Page 78: X3 Signaling Contact
Control Unit, which controls this spindle. If an armature short-circuit occurs, the pulses of the axis involved must remain inhibited. To do this, the connected digital input is interconnected to control bit OFF2 (pulse inhibit) (see SINAMICS S120/S150 List Manual). The signaling interface is operated with +24 V. -
Page 79: Connection Busbars U, V, W, Pe
Voltage Protection Module (VPM) 5.3 Interfaces 5.3.3 Connection busbars U, V, W, PE As far as the power connections to the HF Choke Module are concerned, cables are routed through the cable entry of the Voltage Protection Module and attached to the connection bars inside the unit. -
Page 80: Connection Example
Voltage Protection Module (VPM) 5.4 Connection example Connection example Figure 5-4 Connection example for a shared power cable at the VPM 200 Dynamik Cable lengths The maximum length of the power cable between the HF Choke Module and the Voltage Protection Module is 3 m. -
Page 81: Dimension Drawing
Voltage Protection Module (VPM) 5.5 Dimension drawing Dimension drawing Figure 5-5 Dimension drawing of the Voltage Protection Module VPM 200 Dynamik, all data in mm (inches) High Frequency Drive System Manual, (SH2), 04/2015, 6SL3097-4AH10-0BP3... -
Page 82: Installation
Voltage Protection Module (VPM) 5.6 Installation Installation The Voltage Protection Module is installed in the control cabinet close to the HF Choke Module. Figure 5-6 Mounting dimensions for a Voltage Protection Module VPM 200 Dynamik High Frequency Drive System Manual, (SH2), 04/2015, 6SL3097-4AH10-0BP3... -
Page 83: Electrical Connection
Voltage Protection Module (VPM) 5.7 Electrical connection Electrical connection DANGER Danger of death due to electric shock when live parts are touched Death or serious injury can result when live parts are touched. • Bring the system into a no-voltage condition by opening the main switch. •... -
Page 84: Connecting Signaling Contact X3
Voltage Protection Module (VPM) 5.7 Electrical connection 5.7.1 Connecting signaling contact X3 Signaling contact X3 must be wired before the power cables are connected. Figure 5-7 Connecting terminal X3 of the Voltage Protection Module Note Signaling contact X3 on the Voltage Protection Module is routed via a bistable relay. The relay may shift to the other switching state if subjected to excessive movement during transportation and installation. -
Page 85: Technical Data
Voltage Protection Module (VPM) 5.8 Technical data Technical data Table 5- 5 Technical data, VPM 200 Dynamik 6SN1113–1AA00–1KCx Type of voltage 3-phase pulsed AC voltage, motor EMF Ramp-up time for VPM 1 (from pulse enable) Normal range of the DC link voltage: Lower limit Upper limit Operating range for VPM... - Page 86 Voltage Protection Module (VPM) 5.8 Technical data High Frequency Drive System Manual, (SH2), 04/2015, 6SL3097-4AH10-0BP3...
-
Page 87: Braking Modules
Braking Modules Braking Module Booksize 6.1.1 Description The Braking Module Booksize is always used together with an external braking resistor. It has the following tasks: ● Specific stop of the drives in the event of a line failure (e.g. emergency retraction or EMERGENCY OFF category 1). ●... - Page 88 Braking Modules 6.1 Braking Module Booksize Rapid discharge Furthermore, the Braking Module Booksize can used with a braking resistor to quickly discharge the DC link capacitors The DC link is discharged in a controlled manner via the braking resistor once the infeed unit has been switched off and the line-up has been disconnected from the line supply (e.g.
-
Page 89: Safety Instructions For Braking Modules Booksize
Danger to life through the use of non-approved braking resistors Braking resistors can be damaged when using braking resistors other than those specified in this Manual. • Only use braking resistors approved by Siemens. High Frequency Drive System Manual, (SH2), 04/2015, 6SL3097-4AH10-0BP3... -
Page 90: Interface Description
Braking Modules 6.1 Braking Module Booksize 6.1.3 Interface description 6.1.3.1 Overview Figure 6-1 Interface overview, Braking Module Booksize High Frequency Drive System Manual, (SH2), 04/2015, 6SL3097-4AH10-0BP3... -
Page 91: X1 Braking Resistor Connection
Braking Modules 6.1 Braking Module Booksize 6.1.3.2 X1 braking resistor connection Table 6- 1 X1 braking resistor connection Terminal Designation Technical data Braking resistor connection R1 Continuously short-circuit proof Braking resistor connection R2 Type: Screw terminal 4 (Page 172) Max. cross-section that can be connected: 4 mm Table 6- 2 Braking resistors without a thermostatic switch for Braking Modules Braking resistor... -
Page 92: X21 Digital Inputs/Outputs
● 80 % of the maximum switch on duration of the braking resistor has been reached (I monitoring). ● 80 % of the maximum braking energy of the braking resistor has been reached. ● An incorrect braking resistor is connected (only braking resistors approved by Siemens for this component are automatically identified). Terminal X21.4 - fault The fault can have the following causes: ●... -
Page 93: Connection Example
Braking Modules 6.1 Braking Module Booksize ● Overcurrent trip ● I t monitoring has responded. ● Ground fault/short circuit In the event of an overtemperature, the fault can only be acknowledged with X21.1 = high after a cooling-down time. WARNING Danger to life as a result of a hazardous voltage at terminals X21 Hazardous voltages can be present at terminals X21 in the case of a fault. -
Page 94: Meaning Of The Leds
Note: In the event of an overtemperature, the error cannot be acknowledged until a cooling time has elapsed. DC LINK Only braking resistors approved by Siemens for this – component are identified automatically. The component is not active. Green... -
Page 95: Dimension Drawing
Braking Modules 6.1 Braking Module Booksize 6.1.6 Dimension drawing Figure 6-3 Dimension drawing of Braking Module, all dimensions in mm and (inches) High Frequency Drive System Manual, (SH2), 04/2015, 6SL3097-4AH10-0BP3... -
Page 96: Installation
Braking Modules 6.1 Braking Module Booksize 6.1.7 Installation ① Delivery condition with spacer - mounting depth for drive line-up in booksize format with internal air cooling ② Spacer removed - mounting depth for drive line-up in booksize format with external air cooling Figure 6-4 Methods of installing Braking Modules with/without spacer elements High Frequency Drive... -
Page 97: Technical Data
Braking Modules 6.1 Braking Module Booksize 6.1.8 Technical data 6.1.8.1 Technical data Table 6- 5 Technical data 6SL3100-1AE31-0ABx DC link voltage 510 … 720 DC link capacitance µF ON threshold Electronics power supply 24 (20.4 … 28.8) Electronics current consumption (at 24 V DC) Current carrying capacity DC link busbars 24 V busbars... -
Page 98: Configuration Instructions
Braking Modules 6.1 Braking Module Booksize Table 6- 6 Duty cycles 6SN1113–1AA00–0DA0 6SL3100–1BE31–0AAx Short duty cycle Long duty cycle Short duty cycle Long duty cycle A [s] T [s] 11.5 The following applies when connecting Braking Modules in parallel: = 0.9 x total P of single devices N total = total P... -
Page 99: Braking Module Booksize Compact
Braking Modules 6.2 Braking Module Booksize Compact Braking Module Booksize Compact 6.2.1 Description The Braking Module Booksize Compact is always used together with a braking resistor. It has the following tasks: ● Controlled stop of the drives in the event of a power failure (e.g. - Page 100 Braking Modules 6.2 Braking Module Booksize Compact Rapid discharge Furthermore, the Braking Module Booksize Compact can be used with a braking resistor to quickly discharge the DC link. The DC link is discharged in a controlled manner via the braking resistor once the infeed unit has been switched off and the line-up has been disconnected from the line supply (e.g.
- Page 101 Braking Modules 6.2 Braking Module Booksize Compact Monitoring functions ● Automatic detection of braking resistors without thermostatic switch and corresponding braking power monitoring (only if the "Braking resistor without thermostatic switch" setting is used) ● I t monitoring of the Braking Module ●...
-
Page 102: Safety Instructions For Braking Modules Booksize Compact
Danger to life through the use of non-approved braking resistors Braking resistors can be damaged when using braking resistors other than those specified in this Manual. • Only use braking resistors approved by Siemens. High Frequency Drive System Manual, (SH2), 04/2015, 6SL3097-4AH10-0BP3... -
Page 103: Interface Description
Braking Modules 6.2 Braking Module Booksize Compact 6.2.3 Interface description 6.2.3.1 Overview Figure 6-6 Interface overview, Braking Module Booksize Compact High Frequency Drive System Manual, (SH2), 04/2015, 6SL3097-4AH10-0BP3... -
Page 104: X1 Braking Resistor Connection
Braking Modules 6.2 Braking Module Booksize Compact 6.2.3.2 X1 braking resistor connection Table 6- 7 X1 braking resistor connection Terminal Designation Technical data Braking resistor connection R1 Continuously short-circuit proof Not assigned Braking resistor connection R2 Type: Screw terminal 5 (Page 172) Max. -
Page 105: X21 Digital Inputs/Outputs
Braking Modules 6.2 Braking Module Booksize Compact 6.2.3.3 X21 digital inputs/outputs Table 6- 10 X21 digital inputs/outputs Terminal Designation Technical data DI low: Enable Braking Module Voltage: -3 … +30 V DI high: inhibit/acknowledge Typical current drain: 10 mA at 24 V DC Edge change, high →... -
Page 106: X22 Digital Output/Temperature Switch
Braking Modules 6.2 Braking Module Booksize Compact Terminal X21.4 - fault In the event of an overtemperature fault, l t monitoring, or braking power monitoring, the fault will be acknowledged automatically after a cooling phase. Manual acknowledgment is not necessary! WARNING Danger to life as a result of a hazardous voltage at terminals X21 Hazardous voltages can be present at terminals X21 in the case of a fault. -
Page 107: Dip Switch
Braking Modules 6.2 Braking Module Booksize Compact 6.2.3.5 DIP switch The 4-pin DIP switch is located at the top of the Braking Module and sets the braking resistor being used, the cooling method, and the line voltage. Make the required settings before the Braking Module is mounted in the control cabinet; once the module is mounted, the DIP switch can no longer be accessed from the front. -
Page 108: Connection Examples
Braking Modules 6.2 Braking Module Booksize Compact 6.2.4 Connection examples Braking resistor without thermostatic switch connected to a Braking Module Booksize Compact Figure 6-7 Connection example for Braking Module Booksize Compact and braking resistor without a thermostatic switch Note The digital inputs DI are isolated and are referenced to M_DI (X21.5 and X21.6). The reference point of the digital outputs DO is the ground GND of the 24 V supply. - Page 109 Braking Modules 6.2 Braking Module Booksize Compact Braking resistor with thermostatic switch connected to a Braking Module Booksize Compact Figure 6-8 Connection example for Braking Module Booksize Compact and braking resistor with a thermostatic switch Note The digital inputs (DI) are isolated and are referenced to M_DI (X21.5 and X21.6). The reference point of the digital outputs (DO) is the ground GND of the 24 V supply.
-
Page 110: Meaning Of Leds On The Braking Module Booksize Compact
Braking Modules 6.2 Braking Module Booksize Compact 6.2.5 Meaning of LEDs on the Braking Module Booksize Compact Table 6- 13 Meaning of LEDs on the Braking Module Booksize Compact Color Status Description Remedy READY The electronics power supply is missing or outside the Check the electronics power permissible tolerance range. -
Page 111: Dimension Drawing
Braking Modules 6.2 Braking Module Booksize Compact 6.2.6 Dimension drawing Figure 6-9 Dimension drawing of Braking Module Booksize Compact, all dimensions in mm and (inches) High Frequency Drive System Manual, (SH2), 04/2015, 6SL3097-4AH10-0BP3... -
Page 112: Mounting
Braking Modules 6.2 Braking Module Booksize Compact 6.2.7 Mounting Mounting a Braking Module Booksize Compact with internal air cooling ① Mounting wall ② M6 x 16 screw Hex combination screw or hex screw with spring washer and plain washer Figure 6-10 Mounting a Braking Module Booksize Compact with internal air cooling Tightening torques: 1. - Page 113 Braking Modules 6.2 Braking Module Booksize Compact Mounting a Braking Module Booksize Compact with cold plate ① Threaded bolts M6 ② Cold plate (air or liquid cooling) ③ Heat-conducting foil ④ Washer ⑤ Spring washer ⑥ M6 nut Figure 6-11 Mounting a Braking Module Booksize Compact with cold plate Tightening torques: 1.
-
Page 114: Technical Data
Compact is supplied with heat-conducting foil cut to the right size. Note the mounting position of the heat-conducting foil. Note • Also replace the heat-conducting foil when replacing a component. • Only use heat-conducting foil released or supplied by Siemens. Article No. Heat-conducting foil, 50 mm 6SL3162-6FB01-0AA0 6.2.8... -
Page 115: Characteristic Curves
Braking Modules 6.2 Braking Module Booksize Compact 6.2.8.2 Characteristic curves Duty cycle for braking resistors without a thermostatic switch Figure 6-12 Duty cycle for braking resistors without a thermostatic switch T [s] time period of braking duty cycle A [s] load duration [kW] rated power (continuous power) of the braking resistor [kW] peak power of braking resistor (6 x P Table 6- 15... -
Page 116: Configuration Instructions
Braking Modules 6.2 Braking Module Booksize Compact Table 6- 16 Duty cycles 6SE7018-0ES87-2DC0 6SE7021-6ES87-2DC0 6SE7023-2ES87-2DC0 Duty cycle P Duty cycle 4 x P Duty cycle P Duty cycle 4 x P Duty cycle P Duty cycle 4 x P A [s] T [s] 6.2.9 Configuration instructions... -
Page 117: Braking Resistors
Braking resistors Description A braking resistor is used to dissipate the excess DC link energy in generator operation. Braking resistors are connected to a Braking Module. Resistors are available with and without thermostatic switch with various rated power levels. The thermostatic switch monitors the braking resistors for overtemperature and issues a signal at an isolated contact if the limit value is exceeded. -
Page 118: Safety Instructions For Braking Resistors
Braking resistors 7.2 Safety instructions for braking resistors Connection cables A shielded connection cable (3 m, 3 x 1.5 mm ) is supplied with braking resistor 6SN1113- 1AA00-0DA0. All other braking resistors are supplied without a connection cable. The maximum conductor cross-sections are listed in the technical data. -
Page 119: Dimension Drawings
Braking resistors 7.3 Dimension drawings CAUTION Risk of burns due to high surface temperatures The braking resistor can become very hot. You can get seriously burnt when touching the surface. • Mount the braking resistors so that contact is not possible. If this is not possible, attach a clearly visible and understandable warning notice at hazardous positions. - Page 120 Braking resistors 7.3 Dimension drawings Figure 7-2 Dimension drawing of braking resistor 6SL3100-1BE31-0AA0 where P = 1.5 kW/100 kW, all dimensions in mm and (inches) High Frequency Drive System Manual, (SH2), 04/2015, 6SL3097-4AH10-0BP3...
- Page 121 Braking resistors 7.3 Dimension drawings Braking resistors with a thermostatic switch Figure 7-3 Dimension and installation drawing (roof and wall mounting) of braking resistor 6SE7018-0ES87-2DC0 where = 1.25 kW/7.5 kW, all dimensions in mm and (inches) High Frequency Drive System Manual, (SH2), 04/2015, 6SL3097-4AH10-0BP3...
- Page 122 Braking resistors 7.3 Dimension drawings Figure 7-4 Dimension and installation drawing (roof and wall mounting) of braking resistor 6SE7021-6ES87-2DC0 where = 2.5 kW/15 kW, all dimensions in mm and (inches) High Frequency Drive System Manual, (SH2), 04/2015, 6SL3097-4AH10-0BP3...
- Page 123 Braking resistors 7.3 Dimension drawings ① Thermostatic switch T1 / T2 connection, with connection cross-section 2.5 mm ② Connection for power cable, 2 x M6 bolts Figure 7-5 Dimension and installation drawing (floor and wall mounting) of braking resistor 6SE7023-2ES87-2DC0 where = 5 kW/30 kW, all dimensions in mm and (inches) High Frequency Drive System Manual, (SH2), 04/2015, 6SL3097-4AH10-0BP3...
-
Page 124: Technical Data
Braking resistors 7.4 Technical data Technical data Table 7- 1 Technical data for braking resistors without a thermostatic switch Unit 6SN1113–1AA00–0DA0 6SL3100–1BE31–0AAx Resistance R Ω Rated power P Peak power P Max. Energy consumption Power cable connection Included in the scope of delivery; Screw terminal, 4 mm length 3 m, 3 x 1.5 mm Weight... -
Page 125: Characteristic Curves
Braking resistors 7.4 Technical data 7.4.1 Characteristic curves Duty cycle for braking resistors without a thermostatic switch Figure 7-6 Duty cycle for braking resistors without a thermostatic switch T [s]: Period duration of braking duty cycle A [s]: Load duration [W]: Rated power (continuous power rating) of the braking resistor [W]: Peak power of braking resistor (6 x P Table 7- 3... - Page 126 Braking resistors 7.4 Technical data Duty cycles for braking resistors with a thermostatic switch Figure 7-7 Duty cycles for braking resistors with a thermostatic switch T [s]: Period duration of braking duty cycle A [s]: Load duration [W]: Rated power (continuous power rating) of the braking resistor [W]: Peak power of braking resistor (6 x P 4 x P [W] = power permitted every 90 s for 20 s...
-
Page 127: Control Supply Module (Csm)
Control Supply Module (CSM) Description The Control Supply Module provides an output voltage of 24 V - 28.8 V DC. The output voltage can be adjusted using an integrated potentiometer. In normal operation, the Control Supply Module is supplied from the line voltage. When the power fails, the module automatically changes over to supply from the DC link. -
Page 128: Safety Instructions For Control Supply Modules
Control Supply Module (CSM) 8.2 Safety instructions for Control Supply Modules Safety instructions for Control Supply Modules WARNING Danger to life if the fundamental safety instructions and remaining risks are not carefully observed If the fundamental safety instructions and remaining risks in Chapter 1 (Page 17) are not observed, accidents involving severe injuries or death may occur. - Page 129 Control Supply Module (CSM) 8.2 Safety instructions for Control Supply Modules WARNING Fire hazard due to overheating because of inadequate ventilation clearances Inadequate ventilation clearances can cause overheating with a risk for personnel due to smoke and fire. This can also result in increased failure rates and a shorter service life of the component.
-
Page 130: Interface Description
Control Supply Module (CSM) 8.3 Interface description Interface description 8.3.1 Overview Figure 8-1 Interface overview, Control Supply Module High Frequency Drive System Manual, (SH2), 04/2015, 6SL3097-4AH10-0BP3... -
Page 131: X1 Line Connection
Control Supply Module (CSM) 8.3 Interface description 8.3.2 X1 line connection Table 8- 1 X1 line connection Terminal Technical data Supply voltage: 3 AC 380 V … 480 V, 50 / 60 Hz Type: Screw terminal 4 (Page 172) Max. cross-section that can be connected: 4 mm Tightening torque: 0.5 …... -
Page 132: X24 24 V Terminal Adapter
Control Supply Module (CSM) 8.3 Interface description Table 8- 3 Installing the signaling contact Signaling contact without terminal connector in Signaling contact, complete with terminal the delivery condition connector 8.3.4 X24 24 V terminal adapter Table 8- 4 X24 24 V terminal adapter Terminal Designation Technical data... -
Page 133: S1 Dip Switch
Control Supply Module (CSM) 8.3 Interface description 8.3.5 S1 DIP switch Table 8- 5 DIP switch S1 Terminal Designation Technical data Changeover switch, single Left: Single operation operation / parallel operation Right: Parallel operation Dummy contact Changing over the output characteristic (not used) It is only permissible to changeover when in the no-voltage state. -
Page 134: Connection Examples
Control Supply Module (CSM) 8.4 Connection examples Connection examples 8.4.1 General information The Control Supply Module is connected to the line supply (3-ph. 380 V AC -10 % to 480 V AC +10 %) via interface X1 (screw terminals 0.2 to 4 mm ). - Page 135 Control Supply Module (CSM) 8.4 Connection examples Figure 8-3 Connection example for Control Supply Module in single operation High Frequency Drive System Manual, (SH2), 04/2015, 6SL3097-4AH10-0BP3...
-
Page 136: Meaning Of The Leds
Control Supply Module (CSM) 8.5 Meaning of the LEDs Meaning of the LEDs Table 8- 6 Meaning of the LEDs on the Control Supply Module Color Status Description READY The electronics power supply is outside the permissible tolerance range or the temperature prewarning is active. Green Continuous light Ready... -
Page 137: Dimension Drawing
Control Supply Module (CSM) 8.6 Dimension drawing Dimension drawing Figure 8-4 Dimension Control Supply Module, all dimensions in mm and (inches) High Frequency Drive System Manual, (SH2), 04/2015, 6SL3097-4AH10-0BP3... -
Page 138: Installation
Control Supply Module (CSM) 8.7 Installation Installation ① Delivered with spacer - mounting depth for drive line-up in booksize format with internal air cooling ② Spacer removed - mounting depth for drive line-up in booksize format with external air cooling Figure 8-5 Methods of installing the Control Supply Module with and without spacer The Control Supply Module can be attached to the control cabinet panel with or without... -
Page 139: Technical Data
Control Supply Module (CSM) 8.8 Technical data Technical data 8.8.1 Technical data Table 8- 7 Technical data 6SL3100-1DE22-0AA1 Unit Value Input data, AC input Line voltage 3 AC 380 … 480 ± 15 % Line frequency 45 … 66 Rated input current Rated value (at V ≤... -
Page 140: Characteristics
Control Supply Module (CSM) 8.8 Technical data 6SL3100-1DE22-0AA1 Unit Value Fuses (UL) Class RK1, listed JDDZ Rated current: resulting rated short-circuit current SCCR at 480 V AC: Cooling method Internal air cooling Max. ambient temperature without derating ° C ≤ 40 with derating as of 26 V output voltage °... -
Page 141: Dc Link Adapter
DC link adapter Description The DC link adapter is used to directly feed the DC link voltage in the drive line-up. It is required for the High Frequency Drive if the infeed is realized via an Active Line Module in the chassis format. - Page 142 DC link adapter 9.2 Safety instructions for the DC link adapter WARNING Risk of fire and device damage as a result of ground fault/short-circuit The DC link connecting cables must be routed so that a ground fault or short circuit can be ruled out.
-
Page 143: Interface Description
DC link adapter 9.3 Interface description Interface description 9.3.1 Overview ① Installed DC link adapter Figure 9-1 HF Damping Module with DC link adapter 9.3.2 DC link connection Table 9- 1 DC link connection Terminal Function Technical data DC link positive Current carrying capacity: 150 A connection cross-section: 35 …... -
Page 144: Dimension Drawing
DC link adapter 9.4 Dimension drawing Dimension drawing Figure 9-2 Dimension drawing of the HF Damping Module with DC link adapter, all dimensions in mm and (inches) High Frequency Drive System Manual, (SH2), 04/2015, 6SL3097-4AH10-0BP3... -
Page 145: Installation
DC link adapter 9.5 Installation Installation Required tools: ● Slot-head screwdriver (1 x 5.5) for releasing the protective cover ● Torx screwdriver T20 for DC link screws (Torx slot) Table 9- 2 Installation of the DC link adapter at the HF Damping Module 1. -
Page 146: Electrical Connection
DC link adapter 9.6 Electrical connection DANGER Danger to life through electric shock when touching the DC-link busbars Touching live components results in death or severe injury. • Mount the busbars and clips of the DC link as well as the DC link adapter, so that after closing the DC link cover they cannot be touched. -
Page 147: Fixing The Cables To The Rear Cabinet Panel
DC link adapter 9.6 Electrical connection 9.6.2 Fixing the cables to the rear cabinet panel 1. Fix the DC link connecting cables directly next to the last component at the rear control cabinet panel. Use the C-profile rails and the appropriate cable clamps from the Rittal company. -
Page 148: Cable Connection And Shield Support
DC link adapter 9.6 Electrical connection 9.6.3 Cable connection and shield support In order to simplify installing the DC link connecting cables at the DC link adapter, first fix the cables to the control cabinet panel (also see Chapter Fixing cables to the control cabinet panel (Page 147)). - Page 149 DC link adapter 9.6 Electrical connection 5. Tighten the screw of the hose clamp using a 6. Fix the second core of the DC link connecting suitable screwdriver. cable to the profile rail using a cable clamp. Connect the cable for the DCP connection as described under Points 2 to 5.
-
Page 150: Technical Data
DC link adapter 9.7 Technical data Technical data Table 9- 4 Technical specifications DC link adapter 6SL3162-2BM01-0AA0 Unit Value Current carrying capacity Conductor cross-section mm² 35 … 95 Stripped length Tightening torque Terminals DC link busbars High Frequency Drive System Manual, (SH2), 04/2015, 6SL3097-4AH10-0BP3... -
Page 151: Configuring
Features 10.1.1 Speed limitation The SINAMICS S120 High Frequency Drive was developed for the operation of high-speed synchronous and induction motors. In order to minimize the motor losses that occur, HF Drive operates with an output filter (HF Sine Filter Module), which significantly reduces the pulse-frequency components of the inverter output voltage at the motor terminals. - Page 152 Configuring 10.1 Features Calculating the maximum speed for synchronous and induction motors Table 10- 2 Overview of parameters to calculate the speed Parameter Meaning r0297 Overvoltage threshold DC link 820 V p0233 Filter inductance, 0.036 mH p0234 Filter capacitance [µF] Without additional capacitance With additional capacitance 16 kHz...
- Page 153 Configuring 10.1 Features HF Drive without VPM ● Synchronous motor, rotary ● Linear motor ● Induction motor The higher value from the two calculations indicates the maximum motor speed. HF Drive with VPM ● Synchronous motor Note Minimum value of the motor leakage inductance The motor leakage inductance/armature inductance, including series inductance (L_motor), must not be less than 2 •...
-
Page 154: Star-Delta Or Motor Changeover
Configuring 10.1 Features Decision matrix to use the appropriate HF Drive The basis of this decision matrix is the maximum speed of the connected motor. Take into account the series inductance, if L_motor < 2 • p0233, so that L_motor + p 0353 ≥ 2 • p0233. Is the output frequency <... -
Page 155: Pole Position Identification
Before commissioning the High Frequency Drive for the first time, check that all of the connected components are ready for operation. To do this, use the checklists that you can find in the SINAMICS S120 Commissioning Manual (IH1) in Chapter: "Preparing for commissioning / checklists for commissioning SINAMICS S": ●... -
Page 156: Drive-Cliq Topology At The High Frequency Drive
Damage or malfunctions can occur on the devices or system when DRIVE-CLiQ cables are used that are either incorrect or have not been approved for this purpose. • Only use suitable DRIVE-CLiQ cables that have been approved by Siemens for the particular application. - Page 157 Configuring 10.2 Preconditions for commissioning High Frequency Drive with 32 kHz Figure 10-2 DRIVE-CLiQ topology at the High Frequency Drive (32 kHz) DRIVE-CLiQ interface assignment Table 10- 3 Assignment of the DRIVE-CLiQ interfaces at the HF Motor Module DRIVE-CLiQ interface Connection with X200 X101/X102/X103/X100 of the Control Unit...
-
Page 158: Drive-Cliq Topology At The Hf Line-Up
Configuring 10.2 Preconditions for commissioning 10.2.4 DRIVE-CLiQ topology at the HF line-up To operate a High Frequency Drive with an NX module, the topology depends on the pulse frequency. An overview is shown in the table. Pulse frequency Module Possible number of HF Drives 16 kHz NX15 2 and infeed (optional) -
Page 159: Commissioning With Sinumerik Operate
Configuring 10.3 Commissioning with SINUMERIK Operate Figure 10-4 DRIVE-CLiQ topology for one HF Drive 32 kHz (31.25 µs) with Active Line Module and NX module 10.3 Commissioning with SINUMERIK Operate 10.3.1 Preconditions For commissioning High Frequency Drive with SINUMERIK Operate, the following preconditions must be met: ●... -
Page 160: Workflow
Configuring 10.3 Commissioning with SINUMERIK Operate 10.3.2 Workflow The commissioning of the HF Drive corresponds to the standard commissioning via HMI. A detailed description is provided in the SINUMERIK commissioning manual. 1. From the user interface in the "Startup" operating area, initiate the automated commissioning of the drive system. -
Page 161: Displaying The Configuration/Topology
Configuring 10.3 Commissioning with SINUMERIK Operate 10.3.3 Displaying the configuration/topology To show the configuration and the topology at the user interface, a High Frequency Drive with a pulse frequency of 16 kHz connected to an NX15.3 has been commissioned. Configuration view To call the configuration of the HF line-up, at the user interface in the "Startup"... - Page 162 Configuring 10.3 Commissioning with SINUMERIK Operate Topology display In order to show the HF line-up in the target topology that has been read out, at the user interface in the "Startup" operating area, change to "Drive system" > "Drive unit" > "Topology". The High Frequency drive is displayed in the "Topology"...
- Page 163 Configuring 10.3 Commissioning with SINUMERIK Operate Figure 10-7 High Frequency Drive in the topology display (part 2) High Frequency Drive System Manual, (SH2), 04/2015, 6SL3097-4AH10-0BP3...
-
Page 164: Overview Of Important Parameters
All alarm and fault messages are displayed on the operator panel. Detailed information on the displayed alarm and fault messages can be found in the SINUMERIK Diagnostics Manual, in the SINAMICS S120/S150 List Manual and in the online help for the control system. -
Page 165: Cabinet Design And Emc
When operating components in the chassis and booksize formats, the information provided in these manuals regarding cabinet design and EMC apply: ● SINAMICS S120 Manual for Booksize Power Units (GH2) ● SINAMICS S120 Manual for Chassis Power Units (GH3) 11.2... -
Page 166: Dc Supply Voltage
Cabinet design and EMC 11.3 24 V DC supply voltage WARNING Danger to life through electric shock due to unconnected cable shields Hazardous touch voltages can occur through capacitive cross-coupling due to unconnected cable shields. • Connect cable shields and unused conductors of power cables (e.g. brake conductors) at least on one side to the grounded housing potential. - Page 167 Detailed information on supplying components with 24 V DC can be found in these manuals: ● SINAMICS S120 Manual for Chassis Power Units (GH3) ● SINAMICS S120 Manual for Booksize Power Units (GH2)
-
Page 168: 24 V Power Supply And Connection Of Components
Cabinet design and EMC 11.3 24 V DC supply voltage 11.3.2 24 V power supply and connection of components Active Line Modules booksize, HF modules and DC link components are connected to the 24 V DC power supply via the integrated 24 V DC busbars. The current carrying capacity of these busbars is 20 A.The 24 V supply can be realized in various ways: Using a Control Supply Module When a Control Supply Module is used, the 24 V supply can be directly established via the... -
Page 169: Typical 24 V Current Consumption Of The Components
Typical 24 V current consumption of the components A separate 24 V power supply must be used for the SINAMICS S120 drive line-up. The following table can be used to calculate the 24 V DC power supply. The values for typical current consumption are used as a basis for configuration. -
Page 170: Selecting Power Supply Units
Cabinet design and EMC 11.3 24 V DC supply voltage 11.3.4 Selecting power supply units It is recommended that the devices in the following tables are used. Table 11- 2 SITOP Power modular Rated output Phases Rated input voltage [V] Short-circuit current [A] Article No. -
Page 171: Connection System
Cabinet design and EMC 11.4 Connection system 11.4 Connection system 11.4.1 Connectable conductor cross-sections for line supply and power cables of the booksize components Table 11- 5 Connectable cable cross-sections: Line feeder cable / motor cable Connection cross-section [mm Component Terminal type HF Choke Module Threaded bolts M8/13 Nm... -
Page 172: Screw Terminals
Cabinet design and EMC 11.4 Connection system 11.4.2 Screw terminals The type of screw terminal can be taken from the interface description of the particular component. Table 11- 6 Screw terminals Screw terminal type Connectable cable cross- Rigid, flexible 0.08 … 1.5 mm sections With wire end ferrule, without plastic sleeve 0.25 …... -
Page 173: Cable Lugs
Cabinet design and EMC 11.4 Connection system 11.4.3 Cable lugs Figure 11-1 Dimension drawing of cable lugs Table 11- 7 Dimensions of cable lugs Screw/bolt Cable cross-section [mm] [mm] [mm] [mm] [mm] [mm] [mm] [mm] 16.5 High Frequency Drive System Manual, (SH2), 04/2015, 6SL3097-4AH10-0BP3... -
Page 174: Protective Connections And Equipotential Bonding
Cabinet design and EMC 11.5 Protective connections and equipotential bonding 11.5 Protective connections and equipotential bonding Protective connections The SINAMICS S Booksize drive system is designed for use in cabinets with a PE conductor connection. The protective conductor connection of the SINAMICS components must be connected to the protective conductor connection of the control cabinet as follows: Table 11- 8 Conductor cross-sections for copper protective connections... - Page 175 Cabinet design and EMC 11.5 Protective connections and equipotential bonding WARNING Danger of death caused by high discharge currents when the external protective conductor is interrupted Drive components conduct high discharge currents via the protective conductor. When the protective conductor is interrupted, touching live components can result in electric shock, which can lead to death or serious injuries.
-
Page 176: Arrangement Of The Devices
11.7 Cooling circuit and coolant properties The cooling circuit is essentially designed as described in the following manual: ● SINAMICS S120 Manual for Booksize Power Units In the corresponding chapters you will also find information on coolant properties. Note Special features of the High Frequency Drive •... -
Page 177: Service And Maintenance
Service and maintenance 12.1 Replacing the fan 12.1.1 Safety instructions for replacing a fan Note • When replacing the fan, you must observe the ESD regulations (Page 21). • Only qualified personnel are permitted to install spare parts. DANGER Danger of death when live parts are touched The fan must be in a no-voltage and disconnected state when it is replaced. - Page 178 Service and maintenance 12.1 Replacing the fan ① Fans (2x) ② Connecting plug ③ Fan support ④ Oval head screws (2x), M4, Torx T20 ⑤ Fan cover ⑥ Countersunk head screws (4x), M4, Torx T20 Figure 12-1 Remove the fans at the HF Choke Module Installing the fan 1.
-
Page 179: Replacing The Fan At The Hf Damping Module
Service and maintenance 12.1 Replacing the fan 12.1.3 Replacing the fan at the HF Damping Module Removing fans 1. Remove the HF Damping Module from the drive line-up. 2. Remove the retaining screws from the fan support using a Torx T20 screwdriver. 3. -
Page 180: Recycling And Disposal
Service and maintenance 12.2 Recycling and disposal 12.2 Recycling and disposal Dispose of the product according to the applicable national regulations. The products described in this Equipment Manual are extensively recyclable on account of the low-toxic composition of the materials used. To recycle and dispose of your old device in an environmentally friendly way, please contact a company that disposes of electronic waste. -
Page 181: Appendix
Appendix List of abbreviations High Frequency Drive System Manual, (SH2), 04/2015, 6SL3097-4AH10-0BP3... - Page 182 Appendix A.1 List of abbreviations High Frequency Drive System Manual, (SH2), 04/2015, 6SL3097-4AH10-0BP3...
- Page 183 Appendix A.1 List of abbreviations High Frequency Drive System Manual, (SH2), 04/2015, 6SL3097-4AH10-0BP3...
- Page 184 Appendix A.1 List of abbreviations High Frequency Drive System Manual, (SH2), 04/2015, 6SL3097-4AH10-0BP3...
- Page 185 Appendix A.1 List of abbreviations High Frequency Drive System Manual, (SH2), 04/2015, 6SL3097-4AH10-0BP3...
- Page 186 Appendix A.1 List of abbreviations High Frequency Drive System Manual, (SH2), 04/2015, 6SL3097-4AH10-0BP3...
- Page 187 Appendix A.1 List of abbreviations High Frequency Drive System Manual, (SH2), 04/2015, 6SL3097-4AH10-0BP3...
- Page 188 Appendix A.1 List of abbreviations High Frequency Drive System Manual, (SH2), 04/2015, 6SL3097-4AH10-0BP3...
- Page 189 Appendix A.1 List of abbreviations High Frequency Drive System Manual, (SH2), 04/2015, 6SL3097-4AH10-0BP3...
-
Page 190: Documentation Overview
Appendix A.2 Documentation overview Documentation overview High Frequency Drive System Manual, (SH2), 04/2015, 6SL3097-4AH10-0BP3... -
Page 191: Index
Index Cooling clearances High Frequency Drive, 55 Cooling method HF Motor Module, 25 24 V connector, 168 HF Sine Filter Module, 25 Current consumption (24 V DC), 169 Braking Module Booksize, 87 Connection example, 93 DC link Braking Module Booksize Compact, 99 Busbars, 62 Connection example for braking resistor with a DC link adapter, 141... - Page 192 Index Example of connection for booksize infeed, 67 Fault messages, 164 Electrical connection, 148 Features, 31 Equipotential bonding bar, 65 Installation, 55 High Frequency Drive, 62, 63 Line connection booksize, 29 Voltage Protection Module, 83 Line connection for booksize infeed, 66 Equipotential bonding, 174 Line connection, chassis, 30 Equipotential bonding bar...
- Page 193 Index Pole position identification, 155 High Frequency Drive, 155, 157 Speed calculation, 152 NX module, 158 Speed limitation, 151 Star-delta changeover, 154 Synchronous motor, 151, 155 Usage matrix HF Drive, 154 Usage matrix Mounting High Frequency Drive, 154 Braking Module Booksize Compact, 112 Control Supply Module, 138 Voltage Protection Module Connection examples, 80...