Honeywell 8680i User Manual
Wearable mini mobile computer
Hide thumbs
Also See for 8680i:
- User manual (44 pages) ,
- Quick start manual (20 pages) ,
- Quick start manual (17 pages)
Table of Contents
Table of Contents
Troubleshooting

Related Manuals for Honeywell 8680i


Summary of Contents for Honeywell 8680i
- Page 1 8680i Wearable Mini Mobile Computer User Guide...
- Page 2 Disclaimer Honeywell International Inc. (“HII”) reserves the right to make changes in specifications and other information contained in this document without prior notice, and the reader should in all cases consult HII to determine whether any such changes have been made. The information in this publication does not represent a commitment on the part of HII.
-
Page 3: Table Of Contents
About This Manual......................... 1 Unpack Your Device........................1 8680i Overview..........................2 Use the 8680i with a Triggered Ring Wearable Accessory ..........2 Attach the 8680i to a Triggered Ring Wearable Accessory ........2 Remove Bottom Latch Plate ...................... 6 Reading Technique........................6 Center the Aimer ........................ - Page 4 Enter a Bluetooth PIN......................15 Virtual Keyboard ........................16 Pair with a Honeywell Vehicle Mount Computer.............16 Pair with a Honeywell Communication and Charge Base or Access Point...17 Pair with a Vocollect Device.....................18 Configure the 8680i with EZConfig for Scanning ............19 Connect the 8680i to WiFi ....................20 Menu Bar Code Security Settings ..................21...
- Page 5 Beeper Pitch – Good Read ....................43 Vibrate – Good Read......................43 Beeper Pitch – Error ......................44 Beeper Duration – Good Read..................44 LED – Good Read........................45 Number of Beeps – Good Read..................45 Number of Beeps – Error ....................45 Good Read Delay........................46 8680i User Guide...
- Page 6 Preferred Symbology Default ...................55 Output Sequence Overview .....................55 Output Sequence Editor.....................55 To Add an Output Sequence .....................56 Other Programming Selections..................56 Enter Output Sequence......................59 Partial Sequence ........................59 Require Output Sequence ....................61 Good Read Tone - Output Sequences................62 Multiple Symbols .........................63 8680i User Guide...
- Page 7 Show Data Format ........................74 Add a Data Format........................74 Other Programming Selections ..................75 Data Format Editor Commands .....................76 Move Commands........................82 Search Commands........................83 Miscellaneous Commands ....................86 Data Formatter..........................89 Data Format Non-Match Error Tone................90 Primary/Alternate Data Formats ...................91 Single Scan Data Format Change...................91 8680i User Guide...
- Page 8 UPC-E1 ............................120 EAN/JAN-13 ..........................120 ISBN Translate........................127 EAN/JAN-8 ..........................127 MSI..............................129 GS1 DataBar Omnidirectional..................... 131 GS1 DataBar Limited ......................132 GS1 DataBar Expanded ......................132 Trioptic Code..........................133 Codablock A ..........................133 Codablock F ..........................134 8680i User Guide...
- Page 9 Chapter 7 - Imaging Commands ...............155 Single-Use Basis ........................155 Command Syntax........................155 Image Snap - IMGSNP......................156 IMGSNP Modifiers ......................156 Image Ship - IMGSHP ......................159 IMGSHP Modifiers ......................160 Image Size Compatibility....................168 Intelligent Signature Capture - IMGBOX.................169 Signature Capture Optimize ..................169 IMGBOX Modifiers ......................170 8680i User Guide...
- Page 10 Text Color - Foreground Line 1 ..................206 Text Color - Foreground Line 2 ..................206 Text Color - Background ....................206 Screen Display Settings ......................207 Backlight Level........................207 Backlight Timeout......................207 Scan Time..........................207 Button Notifications......................208 viii 8680i User Guide...
- Page 11 Language Setting.......................208 Icon Bar...........................209 Chapter 11 - Product Specifications............211 8680i Wearable Mini Mobile Computer................211 MB4-SCN02 Charge Base Product Specifications .............213 MB4-BAT-SCN02 Charge Base Product Specifications ...........213 Required Safety Labels......................214 Chapter 12 - Maintenance and Troubleshooting ........217 Repairs............................217 Maintenance ..........................217 Clean the Scanner ......................217 Clean the Window or Display ..................217...
- Page 12 8680i User Guide...
-
Page 13: Customer Support
Honeywell International Inc. provides service for all of its products through service centers throughout the world. To obtain warranty or non-warranty service, return your product to Honeywell (postage paid) with a copy of the dated purchase record. To learn more, go to www.honeywellaidc.com... - Page 14 8680i User Guide...
-
Page 15: Chapter 1 - Get Started
CHAPTER GET STARTED About This Manual This User Guide provides installation and programming instructions for the 8680i wearable mini mobile computer. Product specifications, dimensions, warranty, and customer support information are also included. Honeywell devices are factory programmed for the most common terminal and communications settings. -
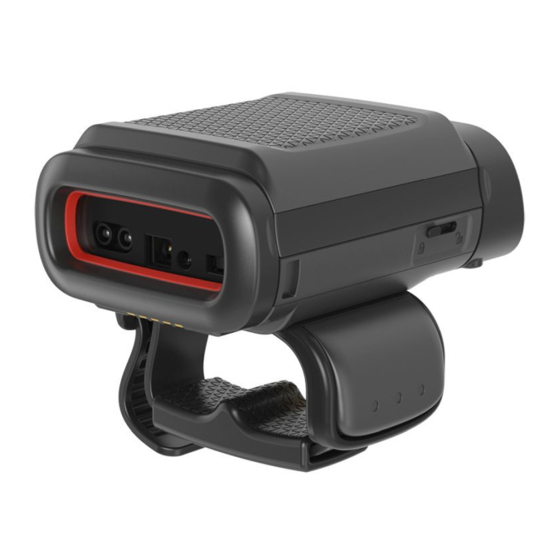
Page 16: 8680I Overview
The 8680i module can be attached to a triggered ring. Attach the 8680i to a Triggered Ring Wearable Accessory 1. Turn over the 8680i and line up the 2 longer tabs of the bottom plate (supplied with the triggered ring) with the front edge of the scanner. - Page 17 4. Place the finger strap in the correct orientation (right or left hand), and push into the bottom plate. The spring latch locks into place. 5. Place the 8680i on your hand. 8680i User Guide...
- Page 18 6. Pull the finger strap to secure it and tuck the excess strap length into the finger guide channel. 7. Press the trigger to power up the scanner. The battery, WiFi, and Bluetooth status appear in the window. Wrist Position When Scanning Warning: Do not stare directly into the laser beam. 8680i User Guide...
- Page 19 Right or Left Handed Operation To release the triggered ring, turn over the 8680i. Slide the spring latch forward to release the triggered ring. Turn the finger strap around and snap it into place to change the operation to the correct hand.
-
Page 20: Remove Bottom Latch Plate
The aiming pattern is smaller when the 8680i is closer to the code and larger when it is farther from the code. Symbologies with smaller bars or elements (mil size) should be read closer to the unit. Symbologies with larger bars or elements (mil size) should be read farther from the unit. -
Page 21: Battery And Charge Information
MB4/MB12-SCN02 Charging Station must be purchased separately. Replace the Battery When the battery is low, the 8680i beeps and vibrates and the window shows a Bat- tery Low warning. You can also press both the right and left buttons at any time to view the battery’s charge status. -
Page 22: Proper Disposal Of The Battery
Do not incinerate the battery or dispose of the battery with general waste materials. You may send the 8680i’s battery to us. (postage paid). The ship- per is responsible for complying with all federal, state, and local laws and regulations related to the packing, labeling, manifesting, and shipping of spent batteries. - Page 23 Firmly press the 8680i straight down into the battery charging pocket. The LED to the left of the pocket lights up in white when the 8680i is properly inserted. It is important that 8680is are inserted into the charging pocket correctly. Inserting the battery incorrectly could result in damage to the 8680i or the charger.
- Page 24 While charging, the red LED on the battery charger indicates the battery has a low charge, yellow indicates a moderate charge, and green indicates the battery has been fully charged and can be removed. 8680i User Guide...
-
Page 25: User Window
Flashing Bluetooth Bluetooth Attempting Signal icon to Connect WiFi On - Weak Signal Bluetooth On and Connected WiFi On - Poor Signal Bluetooth On and Disconnected WiFi On and Bluetooth - No Disconnected Connection WiFi - No Connection 8680i User Guide... -
Page 26: Connect The 8680I To Your Network
2. Set your host device so it searches for other Bluetooth devices. (Refer to your host device’s User’s Guide for pairing instructions.) 3. Once your host device has located the scanner, select the 8680i scanner name from the list displayed. -
Page 27: Disconnect From The Host
Pair with a PC or Laptop Bluetooth: HID Keyboard Mode In this mode, the 8680i pairs with a Bluetooth device using a HID keyboard. 1. Scan a Bluetooth HID Keyboard Connect bar code below. * Bluetooth HID Keyboard... -
Page 28: Pair With Bluetooth Low Energy (Ble) Devices
Serial BLE Connect Pair with an Android™ Mobile Device Tap and Pair You can pair your Android™ phone with the 8680i by touching the devices together. 1. Scan the NFC On bar code with the 8680i. NFC On *NFC Off 2. -
Page 29: Enter A Bluetooth Pin
1. Scan the bar code below. Bluetooth HID Keyboard Connect Bluetooth HID Keyboard Connect 2. On the mobile device, the 8680i scanner is shown as a keyboard. Click on it to pair. Note: See Enter a Bluetooth PIN on page 15 if your host device displays a PIN. -
Page 30: Virtual Keyboard
Virtual Keyboard Once your 8680i has been connected directly to a smart phone or laptop, you can toggle the virtual keyboard on your device using the 8680i trigger. If you have paired with an Apple device, the on-screen keyboard is activated by pressing the 8680i trigger twice, quickly. -
Page 31: Pair With A Honeywell Communication And Charge Base Or Access Point
The Bluetooth symbol appears in the user window when the 8680i pairs with a host. Once the 8680i battery is charged and you have paired it to a host device, you may begin scanning bar codes. Verify the 8680i operation by scanning a bar code... -
Page 32: Pair With A Vocollect Device
1. Scan the Scanner Reconnect Mode bar code below. Scanner Reconnect Mode 2. Configure the 8680i with the termination characters used for your workflow. This is often a carriage return and line feed, which can be programmed by 8680i User Guide... -
Page 33: Configure The 8680I With Ezconfig For Scanning
{FNC3} LnkB, followed by 12 digits, like the sample below. 5. The Bluetooth symbol changes from crossed out or flashing to continuously lit in the user window status screen when the 8680i pairs with a host. (See WiFi and Bluetooth Status.) Once the 8680i battery is charged and you have paired... -
Page 34: Connect The 8680I To Wifi
Note: WiFi capability is only supported by the advanced version of the 8680i. The 8680i goes into sleep mode when there is no activity for 10 seconds. It must be awake to connect to WiFi. Press the trigger to make sure it is awake for this process. -
Page 35: Menu Bar Code Security Settings
Note: The TCP Port is always 3390. 6. Click on either Create 1D Wifi Bar Code or Create 2D Wifi Bar Code. 7. Print the bar code and scan it with the 8680i to connect to the WiFi network. Menu Bar Code Security Settings Honeywell scanners are programmed by scanning menu bar codes or by sending serial commands to the 8680i. -
Page 36: Reset Custom Defaults
Custom Defaults bar code below. This is the recommended default bar code for most users. It resets the 8680i to the custom default settings. If there are no cus- tom defaults, it resets the 8680i to the factory default settings. Any settings that have not been specified through the custom defaults are defaulted to the factory default settings. -
Page 37: Chapter 2 - Wireless System Operation
When using multiple 8680is, you may want to change the PIN so each 8680i is uniquely identified. The PIN code must be between 1 and 16 characters. To change the PIN for the 8680i, scan the bar code below and then scan the appro- priate numeric bar codes from the Programming Chart, beginning on page 235. -
Page 38: Auto Reconnect Mode
8680i does not attempt to reconnect to a host. Pressing the trigger, scanning a host linking bar code, or pairing the 8680i with a host resets the attempt count and the 8680i tries to link again. -
Page 39: Relink Time-Out
Relink Time-Out controls the idle time between relink attempts. An attempt to link the 8680i to a host typically lasts up to 5 seconds. This is the time when the 8680i is actually attempting a contact. Relink Time-Out controls the amount of time, in seconds, that elapses between the end of one connection attempt and the start of the next. -
Page 40: Communication Between The 8680I And The Host
Maximum Link Attempts set to 15 Other values at default setting When the 8680i goes out of range, no action is taken to relink. When the trigger is pressed, 15 attempts are made to link to the host. Each attempt consists of approx- imately 5 seconds of active time followed by 3 seconds of idle time. -
Page 41: 8680I Is Out Of Range
Whenever the 8680i can’t communicate with the host for a few seconds, it is out of range. If the 8680i is out of range and you scan a bar code, the 8680i issues an error tone indicating that there was no communication with the host. -
Page 42: Unlink A Scanner
Unlink Scanner Override Locked Scanner If you need to replace a broken or lost 8680i that is linked to a host, scan the Over- ride Locked Scanner bar code below with a new 8680i and pair that 8680i with the host. -
Page 43: Scanner Power Time-Out Timer
2 chirps, then 1 chirp, high pitch Scanner Alarm Type Scanner Power Time-Out Timer When there is no activity within a specified time period, the 8680i enters low power mode. Scan the appropriate power time-out bar code to change the time-out dura- tion (in seconds). -
Page 44: Flexible Power Management
7200 seconds Note: When the 8680i is in power down mode, press the trigger to power the unit back up. There is a set of power up beeps and a delay of up to a few seconds for the radio to join. -
Page 45: Batch Mode
Scan one of the bar codes below to set the 8680i’s power output to Full Power (100%), Medium Power (35%), Medium Low Power (5%), or Low Power (1%). Default = Full Power. * Full Power Medium Power Medium Low Power... -
Page 46: Batch Mode Beep
RAM Storage: The scanner will not power down while it contains data that has not been transmitted to the base or Access Point, even if it reaches a power down time- out. However, if the scanner runs out of power, it will power down and the data will be lost. 8680i User Guide... -
Page 47: Batch Mode Quantity
1234, then the 1 is dropped, the quantity will be 2345. Example: Add a quantity of 5 for the last item scanned. 1. Scan the item's bar code. 2. Scan the quantity 5 bar code. Example: Add a quantity of 1,500 for the last item scanned. 8680i User Guide... - Page 48 2. Scan the quantity 0 bar code to change the quantity to 0300. 3. Scan the quantity 1 bar code to change the quantity to 3001. 4. Scan the quantity 0 bar code to change the quantity to 0010. Default = 1. Quantity Codes 8680i User Guide...
-
Page 49: Batch Mode Output Order
If you wish to output the total number of bar codes scanned when in Batch Mode, scan Total Records. Total Records Delete Last Code If you want to delete the last bar code scanned when in Batch Mode, scan Delete Last Code. Delete Last Code 8680i User Guide... -
Page 50: Clear All Codes
Contact Technical Support (page iii) for additional information. * Batch Mode Transmit Delay Off (No Delay) Batch Mode Transmit Delay Short (250 ms) Batch Mode Transmit Delay Medium (500 ms) Batch Mode Transmit Delay Long (1000 ms) 8680i User Guide... -
Page 51: Device Name
The default name is in the format “Honeywell-8680i-SN-############ (12 digit serial number)”. If you have more than one 8680i linked to a host and they all have the same name, the first 8680i linked to the host receives commands. When renaming a series of 8680is with identical names, unlink all except one of the 8680is from the host. -
Page 52: Host Acknowledgment
You may also scan the Scanner Name bar code below and scan a number for the 8680i name. For example, if you wanted to name the linked 8680i “312,” you would scan the bar code below, scan the 3, 1, and 2 bar codes on the Programming Chart, beginning on page 235, then scan Save. -
Page 53: Host Ack On/Off
10 seconds. A time-out is indicated by an error tone. If a time-out occurs, the oper- ator should check the host system to understand why a response to the scanner was not received. Host ACK On/Off Host ACK On * Host ACK Off 8680i User Guide... -
Page 54: Host Ack Timeout
Emits a beep at a medium pitch. [ESC] 6, Emits a beep at a high pitch. [ESC] 7, Beeps to indicate a successful decode and communication to host. [ESC] 8,[ESC] 8, Razz or error tone to indicate a decode/communication to host was unsuccessful. 8680i User Guide... -
Page 55: Chapter 3 - Input/Output Settings
Scanner Beep on BEL Character You may wish to force the 8680i to beep upon a command sent from the host. If you scan the Beep on BEL On bar code below, the 8680i beeps every time a BEL character is received from the host. Default = Beep on BEL Off. -
Page 56: Trigger Click
Beeper - Good Read Off * Beeper - Good Read On Beeper Volume – Good Read The beeper volume codes modify the volume of the beep the 8680i emits on a good read. Default = High. Medium 8680i User Guide... -
Page 57: Beeper Pitch - Good Read
High (4200 Hz) Vibrate – Good Read The 8680i vibrates once when a bar code is successfully read, and twice when a programming bar code is successfully read. When a programming bar code is unsuccessful, the 8680i emits one long vibration (2 times the Vibrate Duration length). -
Page 58: Beeper Pitch - Error
* Razz (250 Hz) Medium (3250 Hz) High (4200 Hz) Beeper Duration – Good Read The beeper duration codes modify the length of the beep the 8680i emits on a good read. Default = Normal. * Normal Beep Short Beep... -
Page 59: Led - Good Read
Number of Good Read Beeps/LED Flashes Number of Beeps – Error The number of beeps and LED flashes emitted by the 8680i for a bad read or error can be programmed from 1 - 9. For example, if you program this option to have five error beeps, there will be five error beeps and five LED flashes in response to an error. -
Page 60: Good Read Delay
User-Specified Good Read Delay Manual Trigger Modes When in manual trigger mode, the 8680i scans until a bar code is read, or until the trigger is released. Two modes are available, Normal and Enhanced. Normal mode offers good scan speed and the longest working ranges (depth of field). Enhanced mode gives you the highest possible scan speed but slightly less range than Nor- mal mode. -
Page 61: Serial Trigger Mode
(page 3-41) for further information. When in serial mode, the 8680i scans until a bar code has been read or until the deactivate command is sent. The 8680i can also be set to turn itself off after a specified time has elapsed (see Read Time-Out, which follows). -
Page 62: Object Detection Trigger
This setting improves the 8680i’s ability to read damaged or badly printed PDF codes by combining information from multiple images. When Poor Quality PDF On is scanned, poor quality PDF code reading is improved, but the 8680i’s snappi- 8680i User Guide... -
Page 63: Illumination Lights
Lights Off Aimer Delay The aimer delay allows a delay time for the operator to aim the 8680i before the image is taken. Use these codes to set the time between when the trigger is pressed and when the image is taken. During the delay time, the aiming light appears, but the LEDs won’t turn on until the delay time is over. -
Page 64: User-Specified Aimer Delay
* Interlaced Centering Use Centering to narrow the 8680i’s field of view to make sure that it reads only those bar codes you intend to read. For instance, if multiple codes are placed closely together, centering insures that only the desired codes are read. (Centering... -
Page 65: Single Code Centering
Use the following settings to customize your centering window. If a bar code is not touched by a predefined window, it will not be decoded or output by the 8680i. If centering is turned on by scanning Centering On, the 8680i only reads codes that... -
Page 66: Keyboard Wedge Modifiers
Note: Scan the ALT mode bar code after scanning the appropriate Keyboard Country code. If your keystrokes require the ALT key and 4 characters, scan the 4 Characters bar code. The data is then output with the special character(s). Default = Off. * Off 8680i User Guide... -
Page 67: Keyboard Modifiers
Windows Mode Prefix/Suffix Preferred Symbology The 8680i can be programmed to specify one symbology as a higher priority over other symbologies in situations where both bar code symbologies appear on the same label, but the lower priority symbology cannot be disabled. -
Page 68: High Priority Symbology
For example, you may be using the 8680i in a retail setting to read U.P.C. symbols, but have occasional need to read a code on a drivers license. Since some licenses have a Code 39 symbol as well as the PDF417 symbol, you can use Preferred Sym- bology to specify that the PDF417 symbol be read instead of the Code 39. -
Page 69: Preferred Symbology Time-Out
Once you have enabled Preferred Symbology and entered the high and low priority symbologies, you must set the time-out period. This is the period of time the 8680i searches for a high priority bar code after a low priority bar code has been encoun- tered. -
Page 70: To Add An Output Sequence
To Add an Output Sequence An output sequence is created using a string of serial commands that is sent to the 8680i. This string is most easily sent to the 8680i using the EZConfig software tool (see EZConfig-Scanning Introduction on page 177). You can also accomplish this... - Page 71 In this example, you are scanning PDF417, Code 128, and Code 39 bar codes, but you want the 8680i to output Code 39 first, Code 128 second, and PDF417 third. Set up the sequence editor with the following command line:...
- Page 72 Code 128, 54h = “T” termination string for first code code identifier for PDF417 9999 code length that must match for PDF417, 9999 = all lengths start character match for PDF417, 4Dh = “M” termination string for third code 8680i User Guide...
-
Page 73: Enter Output Sequence
In this example, you are scanning PDF417, Code 128, and Code 39 bar codes, and you want the 8680i to output Code 39 first, Code 128 second, and PDF417 third, in brackets, as shown below, but the Code 39 bar code has been damaged and cannot be output. - Page 74 99 = all symbologies carriage return line feed And you would add >PARTIAL< as the prefix to note the partial sequence: SEQTTS1 transmit partial sequence SEQISU99 add partial sequence prefix, 99 = all symbologies 8680i User Guide...
-
Page 75: Require Output Sequence
When an output sequence is Required, all output data must conform to an edited sequence or the 8680i does not transmit the output data to the host device. When it’s On/Not Required, the 8680i attempts to get the output data to conform to an... -
Page 76: Good Read Tone - Output Sequences
Good Read Tone - Output Sequences The 8680i may be programmed to either beep or click in response to a good read of each bar code in an output sequence, or to emit a beep or error tone for a partial sequence. -
Page 77: Multiple Symbols
When this programming selection is turned On, it allows you to read multiple sym- bols with a single press of the 8680i’s trigger. If you press and hold the trigger, aim- ing the 8680i at a series of symbols, it reads unique symbols once, beeping and vibrating for each read. -
Page 78: Video Reverse
Video Reverse Video Reverse is used to allow the 8680i to read bar codes that are inverted. The Video Reverse Off bar code below is an example of this type of bar code. Scan Video Reverse Only to read only inverted bar codes. Scan Video Reverse and Standard Bar Codes to read both types of codes. -
Page 79: Working Orientation
Some bar codes are direction-sensitive. For example, KIX codes and OCR can mis- read when scanned sideways or upside down. Use the working orientation settings if your direction-sensitive codes are not usually presented upright to the 8680i. Default = Upright. - Page 80 8680i User Guide...
-
Page 81: Chapter 4 - Data Edit
It is not necessary to build a message string. The selections in this chapter are only used if you wish to alter the default settings. Default prefix = None. Default suffix = None. • A prefix or suffix may be added or cleared from one symbology or all symbologies. 8680i User Guide... -
Page 82: Add A Prefix Or Suffix
ASCII Conversion Chart (Code Page 1252), beginning on page 224. Step 4. Scan Save to exit and save, or scan Discard to exit without saving. 8680i User Guide... -
Page 83: Clear One Or All Prefixes Or Suffixes
Scan the following bar code if you wish to add a carriage return suffix to all symbol- ogies at once. This action first clears all current suffixes, then programs a carriage return suffix for all symbologies. Add CR Suffix All Symbologies Prefix Selections Add Prefix Clear One Prefix Clear All Prefixes 8680i User Guide... -
Page 84: Suffix Selections
Intercharacter, Interfunction, and Intermessage Delays Some terminals drop information (characters) if data comes through too quickly. Intercharacter, interfunction, and intermessage delays slow the transmission of data, increasing data integrity. 8680i User Guide... -
Page 85: Intercharacter Delay
Delay Length Character to Trigger Delay To remove this delay, scan the Delay Length bar code, and set the number of delays to 0. Scan the Save bar code from the Programming Chart, beginning on page 235. 8680i User Guide... -
Page 86: Interfunction Delay
2nd Scan Transmission Intermessage Delay Intermessage Delay To remove this delay, scan the Intermessage Delay bar code, then set the number of delays to 0. Scan the Save bar code from the Programming Chart, beginning on page 235. 8680i User Guide... -
Page 87: Chapter 5 - Data Format
DATA FORMAT Data Format Editor Introduction You may use the Data Format Editor to change the 8680i’s output. For example, you can use the Data Format Editor to insert characters at certain points in bar code data as it is scanned. The selections in the following pages are used only if you wish to alter the output. -
Page 88: Show Data Format
PC. Scan three numeric bar codes from the Programming Chart, beginning on page 235 to program the 8680i for your terminal ID (you must enter 3 digits). For example, scan 0 0 3 for an AT wedge. Note: 099 indicates all terminal types. -
Page 89: Other Programming Selections
All other formats remain unaffected. • Clear all Data Formats This clears all data formats. • Save Exit and save your data format changes. • Discard Exit without saving any data format changes. Clear One Data Format Clear All Data Formats 8680i User Guide... -
Page 90: Data Format Editor Commands
Syntax = F1xx where xx stands for the insert character’s hex value for its ASCII code. Refer to the ASCII Conversion Chart (Code Page 1252), beginning on page 224 for decimal, hex and character codes. 8680i User Guide... -
Page 91
10 is the number of characters to send for the first line 0D is the hex value for a CR F1 is the “Send all characters” command 0D is the hex value for a CR The data is output as: 1234567890 ABCDEFGHIJ
8680i User Guide... - Page 92 Using the bar code above, send all characters up to but not including “AB.” Command string: B900024142 B9 is the “Send all characters up to a string” command 0002 is the length of the string (2 characters) 41 is the hex value for A 8680i User Guide...
- Page 93 The string is made up of hex values for the characters in the string. Refer to the ASCII Conversion Chart (Code Page 1252), beginning on page 224 for decimal, hex and character codes. 8680i User Guide...
-
Page 94
1234567890**ABCDEFGHIJ
Insert symbology name B3 Insert the name of the bar code’s symbology in the output message, without moving the cursor. Only symbologies with a Honeywell ID are included (see Symbology Charts on page 221). Refer to the ASCII Conversion Chart (Code Page 1252), beginning on page 224 for decimal, hex and character codes. - Page 95 01 = number of keys pressed (without the key modifier), 02 is the key modifier for Shift Right, and 1F is the “a” key. If a lower case “a” were to be inserted, B501001F would be entered. 8680i User Guide...
-
Page 96: Move Commands
(00-99) for the number of characters the cursor should be moved back. Move the cursor to the beginning F7 Move the cursor to the first character in the input message. Syntax = F7. 8680i User Guide... -
Page 97: Search Commands
Search for the letter “D” in bar codes and send all the data that follows, including the “D.” Using the bar code above: Command string: F844F10D F8 is the “Search forward for a character” command 44 is the hex value for “D” 8680i User Guide... -
Page 98
46 is the hex value for “F” 47 is the hex value for “G” 48 is the hex value for “H” F1 is the “Send all characters” command 0D is the hex value for a CR The data is output as: FGHIJ
8680i User Guide... - Page 99 Syntax = E7xx where xx stands for the search character’s hex value for its ASCII code. Refer to the ASCII Conversion Chart (Code Page 1252), beginning on page 224 for decimal, hex and character codes. 8680i User Guide...
-
Page 100: Miscellaneous Commands
(characters to be replaced plus replacement characters); xx defines characters to be replaced and xx defines replacement characters, continuing through zz and zz E4 Example: Replace zeroes with CRs in bar code data 8680i User Guide... - Page 101 For example, B2000454657374 compares the string at the current cursor position with the 4 character string “Test.” Refer to the ASCII Conversion Chart (Code Page 1252), beginning on page 224 for decimal, hex and character codes. 8680i User Guide...
- Page 102 If this bar code is read, the next data format, if there is one, will be used on this data. If there is no other format, the format fails and the raw data is output as 1234AB. 8680i User Guide...
-
Page 103: Data Formatter
Other data format settings impact the B8 command. If Data Format Non-Match Error Tone is On (page 91), the 8680i emits an error tone. If Data format Non-Match Error Tone is Off, the code is disabled for reading and no tone is sounded. Data Formatter When Data Formatter is turned Off, the bar code data is output to the host as read, including prefixes and suffixes. -
Page 104: Data Format Non-Match Error Tone
When a bar code is encountered that doesn’t match your required data format, the 8680i normally generates an error tone. However, you may want to continue scan- ning bar codes without hearing the error tone. If you scan the Data Format Non- Match Error Tone Off bar code, data that doesn’t conform to your data format is... -
Page 105: Primary/Alternate Data Formats
You can also switch between data formats for a single scan. The next bar code is scanned using an alternate data format, then reverts to the format you have selected above (either Primary, 1, 2, or 3). 8680i User Guide... - Page 106 Single Scan-Data Format 1 bar code below. The next bar code that is scanned uses Data Format 1, then reverts back to Data Format 3. Single Scan-Primary Data Format Single Scan-Data Format 1 Single Scan-Data Format 2 Single Scan-Data Format 3 8680i User Guide...
-
Page 107: Chapter 6 - Symbologies
GS1 Composite Codes • Telepen • GS1 DataBar Expanded • Trioptic Code • GS1 DataBar Limited • UPC-A • UPC-A/EAN-13 with Extended • GS1 DataBar Omnidirectional Coupon Code • GS1 Emulation • UPC-E0 • GS1-128 • UPC-E1 8680i User Guide... -
Page 108: All Symbologies
You are able to set the valid reading length of some of the bar code symbologies. You may wish to set the same value for minimum and maximum length to force the 8680i to read fixed length bar code data. This helps reduce the chances of a mis- read. - Page 109 No Check Character indicates that the 8680i reads and transmits bar code data with or without a check character. When Check Character is set to Validate and Transmit, the 8680i only reads Cod- abar bar codes printed with a check character, and transmits this character at the end of the scanned data.
- Page 110 Codabar Concatenation Codabar supports symbol concatenation. When you enable concatenation, the 8680i looks for a Codabar symbol having a “D” start character, adjacent to a sym- bol having a “D” stop character. In this case the two messages are concatenated into one with the “D”...
-
Page 111: Code 39
133), you should disable Code Code 39 Start/Stop Characters Start/Stop characters identify the leading and trailing ends of the bar code. You may either transmit, or not transmit Start/Stop characters. Default = Don’t Trans- mit. Transmit 8680i User Guide... - Page 112 Code 39 bar codes printed with a check character, but does not transmit the check character with the scanned data. When Check Character is set to Validate and Transmit, the 8680i only reads Code 39 bar codes printed with a check character, and transmits this character at the end of the scanned data.
- Page 113 Maximum Message Length Code 39 Append This function allows the 8680i to append the data from several Code 39 bar codes together before transmitting them to the host computer. When the 8680i encoun- ters a Code 39 bar code with the append trigger character(s), it buffers Code 39 bar codes until it reads a Code 39 bar code that does not have the append trigger.
- Page 114 (see ISO 2022/ISO 646 Character Replacements on page 228), and scan the value and the Save bar code from the Programming Chart, beginning on page 235. The data characters should then appear properly. Code 39 Code Page 8680i User Guide...
-
Page 115: Interleaved 2 Of 5
Interleaved 2 of 5 On/Off * On Check Digit No Check Digit indicates that the 8680i reads and transmits bar code data with or without a check digit. When Check Digit is set to Validate, but Don’t Transmit, the unit only reads Inter- leaved 2 of 5 bar codes printed with a check digit, but does not transmit the check digit with the scanned data. -
Page 116: Nec 2 Of 5
Scan the bar codes below to turn FEBRABAN Boleto decoding on or off. Default = Off. FEBRABAN Decode On *FEBRABAN Decode Off NEC 2 of 5 < Default All NEC 2 of 5 Settings > NEC 2 of 5 On/Off * On 8680i User Guide... - Page 117 5 bar codes printed with a check digit, but does not transmit the check digit with the scanned data. When Check Digit is set to Validate and Transmit, the 8680i only reads NEC 2 of 5 bar codes printed with a check digit, and transmits this digit at the end of the scanned data.
-
Page 118: Code 93
The 8680i stores the data in the order in which the bar codes are read, deleting the first space from each. The 8680i transmits the appended data when it reads a Code 93 bar code that starts with a character other than a space. -
Page 119: Straight 2 Of 5 Industrial (Three-Bar Start/Stop)
235. The data characters should then appear properly. Code 93 Code Page Straight 2 of 5 Industrial (three-bar start/stop)Straight 2 of 5 Industrial On/Off * Off 8680i User Guide... -
Page 120: Straight 2 Of 5 Iata (Two-Bar Start/Stop)
Redundancy adjusts the number of times a bar code is decoded before transmission, which may reduce the number of errors. Note that the higher the redundancy count, the longer it will take to decode the bar 8680i User Guide... -
Page 121: Matrix 2 Of 5
(page 94) for additional information. Minimum and Maximum lengths = 1-48. Minimum Default = 4, Maximum Default = 48. Minimum Message Length Maximum Message Length Matrix 2 of 5Matrix 2 of 5 On/Off * Off 8680i User Guide... -
Page 122: Code 11
Code 11 On/Off * Off Check Digits Required This option sets whether 1 or 2 check digits are required with Code 11 bar codes. Default = Two Check Digits. One Check Digit * Two Check Digits 8680i User Guide... -
Page 123: Code 128
The ISBT 128 Application Specification describes 1) the critical data elements for labeling blood products, 2) the current recommen- dation to use Code 128 due to its high degree of security and its space-efficient 8680i User Guide... - Page 124 Maximum Message Length Code 128 Append This function allows the 8680i to append the data from several Code 128 bar codes together before transmitting them to the host computer. When the 8680i encoun- ters a Code 128 bar code with the append trigger character(s), it buffers Code 128...
-
Page 125: Gs1-128
228), and scan the value and the Save bar code from the Programming Chart, beginning on page 235. The data characters should then appear properly. Code 128 Code Page GS1-128GS1-128 On/Off * On 8680i User Guide... -
Page 126: Telepen
* Off Telepen Output Using AIM Telepen Output, the 8680i reads symbols with start/stop pattern 1 and decodes them as standard full ASCII (start/stop pattern 1). When Original Telepen Output is selected, the 8680i reads symbols with start/stop pattern 1 and decodes them as compressed numeric with optional full ASCII (start/stop pattern 2). -
Page 127: Upc-A
= 1-60. Minimum Default = 1, Maximum Default = 60. Minimum Message Length Maximum Message Length UPC-AUPC-A On/Off * On Note: To convert UPC-A bar codes to EAN-13, see Convert UPC-A to EAN-13 on page 120. 8680i User Guide... - Page 128 This selection adds 2 or 5 digits to the end of all scanned UPC-A data. Default = Off for both 2 Digit and 5 Digit Addenda. 2 Digit Addenda On * 2 Digit Addenda Off 5 Digit Addenda On * 5 Digit Addenda Off 8680i User Guide...
- Page 129 * Not Required Addenda Timeout You can set a time during which the 8680i looks for an addenda. If an addenda is not found within this time period, the data can be either transmitted or discarded, based on the setting you are using for UPC-A Addenda Required.
-
Page 130: Upc-A/Ean-13 With Extended Coupon Code
Require Concatenation Addenda Timeout You can set a time during which the 8680i looks for an addenda. If an addenda is not found within this time period, the data can be either transmitted or discarded, based on the setting you are using for UPC-A/EAN-13 with Extended Coupon Code. -
Page 131: Coupon Gs1 Databar Output
UPC-E0 On selection. If you need to read codes that lead with the 1 number sys- tem, use UPC-E1 (page 120). Default = On. * UPC-E0 On UPC-E0 Off UPC-E0 Expand UPC-E Expand expands the UPC-E code to the 12 digit, UPC-A format. Default = Off. 8680i User Guide... - Page 132 * Not Required Addenda Timeout You can set a time during which the 8680i looks for an addenda. If an addenda is not found within this time period, the data can be either transmitted or discarded, based on the setting you are using for UPC-E0 Addenda Required.
- Page 133 This selection adds 2 or 5 digits to the end of all scanned UPC-E data. Default = Off for both 2 Digit and 5 Digit Addenda. 2 Digit Addenda On * 2 Digit Addenda Off 5 Digit Addenda On * 5 Digit Addenda Off 8680i User Guide...
-
Page 134: Upc-E1
When UPC-A Converted to EAN-13 is selected, UPC-A bar codes are converted to 13 digit EAN-13 codes by adding a zero to the front. When Do not Convert UPC-A is selected, UPC-A codes are read as UPC-A. UPC-A Converted to EAN-13 * Do not Convert UPC-A 8680i User Guide... - Page 135 2 Digit Addenda On * 2 Digit Addenda Off 5 Digit Addenda On * 5 Digit Addenda Off EAN/JAN-13 Addenda Required When Required is scanned, the 8680i only reads EAN/JAN-13 bar codes that have addenda. Default = Not Required. Required 8680i User Guide...
- Page 136 * Not Required EAN-13 Beginning with 290 Addenda Required This setting programs the 8680i to require a 5 digit addenda only on EAN-13 bar codes that begin with “290.” The following settings can be programmed: Require 5 Digit Addenda: All EAN-13 bar codes that begin with “290” must have a 5 digit addendum.
- Page 137 Require 2 or 5 Digit Addenda EAN-13 Beginning with 414/419 Addenda Required This setting programs the 8680i to require any combination of a 2 digit addenda or a 5 digit addenda on EAN-13 bar codes that begin with a “414” or “419.” The fol- lowing settings can be programmed: Require Addenda: All EAN-13 bar codes that begin with a “414”...
- Page 138 Require 2 or 5 Digit Addenda EAN-13 Beginning with 434/439 Addenda Required This setting programs the 8680i to require any combination of a 2 digit addenda or a 5 digit addenda on EAN-13 bar codes that begin with a “434” or “439.” The fol- lowing settings can be programmed: Require Addenda: All EAN-13 bar codes that begin with a “434”...
- Page 139 Require 2 Digit Addenda EAN-13 Beginning with 978 Addenda Required These settings program the 8680i to require a 5 digit addenda only on EAN-13 bar codes that begin with “978.” The following settings can be programmed: Require 5 Digit Addenda: All EAN-13 bar codes that begin with “978” must have a 5 digit addendum.
- Page 140 Require 5 Digit Addenda Addenda Timeout You can set a time during which the 8680i looks for an addenda. If an addenda is not found within this time period, the data can be either transmitted or discarded, based on the setting you are using for UPC-E0 Addenda Required.
-
Page 141: Isbn Translate
EAN/JAN-8 On/Off * On EAN/JAN-8 Check Digit This selection allows you to specify whether or not the check digit should be trans- mitted at the end of the scanned data. Default = On. * On 8680i User Guide... - Page 142 * Not Required Addenda Timeout You can set a time during which the 8680i looks for an addenda. If an addenda is not found within this time period, the data can be either transmitted or discarded, based on the setting you are using for UPC-E0 Addenda Required.
-
Page 143: Msi
When this feature is On, there is a space between the data from the bar code and the data from the addenda. When turned Off, there is no space. Default = On. * OnMSI On/Off * Off 8680i User Guide... - Page 144 MSI Check Character Different types of check characters are used with MSI bar codes. You can program the 8680i to read MSI bar codes with Type 10 check characters. Default = Validate Type 10, but Don’t Transmit. When Check Character is set to Validate Type 10/11 and Transmit, the 8680i only reads MSI bar codes printed with the specified type check character(s), and trans- mits the character(s) at the end of the scanned data.
-
Page 145: Gs1 Databar Omnidirectional
(page 94) for additional information. Minimum and Maximum lengths = 4-48. Minimum Default = 4, Maximum Default = 48. Minimum Message Length Maximum Message Length GS1 DataBar Omnidirectional < Default All GS1 DataBar Omnidirectional Settings > GS1 DataBar Omnidirectional On/Off * On 8680i User Guide... -
Page 146: Gs1 Databar Limited
Scan the bar codes below to change the message length. Refer to Message Length Description (page 94) for additional information. Minimum and Maximum lengths = 4-74. Minimum Default = 4, Maximum Default = 74. Minimum Message Length 8680i User Guide... -
Page 147: Trioptic Code
Codablock A On/Off * Off If you are reading Code 39 bar codes, Codablock A should remain disabled. If you are enabling Codablock A, you should disable Code 39 (see Code 39 on page 97). 8680i User Guide... -
Page 148: Codablock F
Scan the bar codes below to change the message length. Refer to Message Length Description (page 94) for additional information. Minimum and Maximum lengths = 1-2048. Minimum Default = 1, Maximum Default = 2048. Minimum Message Length 8680i User Guide... -
Page 149: Label Code
Scan the bar codes below to change the message length. Refer to Message Length Description (page 94) for additional information. Minimum and Maximum lengths = 1-2750. Minimum Default = 1, Maximum Default = 2750. Minimum Message Length 8680i User Guide... -
Page 150: Macropdf417
PDF417 bar codes. When this selection is enabled, these multiple bar codes are assembled into a single data string. Default = On. * On MicroPDF417 < Default All MicroPDF417 Settings > MicroPDF417 On/Off * Off 8680i User Guide... -
Page 151: Gs1 Composite Codes
Note: If you scan coupons that have both UPC and GS1 DataBar codes, you may wish to scan and output only the data from the GS1 DataBar code. See Coupon GS1 DataBar Output (page 117) for further information. 8680i User Guide... -
Page 152: Gs1 Emulation
Maximum Message Length GS1 Emulation The 8680i can automatically format the output from any GS1 data carrier to emu- late what would be encoded in an equivalent GS1-128 or GS1 DataBar symbol. GS1 data carriers include UPC-A and UPC-E, EAN-13 and EAN-8, ITF-14, GS1- 128, and GS1-128 DataBar and GS1 Composites. -
Page 153: Tcif Linked Code 39 (Tlc39)
TLC39 On is selected. The linear component may be decoded as Code 39 even if TLC39 is off. Default = Off. * Off QR Code < Default All QR Code Settings > QR Code On/Off This selection applies to both QR Code and Micro QR Code. * On 8680i User Guide... - Page 154 Maximum Message Length QR Code Append This function allows the 8680i to append the data from several QR Code bar codes together before transmitting them to the host computer. When the 8680i encoun- ters an QR Code bar code with the append trigger character(s), it buffers the num- ber of QR Code bar codes determined by information encoded in those bar codes.
-
Page 155: Dotcode
< Default All DotCode Settings > DotCode On/Off * Off Poor Quality DotCodes This setting improves the 8680i’s ability to read damaged or badly printed Dot- Codes. Default = Poor Quality DotCodes Off. Poor Quality DotCodes On * Poor Quality DotCodes Off... -
Page 156: Data Matrix
Data Matrix bar codes, it may be helpful to scan Low Contrast Data Matrix Enhancements Off Default = Low Con- trast Data Matrix Enhancements On. * Low Contrast Data Matrix Enhancements On 8680i User Guide... - Page 157 (see ISO 2022/ISO 646 Character Replacements on page 228), and scan the value and the Save bar code from the Programming Chart, beginning on page 235. The data characters should then appear properly. Data Matrix Code Page 8680i User Guide...
-
Page 158: Maxicode
Scan the bar codes below to change the message length. Refer to Message Length Description (page 94) for additional information. Minimum and Maximum lengths = 1-150. Minimum Default = 1, Maximum Default = 150. Minimum Message Length Maximum Message Length 8680i User Guide... -
Page 159: Aztec Code
Maximum Message Length Aztec Append This function allows the 8680i to append the data from several Aztec bar codes together before transmitting them to the host computer. When the 8680i encoun- ters an Aztec bar code with the append trigger character(s), it buffers the number of Aztec bar codes determined by information encoded in those bar codes. -
Page 160: Chinese Sensible (Han Xin) Code
228), and scan the value and the Save bar code from the Programming Chart, beginning on page 235. The data characters should then appear properly. Aztec Code Page Chinese Sensible (Han Xin) Code < Default All Han Xin Settings > Han Xin Code On/Off * Off 8680i User Guide... -
Page 161: Postal Codes - 2D
2D postal code selection, the first selection is overwritten. Default = Intelligent Mail Bar Code On. 2D Postal Codes Off Single 2D Postal Codes: Australian Post On British Post On Canadian Post On * Intelligent Mail Bar Code On 8680i User Guide... - Page 162 Also see Postnet Check Digit, page 151. Postnet with B and B’ Fields On InfoMail On Combination 2D Postal Codes: InfoMail and British Post On Intelligent Mail Bar Code and Postnet with B and B’ Fields On 8680i User Guide...
- Page 163 Planet Code and Postnet with B and B’ Fields On Planet Code and Postal-4i On Planet Code and Intelligent Mail Bar Code Planet Code, Postnet, and Postal-4i On Planet Code, Postnet, and Intelligent Mail Bar Code On 8680i User Guide...
-
Page 164: Planet Code Check Digit
Postnet with B and B’ Fields On Planet Code Check Digit This selection allows you to specify whether the check digit should be transmitted at the end of Planet Code data. Default = Don’t Transmit. Transmit Check Digit 8680i User Guide... -
Page 165: Postnet Check Digit
C Table. Refer to the Australian Post Specification Tables. Combination C and N Tables causes the field to be interpreted using either the C or N Tables. * Bar Output Numeric N Table Alphanumeric C Table 8680i User Guide... -
Page 166: Postal Codes - Linear
Scan the bar codes below to change the message length. Refer to Message Length Description (page 94) for additional information. Minimum and Maximum lengths = 2-80. Minimum Default = 4, Maximum Default = 80. Minimum Message Length Maximum Message Length 8680i User Guide... -
Page 167: Korea Post
Minimum Message Length Maximum Message Length Korea Post Check Digit This selection allows you to specify whether the check digit should be transmitted or not. Default = Don’t Transmit. Transmit Check Digit * Don’t Transmit Check Digit 8680i User Guide... - Page 168 8680i User Guide...
-
Page 169: Chapter 7 - Imaging Commands
CHAPTER IMAGING COMMANDS The 8680i is like a digital camera in the way it captures, manipulates, and transfers images. The following commands allow you to alter the way the 8680i performs these functions. Single-Use Basis Imaging Commands with their modifiers send instructions to the 8680i on a sin- gle-use basis, and take effect for a single image capture. -
Page 170: Image Snap - Imgsnp
8680i from the image/object. To achieve a high quality image, it is recommended that you position your 8680i 4-6" (10.2-15.2 cm) away from the object you are capturing. - Page 171 This is similar to setting a shutter speed on a camera. The exposure time determines how long the 8680i takes to record an image. On a bright day, exposure times can be very short because plenty of light is available to help record an image.
- Page 172 D - Delta for Acceptance This sets the allowable range for the white value setting (see W - Target White Value). Delta is only available when using Photo Style (1P). (Default = 25) Range: 0 - 255 8680i User Guide...
-
Page 173: Image Ship - Imgshp
U - Update Tries This sets the maximum number of frames the 8680i should take to reach the Delta for Acceptance. Update Tries is only available when using Photo Style (1P). (Default = 6) Range: 0 - 10 % - Target Set Point Percentage Sets the target point for the light and dark values in the captured image. -
Page 174: Imgshp Modifiers
Compensation at 1C: D - Pixel Depth Indicates the number of bits per pixel in the transmitted image (KIM or BMP format only). 8 bits per pixel, grayscale image (default) 1 bit per pixel, black and white image 8680i User Guide... - Page 175 1 to 24. Entering a 23E gives the sharpest edges, but also increases noise in the image. Don’t sharpen image (default) Apply edge sharpen for typical image Apply edge sharpen using strength n (n = 1-24) Example: Edge Sharpen at 0E: Edge Sharpen at 24E: 8680i User Guide...
- Page 176 BMP color format BMP Uncompressed raw image H - Histogram Stretch Increases the contrast of the transmitted image. Not available with some image formats. No stretch (default) Histogram stretch Example: Histogram Stretch at 0H: Histogram Stretch at 1H: 8680i User Guide...
- Page 177 Image set to 1iy: IF- Noise Reduction Used to reduce the salt and pepper noise in an image. No salt and pepper noise reduction (default) Salt and pepper noise reduction Example: Noise Reduction Off (0if): Noise Reduction On (1if): 8680i User Guide...
- Page 178 (Default = 50) Image is compressed as much as possible while preserving quality factor of n (n = 0 - 100) worst quality (smallest file) 100J best quality (largest file) 8680i User Guide...
- Page 179 The right edge of the shipped image corresponds to column n - 1 of the image in memory. Range: 000 - 843. (Default = all columns) The top edge of the shipped image corresponds to row n of the image in memory. Range: 000 - 639. (Default = 0) 8680i User Guide...
- Page 180 S - Pixel Ship Pixel Ship sizes an image in proportion to its original size. It decimates the image by shipping only certain, regularly spaced pixels. Example: 4S would transmit every fourth pixel from every fourth line. 8680i User Guide...
- Page 181 1U will have a similar effect to setting E - Edge Sharpen (page 161) to 22e. Range: 0-255. Example: Document Image Filter set to 0U: Document Image Filter set to 26U: 8680i User Guide...
-
Page 182: Image Size Compatibility
Image used for histogram: Histogram of image: Image Size Compatibility If you have applications that expect an image ship to return exactly 640x480 pix- els, scan the Force VGA Resolution bar code. Default = Native Resolution. Force VGA Resolution 8680i User Guide... -
Page 183: Intelligent Signature Capture - Imgbox
A single beep is emitted, indicating that the 8680i has read a Code 128 bar code and the data has been transferred to the host. An IMGBOX command may now be sent... -
Page 184: Imgbox Modifiers
The IMGBOX commands have many different modifiers that can be used to change the size and appearance of the signature image output by the 8680i. Modifiers affect the image that is transmitted, but do not affect the image in memory. Any number of modifiers may be appended to the IMGBOX command. - Page 185 F - File Format This option indicates the type of file format in which to save the image. KIM format TIFF binary TIFF binary group 4, compressed TIFF grayscale Uncompressed Binary Uncompressed grayscale JPEG image (default) Outlined image BMP format 8680i User Guide...
- Page 186 The resolution is the number of pixels that the 8680i outputs per each minimum bar width. The higher the value for R, the higher the quality of the image, but also the larger the file size. Values begin at 1000. The 8680i automatically inserts a dec- 8680i User Guide...
- Page 187 Positive values move the horizontal center to the right and negative values to the left. Measurements are in multiples of the minimum bar width. Example: Horizontal Offset set to 75X: Horizontal Offset set to -75X: 8680i User Guide...
-
Page 188: Rf Default Imaging Device
8680i. To accomplish this, the 8680i uses a menu command called RF_DID (RF Default Imaging Device). RF_DID is the name of the 8680i (BT_NAM) that is to receive imaging commands. The default for RF_DID is “*”indicating that imaging com- mands are to be sent to all associated 8680is. -
Page 189: Chapter 8 - Utilities
When you scan the Test Menu On code, then scan a programming code in this manual, the 8680i displays the content of a programming code. The programming function still occurs, but in addition, the content of that programming code is out- put to the terminal. -
Page 190: Totalfreedom
TotalFreedom TotalFreedom is an open system architecture that makes it possible for you create applications that reside on your 8680i. Decoding apps and Data Formatting apps can be created using TotalFreedom. For further information about TotalFreedom, go to our website at www.honeywellaidc.com. -
Page 191: Ezconfig-Scanning Introduction
Caution: This selection erases all your settings and resets the 8680i to the original factory defaults. It also disables all plugins. If you aren’t sure what programming options are in your 8680i, or you’ve changed some options and want to restore the 8680i to factory default settings, first scan the Remove Custom Defaults bar code, then scan Activate Defaults. - Page 192 8680i User Guide...
-
Page 193: Chapter 9 - Serial Programming Commands
The serial programming commands can be used in place of the programming bar codes. Both the serial commands and the programming bar codes program the 8680i. For complete descriptions and examples of each serial programming com- mand, refer to the corresponding programming bar code in this manual. -
Page 194: Query Commands
(,) and only the SubTag and Data fields of the additional command are issued. If the additional command requires a different Tag field, the command is separated from previous commands by a semicolon (;). Responses The device responds to serial commands with one of three responses: 8680i User Guide... - Page 195 Enter: cbrena?. Response: CBRENA1[ACK] This response indicates that the device’s Codabar Coding Enable (CBRENA) is set to 1, or on. Example: What are the device’s settings for all Codabar selections? Enter: cbr?. Response: CBRENA1[ACK], SSX0[ACK], CK20[ACK], CCT1[ACK], 8680i User Guide...
-
Page 196: Trigger Commands
Activate Custom Defaults Note: This bar code also causes both the 8680i and the host to perform a reset and become unlinked. The charts on the following pages list the factory default settings for each of the commands (indicated by an asterisk (*) on the programming pages). -
Page 197: Menu Commands
Setting Selection # Indicates a numeric Page * Indicates default entry Get Started Pair the 8680i with Bluetooth Devices Pair with a PC or Laptop Bluetooth Host Reconnect Mode PAPSPP;BT_DNG1 Serial Port Scanner Reconnect Mode BT_TRM0,DNG5 * Bluetooth HID Keyboard... - Page 198 BATNUM0 BATNUM1 BATNUM2 BATNUM3 BATNUM4 BATNUM5 BATNUM6 BATNUM7 BATNUM8 BATNUM9 Batch Mode Output Order *FIFO BATLIF0 LIFO BATLIF1 Total Records Total Records BATNRC Delete Last Code Delete Last Code BATUND Clear All Codes Clear All Codes BATCLR 8680i User Guide...
- Page 199 Vibrate Duration TFBDUR#### Beeper Pitch - Error *Razz (250) (min 200Hz) BEPFQ2800 Medium (3250) BEPFQ23250 High (4200) (max 9000Hz) BEPFQ24200 Beeper Duration - Good Read *Normal Beep BEPBIP0 Short Beep BEPBIP1 LED - Good Read BEPLED0 BEPLED1 8680i User Guide...
- Page 200 *Lights On SCNLED1 Lights Off SCNLED0 Aimer Delay 200 milliseconds SCNDLY200 400 milliseconds SCNDLY400 *Off (no delay) SCNDLY0 User-Specified Aimer Delay SCNDLY#### Range 0 - 4,000 ms Aimer Mode SCNAIM0 *Interlaced SCNAIM2 Centering Single Code Centering DECWIN1;DECTOP49;DECBO T51;DECRGT51;DECLFT49. 8680i User Guide...
- Page 201 BEPSIN0 Sequences Sequence *Good Read Click - Each Code in BEPSIN1 Sequence Good Read Beep - Partial BEPISE0 Sequence Output *Error Tone - Partial Sequence BEPISE1 Output Multiple Symbols SHOTGN1 *Off SHOTGN0 No Read SHWNRD1 *Off SHWNRD0 8680i User Guide...
- Page 202 *Default Data Format (None) DFMDF3 Show Data Format DFMBK3? Enter Data Format DFMBK3## Clear One Data Format DFMCL3 Clear All Data Formats DFMCA3 Data Formatter Data Formatter Off DFM_EN0 *Data Formatter On, DFM_EN1 Not Required, Keep Prefix/Suffix 8680i User Guide...
- Page 203 Validate, But Don’t Transmit CBRCK21 Validate, and Transmit CBRCK22 Codabar Concatenation *Off CBRCCT0 CBRCCT1 Require CBRCCT2 Codabar Redundancy Range (0 - 10) *0 CBRVOT## Codabar Message Length Minimum (2 - 60) *4 CBRMIN## Maximum (2 - 60) *60 CBRMAX## 8680i User Guide...
- Page 204 Interleaved 2 of 5 Message Length Minimum (2 - 80) *4 I25MIN## Maximum (2 - 80) *80 I25MAX## *FEBRABAN Decode Off I25PAY0 FEBRABAN Decode On I25PAY1 NEC 2 of 5 Default All NEC N25DFT 2 of 5 Settings N25ENA0 N25ENA1 8680i User Guide...
- Page 205 Default All Matrix 2 of 5 X25DFT Settings *Off X25ENA0 X25ENA1 Matrix 2 of 5 Message Length Minimum (1 - 80) *4 X25MIN## Maximum (1 - 80) *80 X25MAX## Code 11 Default All Code 11 C11DFT Settings *Off C11ENA0 C11ENA1 8680i User Guide...
- Page 206 Minimum (1 - 60) *1 TELMIN## Maximum (1 - 60) *60 TELMAX## UPC-A Default All UPADFT UPC-A Settings UPAENA0 UPAENA1 UPC-A Check Digit UPACKX0 UPACKX1 UPC-A Number System UPANSX0 UPANSX1 UPC-A 2 Digit Addenda *Off UPAAD20 UPAAD21 8680i User Guide...
- Page 207 5 Digit Addenda On UPEAD51 *5 Digit Addenda Off UPEAD50 UPC-E1 *Off UPEEN10 UPEEN11 EAN/JAN-13 Default All EAN/ E13DFT JAN Settings E13ENA0 E13ENA1 Convert UPC-A to EAN-13 UPC-A Converted to EAN-13 UPAENA0 Do not Convert UPC-A UPAENA1 8680i User Guide...
- Page 208 * Don’t Require 5 Digit Addenda ARQ9790 Addenda Required Require 5 Digit Addenda ARQ9791 Addenda Timeout Addenda Timeout DLYADD### EAN/JAN-13 Addenda E13ADS0 Separator E13ADS1 ISBN Translate *Off E13ISB0 E13ISB1 EAN/JAN-8 Default All EAN/ EA8DFT JAN 8 Settings EA8ENA0 EA8ENA1 8680i User Guide...
- Page 209 MSIMAX## GS1 DataBar Omnidirectional Default All RSSDFT GS1 DataBar Omnidirectional Settings RSSENA0 RSSENA1 GS1 DataBar Limited Default All GS1 DataBar Limited RSLDFT Settings RSLENA0 RSLENA1 GS1 DataBar Expanded Default All GS1 DataBar RSEDFT Expanded Settings RSEENA0 RSEENA1 8680i User Guide...
- Page 210 *Off MPDENA0 MicroPDF417 Msg. Length Minimum (1-366) *1 MPDMIN### Maximum (1-366) *366 MPDMAX### GS1 Composite Codes COMENA1 *Off COMENA0 UPC/EAN Version COMUPC1 *Off COMUPC0 GS1 Composite Codes Msg. Minimum (1-2435) *1 COMMIN#### Length Maximum (1-2435) *2435 COMMAX#### 8680i User Guide...
- Page 211 Maximum (1-150) *150 MAXMAX### Aztec Code Default All Aztec Code Settings AZTDFT AZTENA1 AZTENA0 Aztec Code Msg. Length Minimum (1-3832) *1 AZTMIN#### Maximum (1-3832) *3832 AZTMAX#### Aztec Append AZTAPP1 AZTAPP0 Aztec Code Page Aztec Code Page (*51) AZTDCP## 8680i User Guide...
- Page 212 Planet and Postal-4i On POSTAL13 Planet and Intelligent Mail Bar POSTAL15 Code On Planet, Postnet, and Postal-4i On POSTAL21 Planet, Postnet, and Intelligent POSTAL22 Mail Bar Code On Planet, Postal-4i, and Intelligent POSTAL23 Mail Bar Code On 8680i User Guide...
- Page 213 Minimum (2 - 80) *4 KPCMIN## Maximum (2 - 80) *48 KPCMAX## Korea Post Check Digit Transmit Check Digit KPCCHK1 *Don’t Transmit Check Digit KPCCHK0 Imaging Default Commands Image Snap Default all Imaging Commands IMGDFT Imaging Style - Decoding SNPSTY0 8680i User Guide...
- Page 214 File Format - TIFF binary IMGFMT1 File Format - TIFF binary group 4, IMGFMT2 compressed File Format - TIFF grayscale IMGFMT3 File Format - Uncompressed IMGFMT4 binary File Format - Uncompressed IMGFMT5 grayscale File Format - BMP IMGFMT8 8680i User Guide...
- Page 215 IMGHST0 Ship Histogram IMGHST1 Image Size Compatibility Force VGA Resolution IMGVGA1 *Native Resolution IMGVGA0 Intelligent Signature Capture Optimize On DECBND1 *Optimize Off DECBND0 Utilities Add Code I.D. Prefix to All Symbologies (Temporary) PRECA2,BK2995C80! Show Software Revision REVINF 8680i User Guide...
- Page 216 Test Menu TSTMNU1 *Off TSTMNU0 Application Plug-Ins (Apps) *Decoding Apps On PLGDCE1 Decoding Apps Off PLGDCE0 *Formatting Apps On PLGFOE1 Formatting Apps Off PLGFOE0 List Apps PLGINF Reset the Factory Defaults Remove Custom Defaults DEFOVR Activate Defaults DEFALT 8680i User Guide...
-
Page 217: Chapter 10 - Advanced Application Programming
The following commands are used when coding user interface commands for the 8680i directly into an application. Note: The 8680i Software Development Kit can also be used to program the 8680i UI. See the 8680i Software Development Kit User Guide at www.honeywellaidc.com. -
Page 218: Text Settings
This data is a binary byte 0, followed by the two ASCII characters: Byte Value 0x00 (line 0) 0x48 (H) 0x69 (i) The hex string encoding is: Byte Value 0x32 (0) 0x32 (0) 0x34 (4) 0x38 (8) 8680i User Guide... -
Page 219: Text Size Line 1
This command controls the size of the text on the display for line 2. Byte Value Small Medium (default) Large Sample char cFntMenuString[] = "\x16M\x0DGUIFSD2."; SynMenuCmdSync(cFntMenuString); Single Line Display or Large Font GUIFSD to 10 and use GUITXT00xxxx to write text to display line 1. 8680i User Guide... -
Page 220: Text Color - Foreground Line 1
Blue Valid values are 00-FF. Default = FFFFFF (white). Sample char cClrMenuString[] = "\x16M\x0DGUITCDFFFFFF."; SynMenuCmdSync(cClrMenuString); Text Color - Background GUITBC This command uses a hex string to set the background color of the display text. Byte Value 8680i User Guide... -
Page 221: Screen Display Settings
Valid values are 0-30. Default = 10. Sample char cGuiControlString[] = "\x16M\x0DGUITIM15."; SynMenuCmdSync(cGuiControlString); Scan Time GUISCT This sets how many seconds a good or bad scan remains on the display. Valid values are 0-30. Default = 30. 8680i User Guide... -
Page 222: Button Notifications
Value Function Disable/Off Enable/On Default = 0 (Disable/Off). Sample char cGuiControlString[] = "\x16M\x0DGUIBNE1."; SynMenuCmdSync(cGuiControlString); Language Setting GUICTY This sets the display language characters. Value Function English Cyrillic Default = 0 (English). Sample char cGuiControlString[] = "\x16M\x0DGUICTY1."; SynMenuCmdSync(cGuiControlString); 8680i User Guide... -
Page 223: Icon Bar
Icon Bar GUIICN This command turns the icon bar on or off by enabling or disabling it. Value Function Disable/Off Enable/On Default = 0 (Disable/Off). Sample char cGuiControlString[] = "\x16M\x0DGUIICN0."; SynMenuCmdSync(cGuiControlString); 8680i User Guide... - Page 224 8680i User Guide...
-
Page 225: Chapter 11 - Product Specifications
CHAPTER PRODUCT SPECIFICATIONS 8680i Wearable Mini Mobile Computer Parameter Specification Mechanical With BAT-SCN03 standard capacity battery: Height 1.2 inches (31.3mm) Length 3.2 inches (81mm) Width 2.2 inches (56mm) Weight 5.3 ounces (151g) With BAT-SCN02 high capacity battery: Height 1.4 inches (35mm) Length 3.2 inches (81mm) - Page 226 49 - 812mm (1.9 - 32 in.) 10 mil Data Matrix 113 - 275mm (4.5 - 10.8 in.) 6.7 mil PDF417 120 - 225mm (4.7 - 8.9 in.) Guaranteed Performance 100% UPC 48 - 516mm (1.9 - 20.3 in.) 8680i User Guide...
-
Page 227: Mb4-Scn02 Charge Base Product Specifications
ESD Sensitivity Up to 15kV direct air Up to 8 kV contact and indirect MB4-BAT-SCN02 Charge Base Product Specifications Parameter Specification Mechanical Height 2.68 inches (68mm) Length 5.8 inches (147mm) Width 5.3 inches (134mm) Weight 17.6 oz (0.5kg) 8680i User Guide... -
Page 228: Required Safety Labels
(0.9 m) to concrete Vibration 2G Peak from 2Hz to 200Hz ESD Sensitivity Up to 15kV direct air Up to 8 kV contact and indirect Required Safety Labels 8680i Wearable Mini Mobile Computer Compliance and laser label location 16.8 8680i User Guide... - Page 229 MB4-SCN02 and MB4-BAT-SCN02 Charge Bases Compliance label locations 8680i User Guide...
- Page 230 8680i User Guide...
-
Page 231: Chapter 12 - Maintenance And Troubleshooting
If the window or display is visibly dirty, or if the scanner isn’t operating well, clean it with a soft cloth or tissue dampened with water (or a mild detergent-water solu- tion.) If a detergent solution is used, rinse with a clean tissue dampened with water only. 8680i User Guide... -
Page 232: Replace The Finger Strap
(the Enter/Return key or the Tab key, for example). • You need to program a suffix. Programming a suffix enables the scanner to output the bar code data plus the key you need (such as “CR”) to enter the data 8680i User Guide... - Page 233 • Verify that your bar code symbology is enabled (see Chapter • If the scanner still can’t read the sample bar codes, scan All Symbologies page 94. 8680i User Guide...
- Page 234 8680i User Guide...
-
Page 235: Chapter A - Reference Charts
Code 39 (supports Full ASCII mode) 0, 1, 3, 4, 5, 7 TCIF Linked Code 39 (TLC39) Code 93 and 93i 0-9, A-Z, 0, 1, 3, 4 EAN-13 (including Bookland EAN) EAN-13 with Add-On EAN-13 with Extended Coupon Code EAN-8 8680i User Guide... -
Page 236: 2D Symbologies
Telepen 0, 1, 2, 3, 8, 9, A, B, C UPC-A UPC-A with Add-On UPC-A with Extended Coupon Code UPC-E UPC-E with Add-On UPC-E1 Add Honeywell Code ID 5C80 Add AIM Code ID 5C81 Add Backslash 5C5C 2D Symbologies Honeywell... -
Page 237: Postal Symbologies
QR Code Micro QR Code Postal Symbologies Honeywell Possible modifiers Symbology All Symbologies Australian Post British Post Canadian Post China Post InfoMail Intelligent Mail Bar Code Japanese Post KIX (Netherlands) Post Korea Post Planet Code Postal-4i Postnet 8680i User Guide... -
Page 238: Ascii Conversion Chart (Code
PrtScn CTRL+ R Backspace CTRL+ S Save Back Tab CTRL+ T CTRL+ U CTRL+ V Paste CTRL+ W CTRL+ X CTRL+ Y CTRL+ Z CTRL+ [ CTRL+ \ CTRL+ ] CTRL+ ^ CTRL+ - ⌂ NP Enter 8680i User Guide... -
Page 239: Lower Ascii Reference Table
„ ä Insert 0x52 … à Delete 0x53 † å Home 0x47 ‡ ç 0x4F ˆ ê Page Up 0x49 ‰ ë Page Down 0x51 Š è Right ALT 0x38 ‹ ï Right CTRL 0x1D 8680i User Guide... - Page 240 0x1D ° ░ ± ▒ ² ▓ ³ │ ´ ┤ µ ╡ ¶ ╢ · ╖ ¸ ╕ ¹ ╣ º ║ » ╗ ¼ ╝ ½ ╜ ¾ ╛ ¿ ┐ À └ Á ┴ 8680i User Guide...
- Page 241 σ æ µ ç τ è Φ é Θ ê Ω ë δ ì ∞ í φ î ε ï ∩ ð ≡ ñ ± ò ≥ ó ≤ ô ⌠ õ ⌡ ö ÷ ÷ ≈ 8680i User Guide...
-
Page 242: Iso 2022/Iso 646 Character Replacements
(standard ASCII) Automatic National Character ISO/IEC 2022 2 (default) Replacement Binary Code page Default “Automatic National Character replacement” selects the below Honeywell Code Page options for Code128, Code 39 and Code 93. United States ISO/IEC 646-06 Canada ISO /IEC 646-121... - Page 243 Honeywell Code Page Selection Method/ Keyboard Code Standard Country Country Page Option Spain ISO/IEC 646-17 Spain ISO/IEC 646-85 8680i User Guide...
- Page 244 ù à ò è ì § Ã Ç Õ ã ç õ ° § ¡ Ñ ¿ ° ñ ç ˜ · ¡ Ñ Ç ¿ ´ ñ ç ¨ ISO / IEC 646 National Character Replacements 8680i User Guide...
-
Page 245: Keyboard Key References
1F 20 21 22 23 24 25 26 27 28 29 5C 61 66 2E 2F 30 31 32 33 34 35 36 37 5D 62 67 4F 54 59 3A 3B 3C 3E 3F 38 40 105 Key European Style Keyboard 8680i User Guide... - Page 246 8680i User Guide...
-
Page 247: Sample Symbols
0 123456 7890 EAN-13 9 780330 290951 Code 128 Code 39 Code 128 BC321 Codabar A13579B Code 93 Straight 2 of 5 Industrial 123456 123456-9$ Matrix 2 of 5 6543210 RSS-14 PDF417 Car Registration (01) 00123456789012 Code 49 1234567890 8680i User Guide... - Page 248 SAMPLE SYMBOLS (CONTINUED) Postnet Data Matrix Zip Code Test Symbol QR Code Numbers MaxiCode Micro PDF417 Test Message Test Message 8680i User Guide...
-
Page 249: Programming Chart
PROGRAMMING CHART 8680i User Guide... - Page 250 PROGRAMMING CHART (CONTINUED) Save Discard Reset Note: If you make an error while scanning the letters or digits (before scanning Save), scan Discard, scan the correct letters or digits, and Save again. 8680i User Guide...
- Page 252 Honeywell Scanning & Mobility 9680 Old Bailes Road Fort Mill, SC 29707 www.honeywellaidc.com 8680-EN-UG Rev B 10/18...