Table of Contents
Quick Links
Conettix D6680
Installation Instructions
Ethernet Network
EN
Adapter
Available from A1 Security Cameras
www.a1securitycameras.com email: [email protected]
Table of Contents

Related Manuals for Bosch Conettix D6680


Summary of Contents for Bosch Conettix D6680
- Page 1 Conettix D6680 Installation Instructions Ethernet Network Adapter Available from A1 Security Cameras www.a1securitycameras.com email: [email protected]...
- Page 2 Conettix D6680 | Installation Instructions | Trademarks Trademarks ® ® ® ® Microsoft Windows 98SE, Windows ME, Windows ® ®, ® 2000, Windows NT, MS-DOS and Windows XP are either registered trademarks or trademarks of Microsoft Corporation in the United States and/or other countries.
-
Page 3: Table Of Contents
Figure 12: Telnet session – Gateway Address ..10 Figure 13: D6680 Encryption ........11 Figure 14: Command Prompt - telnet .......12 Figure 15: Port Value Change........12 Bosch Security Systems, Inc. | 5/07 | 4998138732-01 Available from A1 Security Cameras www.a1securitycameras.com email: [email protected]... -
Page 4: Introduction
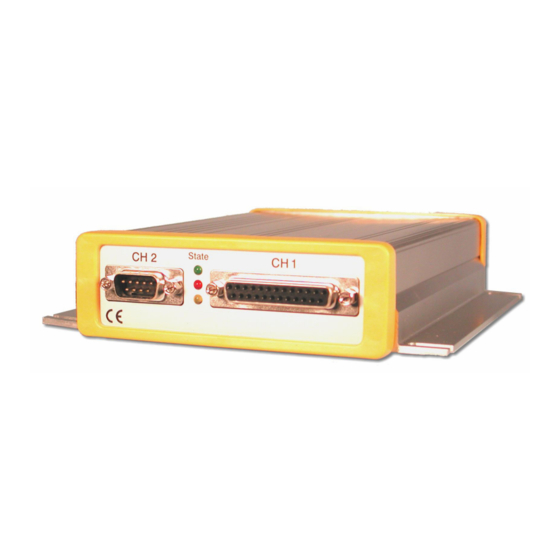
Conettix D6680 | Installation Instructions | 1.0 Introduction Serial Interface 1.0 Introduction Figure 3: Serial Interface The Bosch Security Systems, Inc. Conettix D6680 Ethernet Network Adapter (referred to as the D6680) is a two-channel network adapter. The D6680 includes a cable for connecting to the DB25 Channel 1 Port. -
Page 5: Installation
Conettix D6680 | Installation Instructions | 2.0 Installation 2.0 I nstallation Figure 5: Mounting Holes for D6680 A ll Installations Install the Conettix D6600 Communications Receiver/Gateway (referred to as the D6600) according to NFPA 70, NFPA 72, and the local authority having jurisdiction (AHJ). -
Page 6: D8004 Transformer Enclosure
Conettix D6680 | Installation Instructions | 3.0 Configuration and Programming 6. Energize the power to the circuit(s) and use a 2.4 D8004 Transformer Enclosure digital voltmeter (DVM) to test the duplex outlet The D8004 Transformer Enclosure protects the AC for proper voltage. -
Page 7: Identifying The Mac Hardware Address
Conettix D6680 | Installation Instructions | 3.0 Configuration and Programming 3.2 Identifying the MAC Hardware 3.4 Initial Assignment of the IP Address Address using ARP When everything is verified for proper setup in the Bosch Security Systems, Inc. recommends that you previous steps, you can program the IP address of the read this entire step before beginning. -
Page 8: Arp Command Usage
Conettix D6680 | Installation Instructions | 3.0 Configuration and Programming 3.4.1 ARP Command Usage Figure 10: MS-DOS Prompt Perform the following procedure when using the ARP command to assign an IP address to a D6680. The MAC address shown below is used as an example in the procedure. - Page 9 Conettix D6680 | Installation Instructions | 3.0 Configuration and Programming 7. On the Connect dialog box: a. Type 9999 in the Port field. 3. Select Connect � Remote System. b. Accept the values in the Host Name and TermType fields.
-
Page 10: Figure 11: Telnet Session
Conettix D6680 | Installation Instructions | 3.0 Configuration and Programming 13. Press [ENTER] after entering the correct number Figure 11: Telnet Session of bits for the Netmask. Table 2: Netmask Address Number of Host Bits Netmask 255.255.255.254 255.255.255.252 255.255.255.248 255.255.255.240 255.255.255.224... -
Page 11: Figure 13: D6680 Encryption
Conettix D6680 | Installation Instructions | 3.0 Configuration and Programming If you use a password, store it in a secure For more information on Datagram Types, place. If the password is lost or forgotten refer to the Conettix D6600 System Guide you can not connect to the telnet program (P/N: 4998122712). -
Page 12: Using Telnet With Windows Nt, Windows 2000, Or Windows Xp
Conettix D6680 | Installation Instructions | 3.0 Configuration and Programming 32. At Enable Enhanced Password (N), press The colors are inverted here for clarity. The [ENTER]. normal prompt window appears with white text on black. After you make all the changes and verify them for accuracy, you must save the 3. -
Page 13: Configuring For Network Communication Using A D6680
Conettix D6680 | Installation Instructions | 3.0 Configuration and Programming • 5. Verify that 6.1.2 COM4 Data Bit is set to 8 The type(s) of peripheral reporting device(s) used (default) and press [M/E]. If necessary, change the in your central station (for example external printer... -
Page 14: Editing Program Parameters
Conettix D6680 | Installation Instructions | 3.0 Configuration and Programming 13. Scroll to 6.3.6 Network Automation 21. Scroll to 6.4.5 Network Programming Output Format. Enable. Verify that the value is 1. If the value is not 1, press [M/E][1][M/E]. 14. Type 1 for 6500 mode or 2 for SIA mode and press [M/E] to enter the selection. -
Page 15: Specifications
Conettix D6680 | Installation Instructions | 4.0 Specifications 4.0 Specifications Table 3: Specifications Supported Protocols ARP, UDP, TCP, Telnet, ICMP, SNMP, DHCP, TFTP, HTTP, BootP and ECHO Connectors Serial: DB25: RS-232/RS-322/RS-485 serial port with DCE configuration DB9: RS232 serial port with DTE configuration... - Page 16 Bosch Security Systems, Inc. 130 Perinton Parkway Fairport, NY 14450-9199 Customer Service: (800) 289-0096 Technical Support: (888) 886-6189 © 2007 Bosch Security Systems, Inc. 4998138732-01 Available from A1 Security Cameras www.a1securitycameras.com email: [email protected]...