NEC SL2100 Quick Install Manual
Analogue trunks.
Hide thumbs
Also See for SL2100:
- Features and specifications manual (978 pages) ,
- Programming manual (678 pages) ,
- Hardware manual (218 pages)
Table of Contents
Table of Contents

Related Manuals for NEC SL2100


Summary of Contents for NEC SL2100
- Page 1 The SL2100 Quick Install Guide: Analogue Trunks www.nec-enterprise.com...
- Page 2 NEC SL2100 Communication System This guide explains the installation, configuration and operation of the SL2100 Telephone System including the exchange line and telephone connections. Further information is available on BusinessNet. Please keep all information supplied for future reference. Regulatory Notice.
-
Page 3: Table Of Contents
Automatic Night Mode Schedule ........................33 Extension – Programmable Function Keys ......................34 Extension - Toll Restriction ..........................36 What to do if you make errors within the SL2100 Configuration ..............37 10- Security................................38 Quick Install Guide – SL2100 with Analogue Trunks rev 1.1... -
Page 4: What Is The Sl2100
Each trunk line is presented at a Function Key with busy lamp indication. The system can be easily modified using SL2100 PCPro which has Quick Installation wizards for the majority of system settings. Outside lines (Analogue Trunks) included in this guide The SL2100 has two cards that provide analogue trunks: ... -
Page 5: Parts Available For The Sl2100
NEC SL2100 Communication System Parts available for the SL2100 Not all parts are included within this guide, please refer to the other SL2100 Quick Install Guides or the SL2100 Hardware Manual for a full description and installation instructions of all parts available. -
Page 6: System Overview
NEC SL2100 Communication System System Overview SL2100 chassis showing the CPU card and an interface card with analogue trunks. 3 x Analogue Trunks SL2100 CPU card Extension Interface card The slots are labelled S0~S4 on the front of the chassis. -
Page 7: Installation Procedure
In event of a power failure, the trunk connections are not automatically rerouted. For power failure it is recommended to connect a socket for each Analogue trunk in parallel with the SL2100. Quick Install Guide – SL2100 with Analogue Trunks rev 1.1... -
Page 8: 1- Unpack The Sl2100 System
If you need to extend the exchange line cables: Solid wire for exchange line cables: Recommended cable type: Twisted pair (CW1308 or similar specification) Conductor diameter: 0.4 to 0.6 mm Quick Install Guide – SL2100 with Analogue Trunks rev 1.1... -
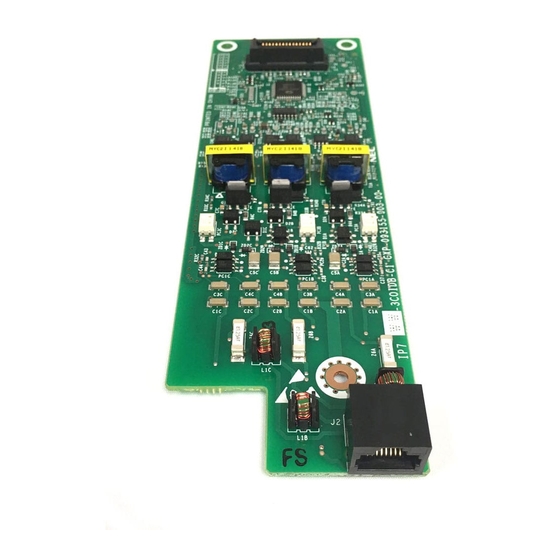
Page 9: 2- Install The Analogue Trunk Card
Install the 3COIDB Card 2- Install the Analogue Trunk Card The SL2100 chassis does not have any trunk ports pre-installed, you install the trunk card of your choice. ! Ensure the SL2100 is powered off before removing/installing any card. Mounting the 3COIDB Daughter card... -
Page 10: Removing The Plastic Knockouts
Cut the three connection points for each left/right knockout depending in the trunk daughter card being installed Remove any sharp edges with a utility knife Ensure the flush side of the cutter is towards the front panel of the card Quick Install Guide – SL2100 with Analogue Trunks rev 1.1... -
Page 11: Installing Into The Universal Slot
Note – Slot 4 does not support digital extensions. Insert the interface card into the SL2100 universal slot, ensure the card slides into the guide rails and tighten the two screws to secure the card. The type of trunk daughter card installed can be identified by the RJ45 sockets visible on the front of the interface card. -
Page 12: 3- Install The Cpu Card
Install the CPU Card 3- Install the CPU Card The SL2100 chassis does not have any CPU card pre-installed, you install the card of your choice. There are two CPU card available: IP7EU-CPU-C1 SL2100 Main Processor Board • VoIPDB Daughter Board Connector : 1 •... - Page 13 Install the CPU Card Insert the CPU card mounted into the SL2100 CPU slot S0, ensure the card slides into the guide rails and tighten the two screws to secure the card. Quick Install Guide – SL2100 with Analogue Trunks rev 1.1...
-
Page 14: 4A- Wall Mount The Sl2100 System
Refer to the SL2100 Hardware Manual for instructions. Fit three screws to the wall in the holes shown. Leave 2.5~3.5 mm stand off. Hook the SL2100 chassis onto the three screw heads. Quick Install Guide – SL2100 with Analogue Trunks rev 1.1... - Page 15 Important. The system must have a permanent Earth Ground connection to a verified Earth point using a minimum of 14AWG/2.5mm cable. The Earth connection must have no other purpose than connecting to the SL2100 unit. Quick Install Guide – SL2100 with Analogue Trunks rev 1.1...
-
Page 16: 4B- Rack Mount The Sl2100 System
Fit the rack mount shelf + chassis into the 19 inch rack and secure the shelf with the four screws supplied Quick Install Guide – SL2100 with Analogue Trunks rev 1.1... -
Page 17: 5- Connect The Telephones
These guides also include details of connecting the following items: Doorphone units DSS consoles 6- Connect the External Music on Hold Device Refer to the Quick Install Guide for MOH and External Audio. Quick Install Guide – SL2100 with Analogue Trunks rev 1.1... -
Page 18: 7- Connect The Exchange Lines
Connect the Exchange Lines 7- Connect the Exchange Lines The SL2100 chassis does not have any trunk ports pre-installed, you install the trunk card of your choice. Analogue Trunk Trunk port allocation CO 1 Trunk port 1 CO 2 Trunk port 2... - Page 19 IP7WW-308U-A1 or IP7WW-3COIDB-C1 card. Using an RJ45 patch cable into the RJ45 connectors Trunk / COI Port RJ45 Colour code White/Orange Orange/White White/Green Blue/White 8 765 4321 White/Blue Green/White White/Brown Brown/White Quick Install Guide – SL2100 with Analogue Trunks rev 1.1...
-
Page 20: 8- Connect The Power & System Start Up
System Start Up – First Time ! The first time you start up the SL2100 it is important to clear the system memory. This will ensure that the system is set to the default/factory configuration. 1. Push and hold the LOAD Button located on the front of the CPU card. -
Page 21: 9- Configure The Sl2100
You must have SL2100 PCPro installed to your laptop/PC, this can be downloaded from BusinessNet, refer to the Quick Install Guide – SL2100 PCpro. The SL2100 can also be configured via an SL2100 System phone or via a WebPro interface, these are not included within this guide. -
Page 22: Change Your Pc Ip Address
Change your PC IP Address You will need to reconfigure your PC to have an IP address in the same subnet as the SL2100 during system commissioning. You will be able to change the IP address of the SL2100 during this process. -
Page 23: Sl2100 Pcpro
Installer level access: User Name: tech Password: 12345678 On first install you may need to setup the default sliding panes if you wish to use these. Select View tab and click Default Quick Install Guide – SL2100 with Analogue Trunks rev 1.1... -
Page 24: Pcpro Initial Setup Wizard
System time and date Downloads the SL2100 system configuration to detect the hardware installed, the wizard will then tailor to the system, so that you only have to setup the parts actually installed. Will detect if the configuration is at default/factory setting and warn you if not, to prevent you from overwriting an existing configuration. - Page 25 This guide is based on an example configuration, your country selection may have different settings. Select the Extension Number Range Will set the extension numbers of all extensons on the system. Press F1 to get help with the Initial Setup Wizard Quick Install Guide – SL2100 with Analogue Trunks rev 1.1...
- Page 26 Will set the programmable function keys for all digital and IP terminals. The Delete all option will set all keys to ‘None’, you can then setup your own functions later using PCPro. Quick Install Guide – SL2100 with Analogue Trunks rev 1.1...
- Page 27 Configure the SL2100 Detected Trunk Type Will show the trunk cards installed within the SL2100 system, in this example only Analogue trunks are installed. Click the ‘Analogue Trunks’ button to continue. For each trunk line, you can configure two Targets and two Modes. Additional Modes can be configured outside of the Initial Setup Wizard.
- Page 28 As you click on each trunk line in each mode it will cycle through different Ring Groups 1~4 and then Voice Mail. You can also change the properties for each trunk by clicking on the trunk icon Some settings you may change are CallerID and the Clear Signal timer. Quick Install Guide – SL2100 with Analogue Trunks rev 1.1...
-
Page 29: Set Time & Date And Upload To The Sl2100
Ensure Select All is ticked and Click Start to begin uploading the changes to the SL2100 system, the progress bar will show when this is complete (should take less than 30 seconds). Click Close when finished. Repeat Wizard or Finish If you’ve uploaded your changes then click Disconnect... -
Page 30: Make Additional Changes With Pcpro
Configure the SL2100 Make Additional Changes with PCPro Note – Only required if the configuration you selected via the Initial Setup Wizard requires fine tuning. Connect and Download the SL2100 configuration Quick Install Guide – SL2100 with Analogue Trunks rev 1.1... -
Page 31: Incoming Ring Groups
Click any IRG to view the details within the Properties pane Click button to open Easy Edit screen for IRG’s Change the view within the pane by right clicking and selecting View Quick Install Guide – SL2100 with Analogue Trunks rev 1.1... -
Page 32: Trunk - Outgoing Trunk Access
The Priority can be used to select the order the trunks are seized when a user dials the Trunk Access code. Use Trunk Group 1 for trunks enabled True = Outgoing outgoing access calls enabled False = Outgoing calls disabled Quick Install Guide – SL2100 with Analogue Trunks rev 1.1... -
Page 33: Automatic Night Mode Schedule
Automatic Night Mode Schedule Night modes are used to adjust the incoming ring assignment of the SL2100. Mode 1 (Day) and Mode 2 (Night) are used within the Initial Setup Wizard, additional modes can be added via this screen. The example below has Mode 3 used for lunch period. -
Page 34: Extension - Programmable Function Keys
1. Within the Properties pane – allows selection of keys 1~12 and requires knowledge of the key types 2. Within the Easy Edit screen – allows selection of all keys and is simpler to use Click the Function Keys button to open the Easy Edit screen Quick Install Guide – SL2100 with Analogue Trunks rev 1.1... - Page 35 You can copy the key assignment of the current phone to others by clicking the Apply to multiple button. Programmable Function keys are setup within the Initial Setup wizard for Line keys or no function, you can add further functions here. Quick Install Guide – SL2100 with Analogue Trunks rev 1.1...
-
Page 36: Extension - Toll Restriction
Green highlight means it’s permitted (applied as an exemption to the restriction tables) Note – You must ensure that all phones can dial Emergency numbers for all available lines in all modes Quick Install Guide – SL2100 with Analogue Trunks rev 1.1... -
Page 37: What To Do If You Make Errors Within The Sl2100 Configuration
Tip - Press F1 to get help within PCro. If you can’t locate your errors within PCPro then you may need to default the SL2100 back to factory defaults and run the Initial Setup wizard again (this will only take a few minutes). -
Page 38: 10- Security
User Pro (if used) DIM Access (if enabled for maintenance) To edit the passwords using PCPro: Search for password within the System Data and Easy Edit areas: 90-02=PCPro‘s password Select Advanced level Quick Install Guide – SL2100 with Analogue Trunks rev 1.1...