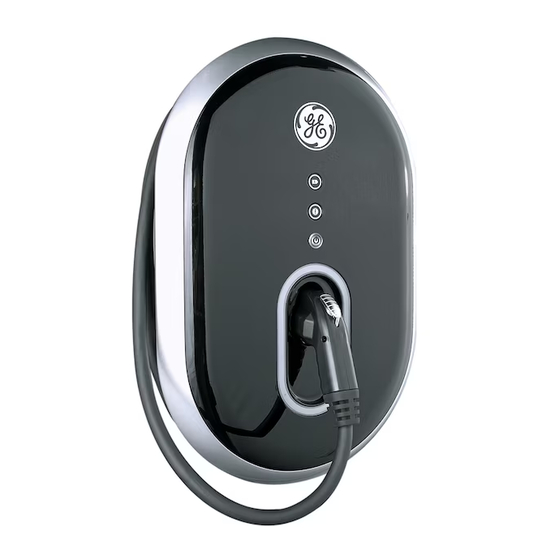
GE WattStation Installation And User Manual
Networked wallmount evse charger
Hide thumbs
Also See for WattStation:
- User manual (16 pages) ,
- User manual (28 pages) ,
- Installation manual (2 pages)

Related Manuals for GE WattStation


Summary of Contents for GE WattStation
- Page 1 GE Energy Industrial Solutions GE Networked Wallmount WattStation EVSE Charger Installation and User Manual Imagination at work © GE All Rights Reserved...
-
Page 2: Table Of Contents
Terms & Definitions ..................................32 Network Topologies ..................................33 Firewall and security considerations ............................40 Catalog Information ............................41 Networked Wallmount WattStation catalog numbers ....................41 Accessories and Replacement kits ............................41 Trouble shooting .............................. 41 Fault Icon flash codes ..................................41 Hard Faults ...................................... -
Page 3: Safety And Compliance
This should be run with circuit conductors and connected to the equipment grounding bar or lead on the EVSE. Connections to the EVSE are the responsibility of the installer and purchaser, not GE and must comply with all applicable electrical codes and ordinances. -
Page 4: Notes
Important: Changes or modifications to this product not authorized by GE Industrial Solutions could affect the EMC compliance and revoke your authority to operate this product. Exposure to Radio Frequency Energy: The radiated power output of the optional IEEE 802.11b/g wireless radio and optional cellular modem in this device are below the FCC radio frequency exposure limits for uncontrolled equipment. -
Page 5: Installation Instructions
2.2 Plug-in version 2.2.1 Before Installation WattStation should be installed only by a licensed contractor, and/or a licensed electrician in accordance with all applicable state, local and national electrical codes and standards Ensure that a dedicated circuit, capable of supplying 30A at 208-240VAC, is available •... - Page 6 Step 2: Check for any damage to the unit, the cord or the connector. If no damage is noticed, proceed to step 3. If damage is noticed, call 1-888-GE-RESOLve. Step 3: Install wall mount bracket to the wall. Use the provided template to locate wall-mounting holes to ensure hole locations match the bracket.
- Page 7 Step 4: Slide WattStation unit onto the mounting bracket, ensuring that the opening in the back plate bracket aligns with the tab on the wall mount bracket Step 5: Lock the WattStation unit onto the mounting bracket using the provided key...
- Page 8 Step 6: Unwrap the plug-in cord and plug into the wall receptacle Step 7: Lock weatherproof receptacle cover (not supplied with WattStation) © GE All Rights Reserved...
-
Page 9: Non-Plug In Version
2.3 Non-plug in version 2.3.1 Before Installation WattStation should be installed only by a licensed contractor, and/or a licensed electrician in accordance with all applicable state, local and national electrical codes and standards Ensure that a dedicated circuit, capable of supplying 30A at 208-240VAC, is available •... - Page 10 ADA accessibility guidelines, section 4.2 Step 4: Slide WattStation unit onto the mounting bracket, ensuring that the opening in the back plate bracket aligns with the tab on the wall mount bracket © GE All Rights Reserved...
- Page 11 Step 5: Lock the WattStation unit onto the mounting bracket using the provided key Step 6: If unit is equipped with a cellular modem, remove the oval ring and front cover and then unplug all wires going into the modem. Be sure to take note where each wire belongs as they will have to be replaced.
-
Page 12: Features
Step 8: Remove the metal dead front by removing the four (4) screws that hold it in place to the plastic enclosure Step 9: Feed the supply power and ground wires through WattStation enclosure holes. Connect supply power wires to line side of the field wiring block and ground wire to the ground bar... -
Page 13: Access Control
RFID A RFID swipe indicator is on the top cover and indicates where a user should swipe their RFID card. The RFID reader will scan RFID cards and pass the scanned information to WattStation Connect for user authorization. The RFID reader is certified as an intentional radiator per FCC Part 15 Subpart C rules and has been granted the following Federal Communication Commission and Industry Canada (Industrie Canada) identification numbers. -
Page 14: Communication Options
The QR code serial number is stored in the EVSE’s SBC (Single Board Computer). An EV driver or EVSE owner can use their IPhone and the GE WattStation application to scan the QR code. Once the QR code is captured, the application will automatically connect to the GE WattStation Connect and provide the driver or EVSE owner with access and information for the Networked Wallmount WattStation. -
Page 15: Payment
(WattStation Connect Payment Card) at the EVSE. The driver must first link the WattStation Connect Payment Card to their PayPal account via the WattStation Connect web application. If the driver accepts the fees, the GE WattStation Connect will grant access of the EVSE to the driver. 3.5 Electronics The EVSE controller integrates Control Pilot Functions, Metering, Overload monitoring, ground fault protection and all local monitoring. -
Page 16: Ge Wattstation Connect
WattStation Connect. 3.6 GE WattStation Connect GE WattStation Connect is a server application that allows owners to configure and monitor their EVSEs remotely. GE WattStation Connect also handles RFID authentication and setup. The customer will access GE WattStation Connect through their web browser on their PC 3.6.1 Status... -
Page 17: Technical Details
The firmware for the EVSE will be upgradeable over the EVSE’s TCP/IP interface (CAT5 or wirelessly through the cellular router or WiFi Access Point). The firmware updates will allow GE to supply customers with updated firmware that adds additional features to flexible charging algorithms, ground fault detection performance, pricing models, communication protocols and other performance enhancements. -
Page 18: Software Configuration
For the purposes of customer convenience, the WattStation is shipped from the factory with default network setting of “DHCP enabled”. This means that the WattStation will try to obtain an IP address from a DCHP server if one is available. © GE All Rights Reserved... - Page 19 Approach 1: In the case of WattStation without the cellular router option, if the WattStation is not connected to a network with a DHCP server then it will default to an IP address of 192.168.13.1. Before connecting to the tool, ensure your computer has an IP address on the same subnet as the WattStation.
- Page 20 Configuration Tool). Approach 2: If the WattStation does have the cellular router option, the cellular router does have an internal DHCP server and will provide any DCHP clients connected to it IP addresses starting with 192.168.13.100. This makes determining the IP address of the WattStation more complex, since multiple WattStations may be connected in addition to the computing device you are using to browse into the configuration tool.
-
Page 21: Ip Address Reset Feature
4.2 IP Address Reset Feature If you assign a static IP address to the WattStation unit be sure to write this address down and store it in a safe place. If, however, you should happen to forget the station’s IP address there is a jumper plug provided that will allow you to reset the IP address to the factory default setting (192.168.13.1). -
Page 22: Accepting Connection To The Configuration Tool
4.3 Accepting Connection to the Configuration Tool The WattStation configuration tool runs over a secure http server that uses a so-called self-signed digital certificate that was created by GE Industrial Solutions specifically for the WattStation. Since this certificate was not issued by a trusted SSL certificate the browser will issue an alert or warning questioning the trustworthiness of the certificate before loading the page. -
Page 23: Using The Configuration Tool
On the Login screen enter the User Name and Password provided on the Provisioning or Commissioning card that was provided with your WattStation. You may wish to write these into the boxes below in case your card ever gets lost or separated from this instruction manual. - Page 24 Common …………….. a variety of settings to configure WattStation functionality o Authorization ……… settings to configure access control and payment options o GE Connect ™ ….… settings to configure your WattStation location and time zone o Modbus ……………….. settings to configure Modbus networking options o Network ……………….
- Page 25 The configuration tool provides built-in help text which is accessed simply by hovering your mouse over the feature. Please note that some features are applicable to the Pedestal WattStation product only, not the Networked Wallmount WattStation. For example the LED brightness feature and the “Enable LED Ring Dark Mode”...
- Page 26 4. Payment by RFID mode …….…………………….……..….…. available with RFID option only Follow the rules in the table below to configure the WattStation for each of these modes. The normal “not-in-use” icon will be illuminated as shown according to the authorization mode.
- Page 27 When a card is used for the first time, the GE WattStation Connect will reply back not only whether the card is authorized or not, but for how long it is authorized. That information goes into the local database.
- Page 28 4.4.3 GE Connect™ tab GE WattStation Connect™ is largely setup and ready to go at the factory. However, there are a few configurable items to consider when setting up your WattStation. Standalone Operation From WattStation Connect • This option, if checked, gives WattStation owners the ability to make their WattStation operable even the GE WattStation Connect connection is down.
- Page 29 This option, if checked, tells the MODBUS server to use the Wi-Fi network (eth1) port instead of the wired network port (eth0). MODBUS Address • This setting sets the MODBUS address (1 to 255). MODBUS Manager Default Port • Default port used to listen for connections. © GE All Rights Reserved...
- Page 30 Enabling Networks and DHCP • Note that the wired Ethernet port cannot be disabled. Dynamic Host Control Protocol (DHCP) tells the WattStation to get IP addresses from DHCP servers if available. Static IP settings, subnet masks and gateway IPs •...
-
Page 31: Networking Setup
Primary Interface • This setting tells the WattStation which port to use as the primary interface for connection to the GE WattStation Connect. Note that Modbus function will use the wired port unless directed otherwise by the configuration setting on its page. -
Page 32: Terms & Definitions
Dedicated Cellular router – Utilizing cellular technology this option offers a dedicated • connection to the Internet. The router will be housed in the WattStation unit and is not user serviceable. The router connects to an internally housed Ethernet switch. -
Page 33: Network Topologies
5.3 Network Topologies There are many different network topologies that the GE WattStation supports. This includes wired Ethernet, WIFI and a dedicated Cellular router. It is important to understand the following minimum requirements for all topologies. - Page 34 In this configuration each WattStation is connected to a common Ethernet LAN to provide primary connectivity. The WattStation units do not need to be plugged into the same switch, but the switches must be part of the same common network segment or VLAN. Internet connectivity is provided through the default gateway.
- Page 35 WattStation. Topology #4: WIFI In this configuration the units WIFI port is used to provide primary connectivity. The security settings for the WIFI must be configured in the WattStation before connectivity can take place. © GE All Rights Reserved...
- Page 36 In this configuration the units WIFI is used to provide primary connectivity. The security settings for the WIFI must be configured in the WattStation before connectivity can take place. Internet access is only available through the sites proxy server. The proxy server IP address and TCP port is manually configured in the WattStation.
- Page 37 In this configuration connectivity is provided to the sites BMS system over the WIFI interface. Internet connectivity is only available through the sites proxy server. The proxy server IP and port are configured in the WattStation. The BMS system resides on a network reachable via WIFI. © GE All Rights Reserved...
- Page 38 Connectivity to the proxy server and BMS are provided through the same router or gateway. Internet connectivity is only available through the sites proxy server. The proxy server IP and port are configured in the WattStation. The BMS system resides on a network connected behind the default gateway router.
- Page 39 WIFI interface. The BMS system is on a different network and a gateway must be used to reach it. A static route is required to be configured on the WattStation to direct BMS traffic to this gateway.
-
Page 40: Firewall And Security Considerations
Some locations may utilize firewalls or similar filtering devices to secure their environment. The following table lists IP addresses and ports that must be allowed for the GE WattStation to communicate properly. The DNS names are provided as reference and firewall or filtering device will most likely only use the IP address and TCP port numbers. -
Page 41: Catalog Information
Many sites that utilize proxy servers for Internet access also require the use of a login or other information to gain access to the Internet. For the WattStation unit to work properly there may be a requirement for your IT team to exclude the GEWattStation.com Internet domain from requiring authentication. -
Page 42: Hard Faults
J7. The pilot line should be connected to J7-1 and chassis ground to J7-2. Code 112 – Invalid configuration This fault indicates that the 8-position DIP switch (S6) on the WattStation charge control board is set incorrectly. The charge control board is used in several GE electric vehicle charging station products, and these settings are used to configure it to operate properly per product. -
Page 43: Soft Faults
J11 pin 5 to change state. If the contactor auxiliary feedback does not change state, this fault will be issued. The charging plug must be removed from the EV socket in order to clear this fault. © GE All Rights Reserved... -
Page 44: Alarms
This alarm indicates that the charge controller has detected a ground fault condition that exceeds the allowable levels per UL 2231-2. The WattStation unit implements the CCID 20 protection as defined in UL 2231-2, which requires a 20mA ground fault to trip in under 1 second (higher currents require faster trip times). - Page 45 The WattStation unit is designed to operate correctly from either centrally grounded (e.g. L1 – N – L2) or end-grounded (e.g. Line – Neutral) power sources. On end-grounded power sources make sure the “hot”...
-
Page 46: Limited Warranty For Ge Networked Wallmount Wattstation ("This Warranty")
(the “Warranty Period”). If a defect in the Hardware arises and a valid claim is received within the Warranty Period, your sole and exclusive remedy will be for GE, in its sole discretion and to the extent permitted by law, to (1) repair the defect in the Hardware at no charge, using new... - Page 47 GE; (h) defects caused by normal wear and tear or otherwise due to the normal aging of the product; (i) removed or defaced GE serial numbers; or (j) damage caused by or via the network on which the Hardware product is used including, but not limited to, any online intrusion or attack.
- Page 48 WattStation is a trademark of General Electric Company. Information provided is subject to change without notice. Please verify all details with GE. All Values are design or typical values when measured under laboratory conditions and GE makes no warranty or guarantee, express or implied, that such performance will be obtained under end-use conditions.