Table of Contents
Quick Links
Table of Contents

Related Manuals for Cisco WVC54GCA


Summary of Contents for Cisco WVC54GCA
- Page 1 USER GUIDE Wireless-G Internet Home Monitoring Camera WVC54GCA Model:...
-
Page 2: About This Guide
Copyright and Trademarks Specifications are subject to change without notice. Linksys is a registered trademark or trademark of Cisco Systems, Inc. and/or its affiliates in the U.S. and certain other countries. Copyright © 2007 Cisco Systems, Inc. All rights reserved. Other brands and product names are trademarks or registered trademarks of their respective holders. -
Page 3: Table Of Contents
Table of Contents Chapter 1: Product Overview Front Panel..........4 Back Panel . - Page 4 Table of Contents Industry Canada Statement ........35 Avis d’Industrie Canada.
-
Page 5: Chapter 1: Product Overview
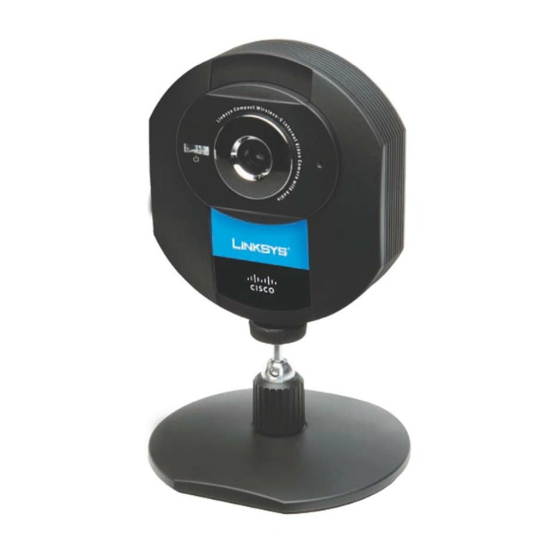
Product Overview Chapter 1 Chapter 1: Bottom Panel Product Overview Thank you for choosing the Linksys Wireless-G Internet Home Monitoring Camera. The Camera sends live video through the Internet to a web browser anywhere in the world! This compact, self-contained unit lets you keep an eye on your home, your kids, your workplace—whatever’s important to you. -
Page 6: Chapter 2: Setting Up And Mounting The Camera
The Setup Wizard should run automatically, and the End User LIcense Agreement Welcome screen should appear. If not, click Start, select Run, and in the field provided, enter D:\wvc54gca.exe Connect the included network cable to your network (if “D” is the letter of your CD-ROM drive). - Page 7 Setting Up and Mounting the Camera Chapter 2 Plug the included power adapter into the Camera’s If the Camera you want is not displayed, click Search Power port. Plug the other end into an electrical outlet. Again to run a new search for Cameras. Click Next.
- Page 8 Setting Up and Mounting the Camera Chapter 2 The Wizard displays the wireless security method that your network is using: WPA/WPA2-Personal, WEP (128-Bit), or WEP (64-Bit). Follow the appropriate instructions below. If you are not using wireless security, select Disabled and go to step 14. •...
- Page 9 Setting Up and Mounting the Camera Chapter 2 Review the Camera’s settings. To make changes to the Reconnect the power to the Camera. Click Next. settings, click Back to go back to the previous screen. If the settings are correct, click Save to continue. Reconnect the Power When the Setup Wizard displays Camera successfully Save the Camera Settings...
-
Page 10: Placement Options
Setting Up and Mounting the Camera Chapter 2 Placement Options Adjust the tilt of its head accordingly, as described below in section “Camera Head Tilting”. The Camera can stand on a surface or be mounted on a wall. Depending on the positioning you want, you attach the Camera head to its stand at two different points. - Page 11 Setting Up and Mounting the Camera Chapter 2 Camera Tilting Feature with Stand Option The installation of the Wireless-G Internet Home Monitoring Camera is complete. Go to “Chapter 3: Installing and Using the Camera Utility.” For information about advanced configuration using the Camera’s Web-based Utility, go to “Chapter 4: Advanced Configuration with the Web-Based Utility.”...
-
Page 12: Chapter 2: Installing And Using The Camera Utility
Installing and Using the Camera Utility Chapter 2 Chapter 2: The Camera Utility displays the Setup screen and searches for your Wireless-G Camera. Installing and Using the Camera Utility Overview This chapter will instruct you on how to install and use the Camera Utility on your PC. - Page 13 Installing and Using the Camera Utility Chapter 2 Setup > Network Camera Setup > Recording Schedule Click Save, then Yes to save the Camera’s settings. To configure the Camera’s preference settings, click the Preferences tab. To set up a Camera that is located on the Internet, click the Internet Camera tab.
-
Page 14: Using The Camera Utility
Installing and Using the Camera Utility Chapter 2 Using the Camera Utility Camera Status This section of the Main screen lists all of the Cameras After the Camera Utility has been installed, its icon will be the Utility has detected. To view the video of a specific displayed in two locations, one on your desktop and one Camera, select a Camera, then drag-and-drop the Camera in the system tray of your desktop’s taskbar. - Page 15 Installing and Using the Camera Utility Chapter 2 Camera Name This is the name you gave to the Camera. MAC Name Displayed here is the MAC address of the Camera. MAC Name Displayed here is the MAC address of the Camera.
- Page 16 Installing and Using the Camera Utility Chapter 2 Main > Camera Settings Icon Function To modify a Camera’s settings, select its name in the If you want to record the current video, Camera Status section of the Main screen, and click click this icon.
- Page 17 Installing and Using the Camera Utility Chapter 2 Main > Scheduled Recordings Estimated Hard-Drive Memory Space Required for Video Recording per Hour To schedule recordings for a Camera, select its name in Resolution Quality Level Bit Rate File Size the Camera Status section of the Main screen, and click Scheduled Recording.
- Page 18 Installing and Using the Camera Utility Chapter 2 If the file you want is not listed, click Explore to find it. To rename a file, click Explore. After you have found the file, you can rename it. To close this screen, click X in the upper-right corner. NOTE: Use Windows Media Player 7 or higher to view your recordings.
- Page 19 Installing and Using the Camera Utility Chapter 2 Frequency Decide which days you want the Camera to monitor its field of view for motion. Select the appropriate Frequency from the drop-down menu. Start Time Decide what time you want the Camera to begin monitoring for motion.
- Page 20 Installing and Using the Camera Utility Chapter 2 Maximum time frame Motion Detection To cancel your changes, click Cancel. Recording This is the maximum length of time the Utility To close this screen, click X in the upper-right corner. will record when motion is detected. (To configure the Motion Detection settings, click Motion Detection on the main menu.) The default is 1 min.
-
Page 21: Chapter 4: Advanced Configuration With The Web-Based Utility
Advanced Configuration with the Web-based Utility Chapter 4 • Chapter 4: Help – Select this tab to display the Help screen. Go to the “Help” section for more information. Advanced Configuration • Exit – Select this tab to close the Utility. with the Web-based Utility View Video Follow these instructions to view the Camera’s video.