Huawei SmartLogger2000 User Manual
Hide thumbs
Also See for SmartLogger2000:
- User manual (230 pages) ,
- Quick manual (36 pages) ,
- User manual (204 pages)

Related Manuals for Huawei SmartLogger2000


Summary of Contents for Huawei SmartLogger2000
- Page 1 SmartLogger2000 User Manual Date 2016-06-20 HUAWEI TECHNOLOGIES CO., LTD.
- Page 2 Notice The purchased products, services and features are stipulated by the contract made between Huawei and the customer. All or part of the products, services and features described in this document may not be within the purchase scope or the usage scope. Unless otherwise specified in the contract, all statements, information, and recommendations in this document are provided "AS IS"...
-
Page 3: About This Document
About This Document About This Document Overview This document introduces the SmartLogger2000 (SmartLogger for short) in terms of installation, cable connections, system operation and maintenance, and troubleshooting. Readers should understand the SmartLogger features, functions, and safety precautions provided in this document before installing and operating the SmartLogger. - Page 4 NOTE is used to address information not related to personal injury, equipment damage, and environment deterioration. Change History Changes between document issues are cumulative. The latest document issue contains all the changes made in earlier issues. (2016-06-20) Huawei Proprietary and Confidential Copyright © Huawei Technologies Co., Ltd.
-
Page 5: Table Of Contents
4.6 Connecting a Power Meter ............................58 4.7 Connecting the Box-type Transformer ........................59 4.8 Connecting a PID Module ............................61 4.9 Connecting a Ripple Control Receiver ........................62 (2016-06-20) Huawei Proprietary and Confidential Copyright © Huawei Technologies Co., Ltd. - Page 6 9.1 CE ....................................85 9.2 FCC ..................................... 85 10 Technical Specifications ......................86 A Product User Lists ........................88 B Acronyms and Abbreviations ....................89 (2016-06-20) Huawei Proprietary and Confidential Copyright © Huawei Technologies Co., Ltd.
-
Page 7: Safety Precautions
Operation personnel should understand the composition and working principles of the PV grid-tied power generating system and local regulations. Read this document thoroughly before operations. Huawei shall not be liable for any consequence caused by violation of the storage, transportation, installation, and operation regulations specified in this document. - Page 8 When maintaining the SmartLogger, wear ESD gloves and comply with ESD precautions. The device has multiple inputs. Switch off all inputs before the maintenance. (2016-06-20) Huawei Proprietary and Confidential Copyright © Huawei Technologies Co., Ltd.
-
Page 9: Overview
Optical fiber ring switch − Provides two 100M Ethernet optical ports that support RSTP and STP to implement fiber ring networking. If RSTP is used, fiber ring protection can be completed (2016-06-20) Huawei Proprietary and Confidential Copyright © Huawei Technologies Co., Ltd. - Page 10 APP. Intelligent management Automatically searches for and accesses Huawei inverters, AC combiner boxes, − PLC modules, and PID modules. If you import a parameter configuration table, the SmartLogger can access third-party devices that support Modbus-RTU and IEC103.
- Page 11 Simultaneously accesses multiple NMSs (including Huawei NetEco and third-party − NMSs) that support Modbus-TCP, IEC103, and IEC104. Huawei NetEco features centralized O&M, big data analysis, intelligent diagnosis, and mobile O&M. Supports connection to a third-party NMS over File Transfer Protocol (FTP).
-
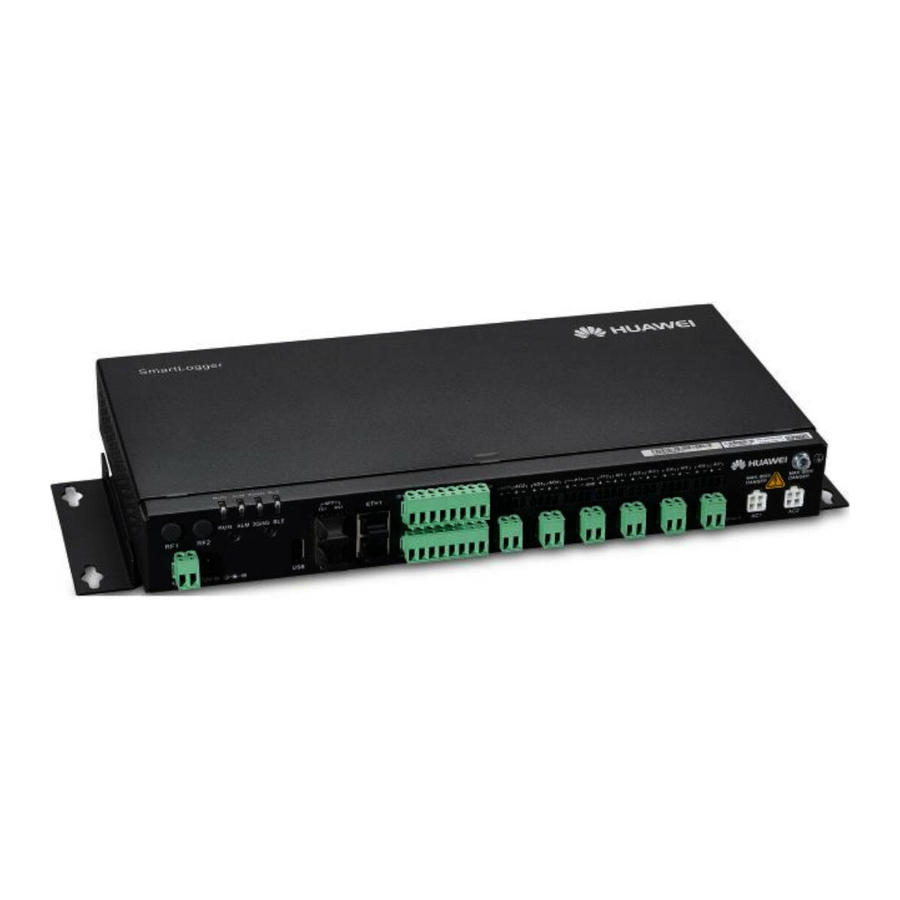
Page 12: Appearance
Blinking red at The SmartLogger or the long intervals (on devices accessing it for 1s and then off generate warnings. for 4s) Blinking red at The SmartLogger or the (2016-06-20) Huawei Proprietary and Confidential Copyright © Huawei Technologies Co., Ltd. - Page 13 After the communication between the SmartLogger and the APP fails, the disconnection is normal if the green indicator goes off immediately, and is abnormal if the indicator goes off after blinking slowly for 30s. (2016-06-20) Huawei Proprietary and Confidential Copyright © Huawei Technologies Co., Ltd.
- Page 14 Figure 2-2 SmartLogger side view (unit: mm) (1) Heat dissipation hole (2) SIM card slot (reserved) Rear View of the Shell Figure 2-3 SmartLogger rear view (unit: mm) (1) Wall-mounting ears (2016-06-20) Huawei Proprietary and Confidential Copyright © Huawei Technologies Co., Ltd.
- Page 15 SmartLogger IP address to the default IP address AC1, AC2 AC power cable Connects to A, B, and C three-phase inputs ports for power line communication (PLC) with the inverter. External grounding (2016-06-20) Huawei Proprietary and Confidential Copyright © Huawei Technologies Co., Ltd.
-
Page 16: Nameplate Description
A nameplate is attached at the back of the SmartLogger. The content of the nameplate includes the SmartLogger model, rated power supply specifications, and compliance symbols, as shown in Figure 2-5. (2016-06-20) Huawei Proprietary and Confidential Copyright © Huawei Technologies Co., Ltd. -
Page 17: Typical Networking Scenarios
AC power cable, connects to a box-type transformer over the RS485 communications cable or Ethernet network cable, and connects to southbound devices such as the EMI and power meter over the RS485 communications cable. (2016-06-20) Huawei Proprietary and Confidential Copyright © Huawei Technologies Co., Ltd. - Page 18 EMI, and power meter. Multiple fiber ring networks can converge over an Ethernet switch or SmartLogger and then connect to an NMS. (2016-06-20) Huawei Proprietary and Confidential Copyright © Huawei Technologies Co., Ltd.
- Page 19 EMI and power meter over the RS485 communications cable, connects to a customer premises equipment (CPE) over an Ethernet electrical port, and transmits information collected from southbound devices to an NMS in wireless mode. (2016-06-20) Huawei Proprietary and Confidential Copyright © Huawei Technologies Co., Ltd.
-
Page 20: System Wiring Diagram
The IP address planned for the box-type transformer needs to be imported to the third-party NMS for the NMS to proactively connect to the box-type transformer. 2.5 System Wiring Diagram (2016-06-20) Huawei Proprietary and Confidential Copyright © Huawei Technologies Co., Ltd. - Page 21 SmartLogger, RS485 signal SPD, PID module, inductor, ATB, PoE module, and PoE SPD. The PID module and inductor are configured only in the smart array controller with the PID module and have been installed before delivery. (2016-06-20) Huawei Proprietary and Confidential Copyright © Huawei Technologies Co., Ltd.
-
Page 22: Specifications
1 PCS with the PID module) delivery SmartLogger SmartLogger2000 Installed before 1 PCS delivery RS485 signal SPD SPM01A Installed before 3 PCS delivery CT-GZF2PJ-8 or Optional; can be 1 PCS (2016-06-20) Huawei Proprietary and Confidential Copyright © Huawei Technologies Co., Ltd. - Page 23 Table 2-5 lists the components required for the LTE+RS485/PLC networking mode in the scenario with a smart array controller. (2016-06-20) Huawei Proprietary and Confidential Copyright © Huawei Technologies Co., Ltd.
- Page 24 If the SmartLogger uses an AC power cable for communication, an MCB or a knife switch needs to be installed to prevent device damage in the case of short circuits (2016-06-20) Huawei Proprietary and Confidential Copyright © Huawei Technologies Co., Ltd.
- Page 25 Rated voltage: ≥ 500 V; rated Prepared by the 1 PCS current: ≥ 6 A customer Socket Matching with the power Prepared by the 1 PCS (2016-06-20) Huawei Proprietary and Confidential Copyright © Huawei Technologies Co., Ltd.
- Page 26 1 PCS purchased from Huawei RS485 signal SPD X4B-05 Optional; can be 3 PCS purchased from Huawei PoE module POE35-54A or POE85-56A Optional; can be 1 PCS purchased from Huawei (2016-06-20) Huawei Proprietary and Confidential Copyright © Huawei Technologies Co., Ltd.
- Page 27 ≥ 6 A customer Socket Matching with the power Prepared by the 1 PCS adapter customer Length of the cable used for connecting components depends on the survey result. (2016-06-20) Huawei Proprietary and Confidential Copyright © Huawei Technologies Co., Ltd.
-
Page 28: Installation
Check the outer packing materials for damage before unpack the SmartLogger, such as holes and cracks. If any damage is found, do not unpack the SmartLogger and contact the dealer as soon as possible. (2016-06-20) Huawei Proprietary and Confidential Copyright © Huawei Technologies Co., Ltd. -
Page 29: Preparing Tools
Diagonal pliers Cuts and tighten cable ties. Wire stripper Peels cable jackets. Crimping tool H4TC0001 Crimps cables. Manufacturer: AMPHENOL RJ45 crimping tool Crimps RJ45 connectors for communications cables. (2016-06-20) Huawei Proprietary and Confidential Copyright © Huawei Technologies Co., Ltd. - Page 30 Hammers expansion sleeves into holes. Guarded blade utility knife Removes package. Cable cutter Cuts cables. Vacuum cleaner Cleans up dust after holes are drilled. Marker Diameter: ≤ 10 mm Marks signs. (2016-06-20) Huawei Proprietary and Confidential Copyright © Huawei Technologies Co., Ltd.
-
Page 31: Determining The Installation Position
Observe the following requirements when determining the installation position: Do not install the SmartLogger outdoors because it is protected to IP20. Install the SmartLogger in a dry environment to protect it against water. (2016-06-20) Huawei Proprietary and Confidential Copyright © Huawei Technologies Co., Ltd. - Page 32 Figure 3-1 and Figure 3-2 show the minimum distance between the SmartLogger and surrounding objects. Figure 3-1 The minimum clearance for wall-mounting (unit: mm) (2016-06-20) Huawei Proprietary and Confidential Copyright © Huawei Technologies Co., Ltd.
-
Page 33: Installing The Smartlogger
Before hanging the SmartLogger on the screws, secure the expansion sleeves, washers, and tapping screws into the wall. Figure 3-3 shows the distances between screw holes on the SmartLogger mounting ears. (2016-06-20) Huawei Proprietary and Confidential Copyright © Huawei Technologies Co., Ltd. - Page 34 Figure 3-5. If you need to use a ladder to install the device on a high position, take measures to protect yourself from falling down. (2016-06-20) Huawei Proprietary and Confidential Copyright © Huawei Technologies Co., Ltd.
- Page 35 Put a hammer drill with a Ф6 mm drill bit on a marked hole position perpendicularly against the wall and drill to a depth greater than or equal to 40 mm. (2016-06-20) Huawei Proprietary and Confidential Copyright © Huawei Technologies Co., Ltd.
- Page 36 Step 4 Tighten the tapping screws to a torque of 0.3 N·m using a torque screwdriver, as shown in Figure 3-7. Figure 3-7 Tightening the tapping screws ----End (2016-06-20) Huawei Proprietary and Confidential Copyright © Huawei Technologies Co., Ltd.
-
Page 37: Mounting The Smartlogger Along A Guide Rail
600 mm or greater. Secure the guide rail before mounting the SmartLogger. Procedure Step 1 Remove the mounting ears from the SmartLogger using a Phillips screwdriver, as shown in Figure 3-9. (2016-06-20) Huawei Proprietary and Confidential Copyright © Huawei Technologies Co., Ltd. - Page 38 1.2 N·m, as shown in Figure 3-10. Install the guide rail clamps exactly as shown in the figure; otherwise, you may not be able to mount the SmartLogger onto the guide rail. (2016-06-20) Huawei Proprietary and Confidential Copyright © Huawei Technologies Co., Ltd.
- Page 39 Figure 3-11 Mounting the SmartLogger onto the guide rail Step 4 Install the guide rails fastener using M4x12 screws, and tighten the screws to a torque wrench of 1.2 N·m, as shown in Figure 3-12. (2016-06-20) Huawei Proprietary and Confidential Copyright © Huawei Technologies Co., Ltd.
-
Page 40: Installing The Rs485 Signal Spd
SPD on a guide rail, prepare a standard 35 mm wide guide rail with a length no less than 80 mm. For details about the guide rail dimensions, see Figure 3-8. (2016-06-20) Huawei Proprietary and Confidential Copyright © Huawei Technologies Co., Ltd. - Page 41 Procedure Step 1 Secure the RS485 signal SPD to the guide rail, as shown in Figure 3-14. Figure 3-14 Securing the RS485 signal SPD to the guide rail ----End (2016-06-20) Huawei Proprietary and Confidential Copyright © Huawei Technologies Co., Ltd.
-
Page 42: Connecting Cables
4.3 Connecting the RS485 signal SPD 4.4 Connecting Inverters 4.5 Connecting an EMI 4.6 Connecting a Power Meter 4.7 Connecting the Box-type Transformer 4.8 Connecting a PID Module 4.9 Connecting a Ripple Control Receiver (2016-06-20) Huawei Proprietary and Confidential Copyright © Huawei Technologies Co., Ltd. -
Page 43: Connection Description
The SmartLogger and SPD are separately connected to the ground bar for grounding protection through a PE cable. 4.2.1 Connecting the PE Cable for the SmartLogger Prerequisites The ground cable and OT terminals are available. (2016-06-20) Huawei Proprietary and Confidential Copyright © Huawei Technologies Co., Ltd. - Page 44 Step 4 Install the crimped OT terminal, flat washer, and spring washer onto the screw, and tighten the screw to a torque of 1.4 N·m using a torque screwdriver, as shown in Figure 4-4. (2016-06-20) Huawei Proprietary and Confidential Copyright © Huawei Technologies Co., Ltd.
-
Page 45: Connecting The Pe Cable For The Rs485 Signal Spd
Step 1 Remove 8 mm of the insulation layer from the ground cable using the wire stripper. Step 2 Insert the bare cable cores into port 3 of the RS485 signal SPD, as shown by (1) in Figure 4-5. (2016-06-20) Huawei Proprietary and Confidential Copyright © Huawei Technologies Co., Ltd. -
Page 46: Connecting The Rs485 Signal Spd
The way of connecting two to three RS485 signal SPDs is the same as the way of connecting one RS485 signal SPD. One RS485 signal SPD provides two RS485 surge protection ports, as shown in Figure 4-6. (2016-06-20) Huawei Proprietary and Confidential Copyright © Huawei Technologies Co., Ltd. - Page 47 Surge ports are connected to RS485 ports of other devices. Port 3 is the ground port. Protection ports and Surge ports must not be reversely connected. One RS485 signal SPD can protect two COM ports. (2016-06-20) Huawei Proprietary and Confidential Copyright © Huawei Technologies Co., Ltd.
- Page 48 SUN2000 Using an RS485 Communications Cable of 4.4.1 Connecting the SUN2000. Remove the terminal block using a flat-head screwdriver. Step 3 Insert the bare cable cores into the terminal block, as shown by (1) in Figure 4-9. (2016-06-20) Huawei Proprietary and Confidential Copyright © Huawei Technologies Co., Ltd.
- Page 49 Protection port 6 or 12 on the RS485 signal SPD. Step 7 Use a flat-head screwdriver to tighten the screws on the Protection ports, as shown by (2) in Figure 4-10. ----End (2016-06-20) Huawei Proprietary and Confidential Copyright © Huawei Technologies Co., Ltd.
-
Page 50: Connecting Inverters
Table 4-2 COM port description Port Silk Screen Function RS485A, for RS485 positive differential signaling COM1 RS485B, for RS485 negative differential signaling COM2 RS485A, for RS485 positive differential signaling (2016-06-20) Huawei Proprietary and Confidential Copyright © Huawei Technologies Co., Ltd. - Page 51 − SUN2000-50KTL/50KTL-C1 Figure 4-12 shows the position of the terminal block in the SUN2000-50KTL/50KTL-C1. Figure 4-13 describes the functions. Figure 4-12 Position of the terminal block in the SUN2000 (2016-06-20) Huawei Proprietary and Confidential Copyright © Huawei Technologies Co., Ltd.
- Page 52 RS485B OUT RS485B, for RS485 negative differential signaling − Other models of SUN2000s Figure 4-14 shows the position of the terminal block in the SUN2000-33KTL/40KTL. Figure 4-15 describes the functions. (2016-06-20) Huawei Proprietary and Confidential Copyright © Huawei Technologies Co., Ltd.
- Page 53 RS485B (OUT), for RS485 positive differential signaling negative differential signaling RJ45 network port connection The RJ45 port needs to be connected using an RJ45 connector, as shown in Figure 4-16. (2016-06-20) Huawei Proprietary and Confidential Copyright © Huawei Technologies Co., Ltd.
- Page 54 This section describes how to connect the SUN2000-50KTL to the SmartLogger through a terminal block. Figure 4-17 shows how to connect the SmartLogger to the SUN2000 through an RS485 signal SPD. (2016-06-20) Huawei Proprietary and Confidential Copyright © Huawei Technologies Co., Ltd.
- Page 55 Figure 4-18 Stripping an RS485 communications cable (unit: mm) Step 3 Insert the bare cable cores into the Surge port of the RS485 signal SPD, as shown by (1) in Figure 4-19. (2016-06-20) Huawei Proprietary and Confidential Copyright © Huawei Technologies Co., Ltd.
- Page 56 Step 2 Connect the AC1 and AC2 terminals at the other end of the cable to the AC1 and AC2 ports on the SmartLogger respectively, as shown in Figure 4-20. (2016-06-20) Huawei Proprietary and Confidential Copyright © Huawei Technologies Co., Ltd.
- Page 57 Connecting a Device. PLC describes how to configure PLC parameters for the SmartLogger. The port used for PLC networking is RS485-0. The recommended Baud Rate for the port is 115200 bit/s, which can provide optimal communications performance. (2016-06-20) Huawei Proprietary and Confidential Copyright © Huawei Technologies Co., Ltd.
-
Page 58: Connecting The Sun8000
Connecting the SUN2000 Using an RS485 Communications Cable of 4.4.1 Connecting the SUN2000. Figure 4-22 shows how to connect the SmartLogger to the SUN8000 through an RS485 signal SPD. (2016-06-20) Huawei Proprietary and Confidential Copyright © Huawei Technologies Co., Ltd. - Page 59 Step 4 Insert the bare cable cores into the Surge port of the RS485 signal SPD, as shown by (1) in Figure 4-23. Figure 4-23 Connecting the Surge port of the RS485 signal SPD (2016-06-20) Huawei Proprietary and Confidential Copyright © Huawei Technologies Co., Ltd.
-
Page 60: Connecting Multiple Inverters To The Smartlogger
RS485IN port of the next inverter, and the first inverter is connected to the SmartLogger as described in Connecting the SUN2000 Using an RS485 Communications Cable or 4.4.2 Connecting the SUN8000 in 4.4.1 Connecting the SUN2000. Figure 4-24 shows the connection. (2016-06-20) Huawei Proprietary and Confidential Copyright © Huawei Technologies Co., Ltd. - Page 61 Baud rate of all the devices in one daisy chain should stay consistent with those of the SmartLogger. AC Power Cable Connection Figure 4-25 shows the method for connecting the SmartLogger to multiple SUN2000s over an AC power cable. (2016-06-20) Huawei Proprietary and Confidential Copyright © Huawei Technologies Co., Ltd.
-
Page 62: Connecting An Emi
Connecting the SUN2000 Using an RS485 Communications Cable of 4.4.1 Connecting the SUN2000. Figure 4-26 shows how to connect the SmartLogger to an EMI through an RS485 signal SPD. (2016-06-20) Huawei Proprietary and Confidential Copyright © Huawei Technologies Co., Ltd. - Page 63 For details about the daisy chain connections, see Daisy Chain Connection in 4.4.3 Connecting Multiple Inverters to the SmartLogger. ----End Follow-up Procedure Take the reverse steps to disconnect the SmartLogger from the EMI. (2016-06-20) Huawei Proprietary and Confidential Copyright © Huawei Technologies Co., Ltd.
-
Page 64: Connecting A Power Meter
Step 2 Connect the other end of the cable to the COM port of the SmartLogger. For details about the operation, see Step 1–Step 5 in 4.3 Connecting the RS485 signal SPD. (2016-06-20) Huawei Proprietary and Confidential Copyright © Huawei Technologies Co., Ltd. -
Page 65: Connecting The Box-Type Transformer
Connecting the SUN2000 Using an RS485 Communications Cable of 4.4.1 Connecting the SUN2000. Figure 4-28 shows how to connect the SmartLogger to the box-type transformer through an RS485 signal SPD. (2016-06-20) Huawei Proprietary and Confidential Copyright © Huawei Technologies Co., Ltd. - Page 66 After connecting the cable, log in to the WebUI and set parameters under Box-type Transformer. For details about this operation, see Custom Devices. ----End Follow-up Procedure Disconnection can be performed in reverse order. (2016-06-20) Huawei Proprietary and Confidential Copyright © Huawei Technologies Co., Ltd.
-
Page 67: Connecting A Pid Module
Step 2 Connect the other end of the cable to the COM port of the SmartLogger. For details about the operation, see Step 1–Step 5 in 4.3 Connecting the RS485 signal SPD. (2016-06-20) Huawei Proprietary and Confidential Copyright © Huawei Technologies Co., Ltd. -
Page 68: Connecting A Ripple Control Receiver
Figure 4-30 shows the DI ports of the SmartLogger. Figure 4-30 DI ports of the SmartLogger Table 4-8 describes the DI ports. (2016-06-20) Huawei Proprietary and Confidential Copyright © Huawei Technologies Co., Ltd. - Page 69 Step 1 Select a cable of appropriate length and connect one end of the cable to the Ripple Control Receiver. A two-core or multiple-core cable with a cross sectional area of 1.5 mm is recommended. (2016-06-20) Huawei Proprietary and Confidential Copyright © Huawei Technologies Co., Ltd.
- Page 70 To enable the power grid scheduling function, you need to set the corresponding parameters (Active Power Control or Reactive Power Control) on the embedded WebUI after connecting cables. For details, see Active Power Control or Reactive Power Control. ----End (2016-06-20) Huawei Proprietary and Confidential Copyright © Huawei Technologies Co., Ltd.
-
Page 71: Connecting An Ethernet Network Cable
A POE module can be connected only to the DATA port of the SmartLogger. The default IP address of the SmartLogger is 192.168.0.10, the default subnet mask is 255.255.255.0, and the default gateway is 192.168.0.1. (2016-06-20) Huawei Proprietary and Confidential Copyright © Huawei Technologies Co., Ltd. -
Page 72: Connecting Optical Fibers
Step 2 Connect the two optical fibers delivered with the optical module to the ports on the optical module. Step 3 Connect the other end of the optical fiber to the ATB, as shown in Figure 4-35. (2016-06-20) Huawei Proprietary and Confidential Copyright © Huawei Technologies Co., Ltd. - Page 73 Green steady on and yellow An optical fiber link has been successfully established. Green steady on and yellow Optical fiber communication blinking slowly (0.1s on and is in progress. (2016-06-20) Huawei Proprietary and Confidential Copyright © Huawei Technologies Co., Ltd.
- Page 74 Disconnection can be performed in reverse order. 1. When removing an optical fiber, press down the clip first. 2. When removing an optical module, press down the handle, and then pull the module outwards. (2016-06-20) Huawei Proprietary and Confidential Copyright © Huawei Technologies Co., Ltd.
-
Page 75: System Operation
Incompliant cables and complies with the cable routing plan. Cables are bound neatly, and cable ties are secured evenly □ Compliant □ and properly in the same direction. Incompliant (2016-06-20) Huawei Proprietary and Confidential Copyright © Huawei Technologies Co., Ltd. -
Page 76: Powering On The System
If the SmartLogger is installed outside a smart array controller, place the power adapter on the top of the SmartLogger and secure the power adapter using cable ties, as shown in Figure 5-1. (2016-06-20) Huawei Proprietary and Confidential Copyright © Huawei Technologies Co., Ltd. - Page 77 Step 4 Switch on the circuit breaker of the AC socket. Step 5 Switch on the upstream circuit breaker of the AC power cable. Step 5 needs to be performed only in the PLC networking scenario. ----End (2016-06-20) Huawei Proprietary and Confidential Copyright © Huawei Technologies Co., Ltd.
-
Page 78: User Interface
Step 3 Remove the USB flash drive from the USB port at the bottom of the SmartLogger, and insert the USB flash drive into the port again. After the USB flash drive is connected again, the SmartLogger can automatically detect the boot script file. (2016-06-20) Huawei Proprietary and Confidential Copyright © Huawei Technologies Co., Ltd. -
Page 79: Exporting All Files
After exporting all files, you can view information about the SmartLogger and devices connected to the SmartLogger. Procedure Step 1 Insert the USB flash drive into the USB port at the bottom of the SmartLogger. (2016-06-20) Huawei Proprietary and Confidential Copyright © Huawei Technologies Co., Ltd. -
Page 80: Importing All Files
Local maintenance fails. intervals (on for 0.125s and then off for 0.125s) ----End 6.1.3 Importing All Files Prerequisites A USB flash drive contains a boot script file and all export files. (2016-06-20) Huawei Proprietary and Confidential Copyright © Huawei Technologies Co., Ltd. - Page 81 (on for 1s and then progress. off for 1s) Steady green Local maintenance succeeds. Blinking green at short Local maintenance fails. intervals (on for 0.125s and then off for 0.125s) ----End (2016-06-20) Huawei Proprietary and Confidential Copyright © Huawei Technologies Co., Ltd.
-
Page 82: Upgrading The Application
Step 1 Log in to http://support.huawei.com/carrier/, click Product Support, browse to or search for SmartLogger, and download the required upgrade package on the Software tab. The upgrade package is named smartlogger2000.zip. Store the upgrade package in the root directory of a USB flash drive, and do not decompress it. -
Page 83: Upgrading The Bsp
Guide or contact Huawei technical support. Procedure Step 1 Log in to http://support.huawei.com/carrier/, click Product Support, browse to or search for SmartLogger, and download the required upgrade package on the Software tab. The upgrade package is named smartlogger2000_bsp.zip. Store the upgrade package in the root directory of a USB flash drive, and do not decompress it. -
Page 84: Nms Operations
6.3 APP Operations Using the APP, you can monitor, query alarms for, and manage the SmartLogger and southbound devices connected to the SmartLogger. For details, see SUN2000 APP User Manual. (2016-06-20) Huawei Proprietary and Confidential Copyright © Huawei Technologies Co., Ltd. -
Page 85: Maintenance
12V IN port of the 12V IN port of the er cannot the SmartLogger. SmartLogger. powered 2. The power cable does not 2. Connect the power cable to (2016-06-20) Huawei Proprietary and Confidential Copyright © Huawei Technologies Co., Ltd. - Page 86 2. The device is powered off. SmartLogg 2. Power on the device. 3. The baud rate or RS485 address of the device is 3. Verify the baud rate and (2016-06-20) Huawei Proprietary and Confidential Copyright © Huawei Technologies Co., Ltd.
-
Page 87: Alarms
AI properly. If the cable is loose, remote disconnected, or reversely control connected, reconnect it firmly mode, the and correctly. AI port receives 2. Enter the active power AI (2016-06-20) Huawei Proprietary and Confidential Copyright © Huawei Technologies Co., Ltd. - Page 88 DI ports are reactive correct. power Dry 2. Enter the reactive power Dry contact remote contact remote control configuration page and check control mode, the the mapping table of the (2016-06-20) Huawei Proprietary and Confidential Copyright © Huawei Technologies Co., Ltd.
- Page 89 2. If the SmartLogger RS485 device. address conflicts with the logical address for the connected southbound device, choose Settings > Comm. Param. > Modbus TCP and modify SmartLogger address. (2016-06-20) Huawei Proprietary and Confidential Copyright © Huawei Technologies Co., Ltd.
-
Page 90: Disposing Of The Smartlogger
This topic describes how to dispose the SmartLogger. If the service life of the SmartLogger expires, dispose of the SmartLogger according to the local disposal act for waste electric appliances. You can also return it to Huawei, with the related expenses paid. -
Page 91: Certification Declaration
9 Certification Declaration Certification Declaration 9.1 CE Hereby, Huawei Technologies Co., Ltd., declares that this device is in compliance with the essential requirements and other relevant provisions of Directive 1999/5/EC. 9.2 FCC This equipment has been tested and found to comply with the limits for a Class B digital device, pursuant to part 15 of the FCC Rules. -
Page 92: Technical Specifications
Normal: 8 W; maximum: 15 W Language English, Chinese, German, Italian, Japanese, French, and Russian Dimensions (H x W x D, including 350 mm x 170 mm x 44 mm mounting ears) (2016-06-20) Huawei Proprietary and Confidential Copyright © Huawei Technologies Co., Ltd. - Page 93 5%-95% (non-condensing) Protection level IP20 Installation mode Installed in Huawei communication box, on a wall, or on guide rails Altitude 4000 m e: When the altitude is between 3000 meters and 4000 meters, the temperature decreases by 1ºC for each additional 200 meters.
-
Page 94: A Product User Lists
Table A-2 Operating system user list User Name Initial Password enspire Changeme root Changeme prorunacc No preset password No preset password daemon No preset password nobody No preset password sshd No preset password (2016-06-20) Huawei Proprietary and Confidential Copyright © Huawei Technologies Co., Ltd. -
Page 95: B Acronyms And Abbreviations
User Manual B Acronyms and Abbreviations Acronyms and Abbreviations Alternating Current Analog Input Analog Output Application Central Coordinator Communication Digital Input Digital Output Ethernet Light-emitting Diode Power Line Communication (2016-06-20) Huawei Proprietary and Confidential Copyright © Huawei Technologies Co., Ltd. - Page 96 SmartLogger2000 User Manual B Acronyms and Abbreviations Rapid Spanning Tree Protocol RSTP Small Form-factor Pluggable Station Spanning Tree Protocol Waste Electrical and Electronic Equipment WEEE (2016-06-20) Huawei Proprietary and Confidential Copyright © Huawei Technologies Co., Ltd.