Pioneer PDR-W739 Operating Instructions Manual
Compact disc recorder / multi-cd changer
Hide thumbs
Also See for PDR-W739:
- Service manual (92 pages) ,
- Operating instructions manual (64 pages) ,
- Quick start manual (2 pages)
Table of Contents
Table of Contents
Troubleshooting

Related Manuals for Pioneer PDR-W739


Summary of Contents for Pioneer PDR-W739
- Page 1 COMPACT DISC RECORDER / MULTI-CD CHANGER PDR-W739 Operating Instructions...
-
Page 2: Important Safety Instructions
IMPORTANT The lightning flash with arrowhead symbol, within an equilateral triangle, is intended to alert the user to the presence of uninsulated "dangerous voltage" within the product's enclosure that may be of sufficient magnitude to constitute a risk of electric shock to persons. -
Page 3: For Canadian Model
WARNING: TO PREVENT FIRE OR SHOCK HAZARD, DO NOT EXPOSE THIS APPLIANCE TO RAIN OR MOISTURE. IMPORTANT NOTICE [For U.S. model] The serial number for this equipment is located on the rear panel. Please write this serial number on your enclosed warranty card and keep it in a secure area. -
Page 4: Information To User
Recording and playback of copyrighted material may require consent. See the Copyright Design and Patent Act 1988. [For Compact Disc Recorder/Multi-CD Changer PDR-W739] [U.K. model] CAUTION This product contains a laser diode of higher class than 1. To ensure continued... -
Page 5: Table Of Contents
Contents 1 Before You Start Checking what's in the box ... 6 Using this manual ... 6 Putting the batteries in the remote ... 6 Hints on installation ... 6 Avoiding condensation problems ... 6 Maintaining your CD recorder ... 7 Moving the unit ... -
Page 6: Before You Start
1 Before You Start Checking what's in the box Thank you for buying this Pioneer product. Before starting to set up your new CD recorder, please check that you have received the following supplied accessories: • Stereo audio cords (x2) •... -
Page 7: Maintaining Your Cd Recorder
A damaged power cord can cause a fire or give you an electric shock. Check the power cord once in a while. If you find it damaged, ask your nearest Pioneer authorized service center or your dealer for a replacement. -
Page 8: Recording Copyright Material
The process of finalization fixes the contents of a CD-R in place for good by creating a Table of Contents (TOC, for short) at the beginning of the disc. This tells a CD player exactly what's on the disc and where to find it. Once a CD-R is finalized, further recording and other changes become impossible. -
Page 9: Connecting Up
CONTROL standard AC wall outlet. Connect to the CONTROL OUT of a Pioneer amplifer or receiver to be able to use the amp/receiver's remote control with this unit. Connecting stereo audio cords... -
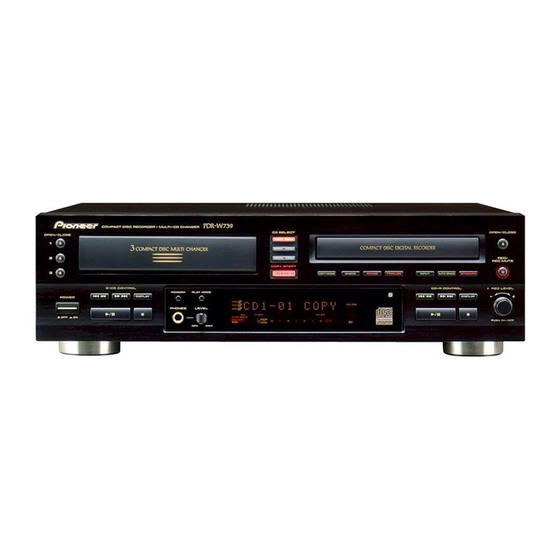
Page 10: Controls And Displays
3 Controls and Displays Front panel COMPACT DISC RECORDER / MULTI-CD CHANGER OPEN/CLOSE - COMPACT DISC MULTI CHANGER 3-CD CONTROL ¡ ¢ DISP POWER — OFF _ ON OPEN/CLOSE ) 1 / 2 / 3 – Press to open/close disc tray 1, 2 or 3 from the changer. Changer disc tray CD SELECT 1 /2/ 3 –... -
Page 11: Remote Control
Remote control Disc select buttons DISC 1/2/3 – Select discs from the changer. (p.14) CD-R – Switch to the CD recorder. (p.14) Playback control buttons DISPLAY – Switch the display mode. (p.29–30) 7 – Stop playback or recording. 8 – Pause playback or recording. 3 –... -
Page 12: Display
3 Controls and Displays Display DISC DISC DISC DISC PARTIAL SINGLE ALL RELAY FADER AUTO SPACE ALC COPY –dB DISC 1/2/3 – Indicates discs loaded. Message/time display Status indicators PARTIAL – Lights when a partially recorded CD-R or CD-RW is loaded into the 3 CD changer. Random and repeat play functions are not available when this is lit. -
Page 13: Getting Started
POWER — OFF _ ON Quick CD copying Although the PDR-W739 has many advanced recording features, duplicating a CD is pretty much a one-touch operation. Before starting, make sure that the recorder is connected to your amplifer and that everything is plugged in to a power outlet. -
Page 14: Playing A Cd
4 Getting Started Î DISC DISC CD-R DISC & ⁄ › 10/0 >10 COMPACT DISC RECORDER/ MULTI-CD CHANGER REMOTE CONTROL UNIT Playing a CD This section takes you through using the basic playback controls of the CD changer and CD-R. The steps below describe playing a disc in tray 1 of the disc changer, but the playback controls for the CD-R and for other discs loaded into the changer work in exactly the same way. -
Page 15: Playback Modes
Î DISC DISC DISC CD-R OPEN/CLOSE PLAY MODE COMPACT DISC RECORDER/ MULTI-CD CHANGER REMOTE CONTROL UNIT Playback modes The different play modes let you play either a single disc, or up to four discs one after another for an uninterrupted playing time of up to five hours. -
Page 16: Copying Cds
- COMPACT DISC MULTI CHANGER Introduction Recording CDs from the disc changer has several advantages over recording from an external CD player. • Double speed copying lets you record a disc in half the regular time. • Automatic spacing when individual tracks are recorded. -
Page 17: Copying Individual Tracks
COMPACT DISC RECORDER / MULTI-CD CHANGER OPEN/CLOSE - COMPACT DISC MULTI CHANGER ¡ ¢ Copying individual tracks Here's how to copy individual tracks from any disc in the changer: Load the CD(s) you want to copy tracks from in to the CD changer. You can use any of the three disc trays in the changer. -
Page 18: Copying A Programmed Selection
5 Copying CDs Î DISC DISC DISC › 10/0 >10 PROGRAM COMPACT DISC RECORDER/ MULTI-CD CHANGER REMOTE CONTROL UNIT Copying a programmed selection You can automate the process of making a mix CD by using the programming function of the disc changer. Load the CD(s) you want to program tracks from in to the CD changer. -
Page 19: Changing The Copying Speed
COMPACT DISC RECORDER / MULTI-CD CHANGER - COMPACT DISC MULTI CHANGER 3-CD CONTROL Changing the copying speed The recorder defaults to double (x2) speed, but if you want to listen to the CD as it's recorded, single (x1) speed is better. 1 Press 4 1 or ¡... -
Page 20: Finalizing And Erasing
- COMPACT DISC MULTI CHANGER Finalizing a disc Before you can play a CD-R on an ordinary CD player, the disc must go through a process called finalization. Once finalized, a CD-R disc is no longer recordable. Finalization is not reversible for CD-Rs so be absolutely sure that everything on the disc is the way you want it before you start. -
Page 21: Erasing A Cd-Rw Disc
COMPACT DISC RECORDER / MULTI-CD CHANGER - COMPACT DISC MULTI CHANGER Erasing a CD–RW disc Although more expensive than CD-R discs, the great advantage of CD-RW is that the discs can be erased and reused. Various erase options are available depending on whether or not the disc has been finalized. - Page 22 6 Finalizing and Erasing COMPACT DISC RECORDER / MULTI-CD CHANGER - COMPACT DISC MULTI CHANGER When a finalized disc is loaded: Press ERASE. Press 4 1 or ¡ ¢ to change the erase option. Switch between: • Erase the TOC (‘de-finalize’ the disc so that further recording is possible) DISC DISC...
-
Page 23: Marking Recorded Tracks To Skip
Although you can’t erase tracks on a CD-R disc, you can set what are called ‘skip IDs’. These tell a CD player (though many do not recognize skip IDs) not to play a particular track, but to skip to the next one on the disc. - Page 24 6 Finalizing and Erasing Î & › SKIP SKIP CLEAR COMPACT DISC RECORDER/ MULTI-CD CHANGER REMOTE CONTROL UNIT Clearing skip IDs: With the recorder stopped, press SKIP. The display indicates that you’re in skip set/clear mode and playback starts. DISC DISC DISC FADER...
-
Page 25: Playback Functions
Î DISC DISC DISC & › 10/0 >10 PROGRAM CHECK CLEAR COMPACT DISC RECORDER/ MULTI-CD CHANGER REMOTE CONTROL UNIT Programming a playlist (3-CD changer) Programming a playlist means telling the player precisely which tracks, and in what order, you want played. You can program a sequence of up to 30 tracks, playing tracks from any of the discs loaded in the changer, and playing tracks more than once if you like. -
Page 26: Programming A Playlist (Cd-R)
7 Playback Functions Î CD-R & › 10/0 >10 PROGRAM CHECK CLEAR COMPACT DISC RECORDER/ MULTI-CD CHANGER REMOTE CONTROL UNIT Programming a playlist You can program a playlist for a disc that's in the CD-R disc tray. When you eject the disc, the playlist is lost. Press CD-R then 7 to stop playback. -
Page 27: Using The Repeat Modes
Î CD-R & › RANDOM REPEAT COMPACT DISC RECORDER/ MULTI-CD CHANGER REMOTE CONTROL UNIT Using the repeat modes Use the repeat function to repeat either the current track, an entire disc, or all discs loaded over and over. You can set the repeat mode in normal, random or program play modes. -
Page 28: Fading In And Fading Out
7 Playback Functions Î COMPACT DISC RECORDER/ MULTI-CD CHANGER REMOTE CONTROL UNIT Fading in and fading out CD-R side only Use the fader feature to fade the volume down gradually and pause playback. You can also have the player fade in the volume when you resume playback. -
Page 29: Switching The Display
Î DISPLAY COMPACT DISC RECORDER/ MULTI-CD CHANGER REMOTE CONTROL UNIT Switching the display (CD changer side) The recorder can display various kinds of disc and track information in both playback and copying modes. The information applies only to the currently playing disc. The display button switches between the different display modes. - Page 30 7 Playback Functions Î DISPLAY COMPACT DISC RECORDER/ MULTI-CD CHANGER REMOTE CONTROL UNIT (CD-R side) When the CD-R is stopped, press DISPLAY to switch the display mode. There are four different displays. Press to switch between them: • Track number / time elapsed DISC DISC DISC...
-
Page 31: Recording Other Sources
COMPACT DISC RECORDER / MULTI-CD CHANGER - COMPACT DISC MULTI CHANGER Introduction Use the various recording modes described here when you're recording from a component connected to the recorder either directly via an optical or coaxial digital connection, or via your amplifier to the the analog line in jacks. -
Page 32: Digital Synchro Recording
8 Recording Other Sources COMPACT DISC RECORDER / MULTI-CD CHANGER - COMPACT DISC MULTI CHANGER Digital synchro recording If you have a CD, MD, DAT or DCC player connected to either of the digital inputs of this recorder, you can make digital recordings from it very simply using this mode. -
Page 33: Analog Synchro Recording
COMPACT DISC RECORDER / MULTI-CD CHANGER - COMPACT DISC MULTI CHANGER Analog synchro recording Use the analog line inputs when recording from your turntable, cassette deck, or other analog audio source. Note that double speed recording is not possible in this mode. Make sure that any discs loaded in the CD changer are stopped. -
Page 34: Manual Recording (Analog Or Digital)
8 Recording Other Sources COMPACT DISC RECORDER / MULTI-CD CHANGER - COMPACT DISC MULTI CHANGER Manual recording (analog or digital) The main use for manual recording mode is when there are no specific start and/or end points in the source material—when you're recording from a tuner or a satellite decoder, for example. -
Page 35: Recording Blank Sections
◊ÛB¿ˆ≥≤/ COMPACT DISC RECORDER / MULTI-CD CHANGER - COMPACT DISC MULTI CHANGER Recording blank sections Recording blank sections This feature is useful when you want to put some space at the end of a recording session so that the next recording doesn't start after the last too closely, but use it wherever you need some blank space recorded on the disc. -
Page 36: Additional Information
This recorder is designed for use with conventional, fully circular CDs only. Use of shaped CDs is not recommended for this product. Pioneer disclaims all liability arising in connection with the use of shaped CDs. Recording CDs This recorder is designed to let you make extremely high quality digital recordings onto recordable compact discs. -
Page 37: Digital Recording Restrictions
Digital recording restrictions This unit has been designed exclusively for recording and playback of audio discs—you can’t record other CD formats, such as computer CD-ROMs or Dolby Digital (AC-3). If you record from a disc format such as CD+Graphics, Video CD, or other format that includes both digital audio and video or text, you will only be able to record the audio part of the disc. -
Page 38: Understanding Display Messages
9 Additional Information Understanding display messages Below is a list of messages you’ll see during normal operation with a brief explanation of what they mean. If you need more information, turn to the page indicated. – – e r A e r p e h t s i d... -
Page 39: Error Messages
Error messages Below is a list of error messages you may see during playback or recording, with possible causes and remedies. If you need more information, turn to the page indicated. c s i c s i t s y o r r n i l e s i... -
Page 40: Messages Relating To Recording
1 Pause playback of the source, then press the digital synchro button again. If you’re recording from a portable CD player, etc., make sure that the shock-protection feature is switched off. 2 Start playback of the source component once you see the SYNCHRO indicator start to blink. -
Page 41: Troubleshooting
Troubleshooting Power does not come on • Check that the unit is plugged into a standard AC power outlet. • If the unit is connected to another component’s power output, check that the other component is switched on. No sound when playing a disc •... -
Page 42: Specifications
9 Additional Information Specifications 1. General Model ... Compact disc audio system Applicable discs ... CDs, CD-Rs and CD-RWs Power supply ... AC 120 V, 60 Hz (U.S./Canadian models) AC 230 V, 50/60 Hz (U.K. model) Power consumption ... 28 W (U.S./Canadian models) Operating temperature ... - Page 43 9 Additional Information...
- Page 44 PIONEER ELECTRONIC [EUROPE] N.V..Haven 1087, Keetberglaan 1, 9120 Melsele, Belgium PIONEER ELECTRONICS AUSTRALIA PTY. LTD..178-184 Boundary Road, Braeside, Victoria 3195, Australia, PIONEER ELECTRONICS DE MEXICO S.A. DE C.V..San Lorenzo Num 1009 3er piso Desp. 302 Col. Del Valle, 5<99K00ZW0N00>...