Honeywell Galaxy TouchCenter Plus User Manual
Hide thumbs
Also See for Galaxy TouchCenter Plus:
- Installer manual (30 pages) ,
- User manual (30 pages)
Table of Contents
Table of Contents

Related Manuals for Honeywell Galaxy TouchCenter Plus


Summary of Contents for Honeywell Galaxy TouchCenter Plus
- Page 1 Galaxy TouchCenter Plus User Guide 800-18270 Rev. A...
-
Page 3: Table Of Contents
Table of Contents ABOUT THE SYSTEM ....................................5 Introduction ......................................5 System Interface ................................... 5 Navigating through the Galaxy TouchCenter Plus Keypad ......................6 About the Home Screen ................................6 Multimedia Application .................................. 6 Control......................................6 Navigation Icon Descriptions ................................. 7 Minimising the Home Screen Icons ............................... - Page 4 Table of Contents MULTIMEDIA ......................................21 Video (Audio) Setup ................................... 21 Picture Setup ..................................... 22 Camera Setup ....................................23 USER SETUP ......................................25 Managing Users ....................................25 User PIN Setup ................................... 25 Authority Levels ................................... 25 How to Add a User ..................................26 How to Delete a User ..................................
-
Page 5: About The System
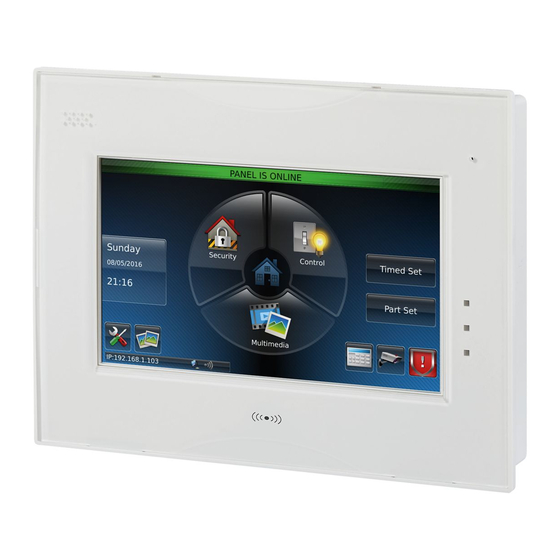
Congratulations on your ownership of a Honeywell Galaxy TouchCenter Plus keypad. With clear, simple controls on a touch-screen interface, Galaxy TouchCenter Plus is both easy to learn and easy to use. System Interface Equipped with WiFi capability, the Galaxy TouchCenter Plus can be retrofitted into home electronics devices and systems without interference from common household wireless electronics. Features This system offers you burglary protection. -
Page 6: Navigating Through The Galaxy Touchcenter Plus Keypad
In everyday handling, memory cards can become susceptible to malfunction and/or failure due to electrostatic discharges and the information on the card may be lost. Note: Honeywell is not responsible for any loss of personal information (files, photos, video etc.) Control If configured by your installer the TouchCenter Plus can be used to control building systems such as lighting, air conditioning and gates. -
Page 7: Navigation Icon Descriptions
About the System (cont'd) Navigation Icon Descriptions To aid navigation through the TouchCenter Plus WIFI screens, a set of user-friendly icons is provided. The appearance and function of these icons is described below. ICON ICON TITLE FUNCTION ICON ICON TITLE FUNCTION Access the Setup menus Control... -
Page 8: System Troubles
About the System (cont'd) System Troubles Security screen also displays an icon(s) next to each trouble in a table. If a trouble icon is shown, contact your alarm company. The following icons may be shown as applicable to your system: ICON MEANING AC Loss –... -
Page 9: Security
Security Introduction to Security System Operation You can set your system in one of eight modes: Timed Set, Instant Set, Part Set, Silent, All Set, Home Set, Force Set and Omit Set, all of which are described below. MODE FUNCTION Exit Delay Entry Delay Perimeter Set... -
Page 10: How To Set The System
Security (cont’d) MODE FUNCTION Exit Delay Entry Delay Perimeter Set Interior Set Force Set Allows a Timed Set of the system when there are zones that are open at the point of selecting the option. Omit Set Allows zones to be temporarily removed (omitted) from the system. - Page 11 Security (cont'd) To cancel an alarm, fault or tamper: ICON ACTION NOTES 1. On the screen, press the icon. Any alarm, fault or tamper condition that has not been cleared is shown Home Security each time a PIN is entered. When the condition is first activated, you 2.
-
Page 12: How To Set A System With Groups
Security (cont’d) How to Set a System with Groups On systems that have several independent groups (areas), it is possible to perform combination sets and unsets. Note: Some systems may not have groups, in which case the screen is not displayed. Group List To set groups: ICON... -
Page 13: How To Display Faults
Security (cont'd) How to Display Faults When a fault is present, ALERT is displayed at the top of the screen. In EN50131 Mode no text is displayed at the top of the screen. Note: To display faults, do the following: ICON ACTION NOTES... -
Page 14: How To Omit Zones
Security (cont’d) How to Omit Zones Use the omit function when you want to set your system with one or more zones left open. Omitted zones are unprotected and do not cause an alarm when violated while your system is set. To omit zones: ICON ACTION... -
Page 15: How To Unset The System
Security (cont'd) How to Unset the System The system may be unset using either of two methods. One method is employed when you enter the premises and the other is when you have been in the premises with the system set (i.e., Part Set and Silent setting modes). To unset the system: ICON ACTION... -
Page 16: How To Check The Status Of Groups
Security (cont’d) How to Check the Status of Groups This system supports between one and thirty two groups (depending on the system). Grouping enables a single physical alarm system to control up to 32 areas of protection (groups) depending on the system you have purchased. Note: Some systems may not have groups in which case the Group List screen is not displayed. -
Page 17: Setup
To Homepage After Auto Slideshow After Clean Screen Language Selection (if applicable) The Galaxy TouchCenter Plus can display ten different languages with the default being English. Adjust the Screen Timeouts When the keypad is left idle, it automatically: Turns the backlight off after the selected backlight off time has expired (unless the option is selected). -
Page 18: Clean Screen
Setup (cont’d) To select the desired screen timeouts: ICON ACTION NOTES 1. On the screen, press the icon, and Settings include: Home Setup then enter an authorised code. Backlight Off After time 2. Press the Display Setup icon. Return To Homepage After time 3. -
Page 19: System Information
Setup (cont'd) System Information To view the current software/firmware version installed on your system, do the following: ICON ACTION NOTES The following information is displayed: MAC Address, CRC, Software 1. On the Home screen, press the Setup icon, and version and Firmware version. then enter an authorised code. - Page 20 Setup (cont’d) Setup a WIFI (WLAN) Connection On the IP Setup screen, add a WIFI network connection as follows: ICON ACTION NOTES 1. On the Home screen, press the Setup icon, and then enter an authorised code. 2. Press the IP Setup icon.
-
Page 21: Multimedia
Multimedia The multi-media options allow you to display personal photos in a slide show format and video (audio) files. Important: The feature will only work if your installer fitted a personal media (SD/SDHC) card with stored photos and /or video (audio) files. Video (Audio) Setup This feature allows you to display videos and can be accessed from the Home... -
Page 22: Picture Setup
Multi-Media (cont'd) Picture Setup This feature allows you to display up to 1000 personal photos on the touch screen and can be accessed from the screen by pressing the Home Multimedia icon. To access this function: ICON ACTION NOTES Supported file formats are: .bmp, png and .jpg. 1. -
Page 23: Camera Setup
Multi-Media (cont'd) Camera Setup The Camera feature allows you to enrol cameras and view up to eight cameras. If using existing (mounted) cameras, go to Step 4 below. If this is a first time setup, you will need to Discover/Configure the cameras prior to mounting and then follow the steps below. The following cameras were tested and are supported: Performance Series: ... - Page 24 Multi-Media (cont'd) ICON ACTION NOTES 1. Connect a Cat5/6 cable to your camera (LAN) and connect the opposite end to an Ethernet connection on your router. 2. Apply power to the Camera. It may take a few seconds for initial power-up of camera. 3.
-
Page 25: User Setup
User Setup Managing Users User Setup allows you to add, delete and edit panel users. User PIN Setup Each user must be assigned a name with a corresponding 4 to 6 digit User PIN in order to gain access to various features and functions. Users of the system are programmed in a central user setup location in the control panel that provides options to enable various user details. -
Page 26: How To Add A User
User Setup (cont'd) How to Add a User To add a user: ICON ACTION NOTES Use the data entry keyboard to enter all required information. 1. On the Home screen, press the Setup icon, and then enter an authorised code. User names can have up to 6 characters, including spaces. -
Page 27: How To Edit A User
User Setup (cont'd) How to Edit a User To edit a user: ICON ACTION NOTES 1. On the Home screen, press the Setup icon, and then enter an authorised code. 2. Press the icon. System Setup 3. Press the User Setup icon. -
Page 28: User System Setup
User System Setup Time/Date Setup You can set the time and date on the screen. When using the keypad, the panel may download its time into the keypad periodically Time/Date Setup after the clock is set. Setting Current Time and Date To set the time and date: ICON ACTION... -
Page 29: Glossary
Glossary The following terms are used throughout the guide. Set/Unset: Set means that the burglary portion of your system is turned on and is in a state of readiness. Unset means that the burglary system is turned off, and must be reset to become operational. However, even in an unset state, portions of your system such as emergency, carbon monoxide and fire are still operational. - Page 30 This product has been tested for compliance to EN50131-3:2009 by BRE Global Ltd. Security Grade: 3 Environmental class: II NFa2p Type: 3 Honeywell Security and Fire (UK07) Newhouse Industrial Estate, Motherwell Lanarkshire, ML1 5SB, UK Copyright © 2015 Honeywell International Inc. 800-18270 Rev. A www.security.honeywell.com/uk/...