
Related Manuals for GE Sievers Innovox


Summary of Contents for GE Sievers Innovox
- Page 1 Analytical Instruments Sievers InnovOx On-Line TOC Analyzer 3.07 IRMWARE ERSION ATER DLM 68100-09 EN Rev. A...
- Page 2 The Americas Europe/Middle East/Africa Asia Pacific 6060 Spine Road T +44 (0) 161 864 6800 T +(8621) 38777735 Boulder, CO 80301-3687 USA [email protected] [email protected] T +1 800 255 6964 [email protected] [email protected] T +1 303 444 2009 F +1 303 444 9543 www.geinstruments.com...
-
Page 3: Identification Records
Analyzer serial number: _______________________ (This is located on the side of the Analyzer.) Date of receipt and installation of the Analyzer: _______________________ (This is the warranty start date.) GE Analytical Instruments ©2016 3 of 270 DLM 68100-09 EN Rev. A... -
Page 4: Table Of Contents
Specifications — (2-Stream or 5-Stream) Clean Water Sampler ........62 GE Analytical Instruments ©2016 4 of 270 DLM 68100-09 EN Rev. - Page 5 Installing the Check Standard System ..............98 GE Analytical Instruments ©2016 5 of 270 DLM 68100-09 EN Rev.
- Page 6 Check Standards ................134 GE Analytical Instruments ©2016 6 of 270 DLM 68100-09 EN Rev.
- Page 7 Setting Analyzer Name and Location ............165 GE Analytical Instruments ©2016 7 of 270 DLM 68100-09 EN Rev.
- Page 8 Visual Inspection ..................210 GE Analytical Instruments ©2016 8 of 270 DLM 68100-09 EN Rev.
- Page 9 Returning the Analyzer to GE Analytical Instruments ........
-
Page 10: List Of Tables
Consumables Replacement Schedule ............178 Table 15 2-Year Maintenance Worksheet — Sievers InnovOx Online TOC Analyzer ..... . . 196 Table 16 Other Software Errors . -
Page 11: List Of Figures
Calibration Curve for Single-Point Calibration..........108 GE Analytical Instruments ©2016 11 of 270 DLM 68100-09 EN Rev. - Page 12 The Advanced Screen ..............165 GE Analytical Instruments ©2016 12 of 270 DLM 68100-09 EN Rev.
- Page 13 Gas Manifold Leak Check..............229 GE Analytical Instruments ©2016 13 of 270 DLM 68100-09 EN Rev.
- Page 14 Microsoft Excel Spreadsheet Program — Text Import Wizard - Step 3 ......257 GE Analytical Instruments ©2016 14 of 270 DLM 68100-09 EN Rev.
-
Page 15: Revision History
DLM 68100-07 EN Rev. A Firmware 3.04 and Wastewater Sampler August 2014 DLM 68100-08 EN Rev. A Firmware 3.05 October 2015 DLM 68100-09 EN Rev. A Firmware 3.06 and 3.07 June 2016 GE Analytical Instruments ©2016 15 of 270 DLM 68100-09 EN Rev. A... -
Page 16: Confidentiality
Confidentiality The information contained in this manual may be confidential and proprietary and is the property of GE Analytical Instruments. Information disclosed herein shall not be used to manufacture, construct, or otherwise reproduce the goods disclosed herein. The information disclosed herein shall not be disclosed to others or made public in any manner without the express written consent of GE Analytical Instruments. -
Page 17: Declaration Of Conformity
Warranty Term The GE Analytical Instruments warranty term is thirteen (13) months ex-works, or twelve (12) months from installation or start up by GE Ana- lytical Instruments certified service personnel. In no event shall the standard limited warranty coverage extend beyond thirteen (13) months from original shipment date. -
Page 18: Limitation Of Remedies And Liability
Operation and Maintenance Manual. Usage of non-recommended maintenance materials may void a warranty claim. The remedies provided herein are the customer's sole and exclusive remedies. In no event shall GE Analytical Instruments be liable for direct, indirect, special, incidental or consequential damages (including loss of profits) whether based on contract, tort, or any other legal theory. -
Page 19: Limitazione Di Rimedi E Responsabilità
Gli unici rimedi spettanti all’utente sono quelli qui inclusi. In nessun caso GE Analytical Instruments sarà responsabile per danni diretti, indiretti, speciali, accidentali o consequenziali (inclusa la perdita di profitti) risultanti dall’applicazione del contratto, atto illecito o altra teoria legale. Il manuale d’uso e manutenzione è... -
Page 20: Warnings
This symbol indicates that to comply with European Union Directive 2002/96/EC for waste electrical and electronic equipment (WEEE), the Analyzer should be disposed of separately from standard waste. GE Analytical Instruments ©2016 20 of 270 DLM 68100-09 EN Rev. A... - Page 21 100 psig (689 kPa). The pressure of compressed gas at the blowback gas inlet on the Filter Panel accessory must not exceed 40 psig (276 kPa). Use only dry, oil-free air or nitrogen. GE Analytical Instruments ©2016 21 of 270 DLM 68100-09 EN Rev. A...
- Page 22 Warning If this instrument is used in a manner not specified by GE Analytical Instruments, the protection provided by the instrument may be impaired. Warning Consult the MSDS that accompanies each standards set and the reagents to identify proper disposal techniques.
- Page 23 Warning If you experience an issue with the printed circuit assembly (PCA) that contains a lithium battery, please contact GE Analytical instruments for return instructions. Whenever changing the lithium battery, observe the correct polarity. Dispose of used batteries according to the manufacturer’s instructions and local disposal requirements.
- Page 24 Éste es un producto de Seguridad Clase I. Debe contar con una conexión con cable a tierra. Para evitar daños en el Analyzer y la probabilidad de lesiones, asegúrese de que el equipo esté conectado al voltaje correcto. GE Analytical Instruments ©2016 24 of 270 DLM 68100-09 EN Rev. A...
- Page 25 Analyzer. Advertencia Durante la manipulación de componentes que contengan muestras, estándares, soluciones de desecho o reactivos, utilice anteojos y guantes de protección. GE Analytical Instruments ©2016 25 of 270 DLM 68100-09 EN Rev. A...
- Page 26 Advertencia La utilización de este instrumento de un modo no especificado por GE Analytical Instruments puede afectar la protección que brinda el instrumento. Advertencia Para conocer las técnicas apropiadas de desecho, consulte la hoja de datos de...
- Page 27 El equipo debe tener una conexión eléctrica a tierra de conformidad con los códigos y ordenanzas locales o, en ausencia de dichas regulaciones, de conformidad con el Código Eléctrico Nacional, ANSI/NFPA, n? 70. GE Analytical Instruments ©2016 27 of 270 DLM 68100-09 EN Rev. A...
- Page 28 Reagentes perigosos, como persulfato de sódio, ácido clorídrico e ácido fosfórico, são usados no Analisador. O fluxo de resíduos do instrumento é acidífero e deve ser descartado de forma adequada. Consulte as regulamentações federais, estaduais e municipais. GE Analytical Instruments ©2016 28 of 270 DLM 68100-09 EN Rev. A...
- Page 29 Advertência Antes de analisar uma nova amostra, consulte o Capítulo 3, Interferências, para obter informações sobre possíveis interferências e seus efeitos no Analisador. GE Analytical Instruments ©2016 29 of 270 DLM 68100-09 EN Rev. A...
- Page 30 Se você se deparar com um problema com as placas de circuitos impressos que contenha bateria de lítio, entre em contato com a GE Analytical Instruments para obter instruções para a devolução. Sempre que trocar a bateria de lítio, observe a polaridade correta.
- Page 31 Dämpfe Natriumhydroxid (Lauge) oder Natriumcarbonat (kohlensaures Natron) in den Abfallbehälter, um die Säure im Abfall zu neutralisieren. Vermeiden Sie Schichtenbildung des Abfalls in dem Behälter, indem Sie den Behälter gelegentlich schütteln. GE Analytical Instruments ©2016 31 of 270 DLM 68100-09 EN Rev. A...
- Page 32 Warnung Alle Arbeiten im Inneren des Analysators, einschließlich der Anbringung von Verschleißteilen, können zu Verletzungen führen. Um elektrische Schläge oder Verbrennungen zu vermeiden, schalten Sie den Analysator aus und ziehen Sie den Netzstecker, bevor Sie ihn öffnen. Seien Sie vorsichtig, wenn Sie elektrische Komponenten berühren.
- Page 33 Beeinflussung verursachen. In diesem Fall kann es sein, dass der Benutzer entsprechende Maßnahmen treffen muss, um diese Störung zu beheben. Warnung Wenn dieses Instrument auf eine nicht von GE Analytical Instruments festgelegte Weise verwendet wird, kann der durch das Instrument gewährleistete Schutz beeinträchtigt werden. GE Analytical Instruments ©2016 33 of 270 DLM 68100-09 EN Rev.
- Page 34 Wenn sich Probleme mit der bestückten Leiterplatte (PCA) ergeben, die eine Lithiumbatterie enthält, wenden Sie sich bitte wegen der Rücksendeanweisungen an GE Analytical Instruments. Beachten Sie bei jedem Wechsel der Lithiumbatterie die richtige Polung. Entsorgen Sie die gebrauchten Batterien gemäß den Herstelleranweisungen und den örtlichen Entsorgungsbestimmungen.
- Page 35 à la terre. Pour ne pas risquer d'endommager l'analyseur et éviter tout risque de blessure, s'assurer que l'analyseur est connecté à une ligne d'alimentation à la tension adéquate. GE Analytical Instruments ©2016 35 of 270 DLM 68100-09 EN Rev. A...
- Page 36 Avertissement Pour manipuler des éléments qui contiennent un échantillon, des standards, une solution de déchets ou des réactifs, porter une protection oculaire et des gants. GE Analytical Instruments ©2016 36 of 270 DLM 68100-09 EN Rev. A...
- Page 37 électromagnétiques, auquel cas l'utilisateur peut être contraint de prendre les mesures adéquates pour y remédier. Avertissement Si cet instrument est utilisé d'une manière non spécifiée par GE Analytical Instruments, la protection offerte par l'instrument peut s'en trouver affaiblie. Avertissement Consulter les fiches techniques des substances dangereuses fournies avec chaque jeu de standards et avec les réactifs afin d'identifier les bonnes techniques de mise...
- Page 38 Nell'analizzatore vengono utilizzati reagenti pericolosi (persolfato di sodio, acido idroclorico e acido fosforico). Il flusso di scarico dello strumento è acidico e deve essere smaltito correttamente. Fare riferimento alle proprie norme nazionali, regionali e locali. GE Analytical Instruments ©2016 38 of 270 DLM 68100-09 EN Rev. A...
- Page 39 Prima di procedere all'analisi di un nuovo campione, vi invitiamo a consultare il Capitolo 3, intitolato "Interferenze" per avere maggiori informazioni sulle potenziali interferenze e il loro effetto sull'analizzatore. GE Analytical Instruments ©2016 39 of 270 DLM 68100-09 EN Rev. A...
- Page 40 Avvertenza Se lo strumento viene utilizzato in modo diverso da quello specificato dalla GE Analytical Instruments, potrebbe essere compromessa la protezione prevista per l'apparecchiatura.
- Page 41 Avvertenza Quest'attrezzatura deve essere collegata elettricamente a terra in conformità ai decreti e alle leggi locali o, in assenza, in conformità al Codice elettrico nazionale, ANSI/NFPA, Numero 70. GE Analytical Instruments ©2016 41 of 270 DLM 68100-09 EN Rev. A...
- Page 42 ら出る有毒ガスが分析装置の廃液に放出される可能性がありま す。有害ガスを吸入しないようにするため、水酸化ナトリウム ( 苛性アルカリ溶液 ) または炭酸ナトリウム ( ソーダ灰 ) を廃液 容器に加え、廃液中の酸を中和します。時々、容器をかき混ぜ て、容器内で廃液が層を形成しないようにします。 警告 この記号は、EU の廃電気電子機器指令 (WEEE) に準拠しており、 分析機器を標準の廃棄物とは別に廃棄すべきであることを示し ます。 警告 有害な試薬 ( 過硫酸ナトリウム、塩化水素酸、 燐酸 ) が分析機器で使用され ます。機器から出る排水は酸性であり正しい方法で廃棄する必要があります。 国、州、および地方自治体の政府規制に従ってください。 GE Analytical Instruments ©2016 42 of 270 DLM 68100-09 EN Rev. A...
- Page 43 器を操作しないでください。 警告 保守管理用の品目の取り付けを含む、分析機器内部に接近する操作は、人身 傷害につながる可能性があります。感電や火傷の危険性を回避するため、分 析機器を開く前に電源を切り、コンセントから抜いてください。電気部品に 触れる場合は細心の注意を払ってください。 警告 サンプル、標準、廃液または試薬が含まれる部品を取り扱う際は、目の保護 具と手袋を着用してください。 警告 ディスプレイ画面には、水銀が含まれ、お住まいの地域では有害物質に指定 されている可能性があります。この品目は、国、州、および地方自治体の政 府規制に従って廃棄してください。 警告 分析は、必ず分析機器の電源を切る前に停止してください。 警告 これは、等級 A 製品です。屋内環境においては、この製品は電磁干渉を 発生することがあり、その場合はユーザーが適切な是正措置を取る必要が あります。 警告 この機器が GE Analytical Instruments によって指定された方法で使用され なかった場合、機器に組み込まれた保護機能は損なわれます。 GE Analytical Instruments ©2016 43 of 270 DLM 68100-09 EN Rev. A...
- Page 44 可能性の高い障害 と 、 それ らが分析器に及ぼす影響について記載 さ れていま す 警告 新 し いサン プルを分析する前に、 第三章 『障害』 を ご参照下 さ い。 発生する 可能性の高い障害 と 、 それ らが分析器に及ぼす影響について記載 さ れていま す 警告 この機器は、その地域の規定や条例に従って、また地域の規定がない 場合には、米国電気規則、ANSI/NFPA、規格番号 70 に従って、電気的 に接地する必要があります。 GE Analytical Instruments ©2016 44 of 270 DLM 68100-09 EN Rev. A...
- Page 45 警告: 仪器上的此符号表示用户应参阅操作说明手册。 警告: 瓶口含有锐利的针,设计用于刺穿样本瓶的隔片。请勿将手指或不 当物体放入瓶口中。 警告: 为了防止吸入有毒烟雾,请确保将分析仪安装在通风良好的地方。 样品由多种成分组成,氯或溴等卤素,或氟化物、氰化物、或其它 毒性盐发出的有毒烟雾,可能会进入分析仪的废液之中。为了防止 吸入有害气体,请向废液容器中加入氢氧化钠 (碱液)或碳酸钠 (纯碱) ,以中和废液中的酸。应偶尔搅动容器中的废液,以避免 废液分层。 警告: 此符号表示符合有关废弃电气和电子设备 (WEEE)的欧盟指令 2002/96/EC,分析仪应与标准废物隔离单独处置。 警告: 在分析仪中使用有害试剂 (过硫酸钠、盐酸以及磷酸) 。仪器中排出的废物流 属酸性,必须妥善处理。请查询联邦、州和当地政府的法规。 警告: 这是安全等级 I 级产品。它必须连接到接地的电源上。为避免对分析仪造成损 坏,并避免受伤,要确保分析仪连接到电压正确的电源线上。 GE Analytical Instruments ©2016 45 of 270 DLM 68100-09 EN Rev. A...
- Page 46 为确保正常工作并防止受伤,在分析仪护盖拆掉时不得操作分析仪。 警告: 需要进入分析仪内部的任何操作,包括安装维护物品,都可能会导致伤害。为 避免潜在的危险电击或灼伤,在打开分析仪之前请关闭电源并拔下电源线。在 接触任何电子器件时务必小心。 警告: 在搬运含有样本、标准、废物溶液或试剂的部件时,请佩戴眼睛保护和手套。 警告: 显示屏幕可能含有汞,而汞在您的所在地可能被认为是有害物质。根据联邦、 州或当地政府法规处置此物品。 警告: 一定要在关闭分析仪之前先停止分析。 警告: 这是 A 级产品。在室内环境中,该产品可能会造成电磁干扰,此时用户需要采 取适当措施消除干扰。 警告: 如果该仪器以通用电气分析仪未规定的方式使用,该仪器所提供的保护可能会 受到损害。 警告 查阅随每个标准组和试剂配备的物质安全数据表 (MSDS) ,以确定正确的处置 技术。 警告 分析仪风扇附近避免置放异物,以避免将有害物吹入分析仪。用于反应器的冷 却空气进口在分析仪的底部,严禁纸张或其它物体堵塞或进入该入口。 GE Analytical Instruments ©2016 46 of 270 DLM 68100-09 EN Rev. A...
- Page 47 警告 警告 警告 警告 警告 警告 仪器上的此符号表示此产品不含有中国 RoHS II 列明的任何禁用物 质。 GE Analytical Instruments ©2016 47 of 270 DLM 68100-09 EN Rev. A...
- Page 48 警告 此设备必须按照地方法规和条例接地。在没有地方法规的情况下,必须 按照美国电工法 ANSI/NFPA 第 70 号的规定接地 . GE Analytical Instruments ©2016 48 of 270 DLM 68100-09 EN Rev. A...
-
Page 49: Chapter 1: Introduction
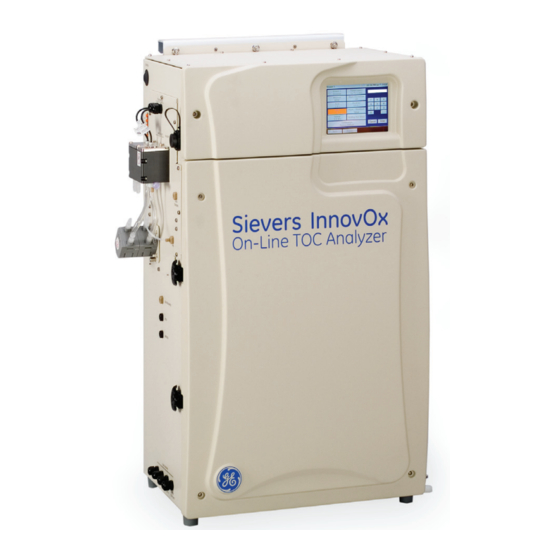
Chapter 1. Introduction The Sievers* InnovOx On-Line TOC Analyzer from GE Analytical Instruments is a high-sensitivity Analyzer used to measure the concentration of total organic carbon (TOC), non-purgeable organic carbon (NPOC), total carbon (TC), and inorganic carbon (IC) in water samples. The Analyzer uses supercritical water oxidation (SCWO) to measure a wide range of carbon concentrations in complex sample matrices, including those containing high concentrations of total dissolved solids (TDS) and particulates. - Page 50 Chapter 1: Introduction This page is intentionally left blank. GE Analytical Instruments ©2016 50 of 270 DLM 68100-09 EN Rev. A...
-
Page 51: Chapter 2: System Description
Chapter 2. System Description System Specifications System Specifications for the InnovOx On-Line TOC Analyzer follow starting on the next page. GE Analytical Instruments ©2016 51 of 270 DLM 68100-09 EN Rev. A... - Page 52 Up to 95%, non-condensing Maximum Altitude 3,000 m (9,800 ft) Pollution Degree ________________________________ Stated analytical performance is achievable under controlled laboratory conditions that minimize operator and standards errors. GE Analytical Instruments ©2016 52 of 270 DLM 68100-09 EN Rev. A...
-
Page 53: Additional System Specifications
Binary Output Relay rated max 125 VAC or 110 VDC @ 1A (analysis complete) Analog Output 4-20 mA, max load @ 600 ohms, powered Ethernet Modbus port 502 GE Analytical Instruments ©2016 53 of 270 DLM 68100-09 EN Rev. A... -
Page 54: Reagent Consumption
USEPA SW 9060, DIN-EN1484, ISO 8245. System Overview The Sievers InnovOx On-Line TOC Analyzer consists of eleven major modules: Multistream module, which accommodates two or five sample streams, depending on the Analyzer configuration. It also includes a vial port, which is used to calibrate the Analyzer. The multistream module also includes a port through which a check standard can be measured. - Page 55 • Color video graphics array (VGA) display with touchscreen • Flash memory card 10. Input/Output (I/O) board, which contains 4-20 mA analog outputs and digital inputs and outputs. 11. Power Supply/Power Entry (universal). GE Analytical Instruments ©2016 55 of 270 DLM 68100-09 EN Rev. A...
-
Page 56: Figure 1: Analyzer Schematic
This schematic is a flattened image of the Analyzer’s components. For a spatial representation of the fluidics layout inside the instrument, refer to Figure 85 on page 211. GE Analytical Instruments ©2016 56 of 270 DLM 68100-09 EN Rev. A... -
Page 57: Sample Flow Path
If NPOC is to be measured, the solution is sparged with CO -free gas to remove the CO before the solution is transferred to the reactor. GE Analytical Instruments ©2016 57 of 270 DLM 68100-09 EN Rev. A... - Page 58 375° C necessary to create supercritical water in the Analyzer’s sample flow path. For additional information on the heater testing criteria see “Heater Testing Criteria” on page 224. GE Analytical Instruments ©2016 58 of 270 DLM 68100-09 EN Rev. A...
-
Page 59: Table 1 Innovox Wetted Materials List
Table 1: InnovOx Wetted Materials List Material Components Clear tubing 316 SS Sample needle(s) and inlet tube fitting CTFE Ferrules ETFE Barb fittings Isoprene Pinch‐valve tubing Titanium Reactor, reactor valves Polypropylene Mixer bar ® Pump tubing Norprene Chemical with PVC lining External pump tubing Santoprene UHMW polyethylene Reactor seals Polypropylene, PTFE NDIR filter GE Analytical Instruments ©2016 59 of 270 DLM 68100-09 EN Rev. A... -
Page 60: Additional System Components
• Input/Output board for processing digital input signals and analog and digital outputs • Terminator board, which terminates the M-LVDS bus and provides Ethernet and USB interfaces • Power Entry/Supply GE Analytical Instruments ©2016 60 of 270 DLM 68100-09 EN Rev. A... -
Page 61: Data Outputs
The Analyzer will export to the first inserted USB flash storage device. While this USB flash storage device is inserted, the Analyzer will not recognize any additional USB storage devices inserted in other USB ports. GE Analytical Instruments ©2016 61 of 270... -
Page 62: 2-Stream Configuration
Grab mode. An additional port is provided for the automated measurement of a check standard to ensure the Analyzer is calibrated and operating properly. The high temperature sampler is only available in the 2-Stream configuration. GE Analytical Instruments ©2016 62 of 270 DLM 68100-09 EN Rev. A... -
Page 63: Specifications - (2-Stream) High Temperature Clean Water Sampler
40-mL vials using the vial port and Grab mode. A port is provided for automated measurement of a check standard to ensure the Analyzer is operating properly and that it is in calibration. GE Analytical Instruments ©2016 63 of 270... -
Page 64: Specifications - Wastewater Sampler
50 psi (2.5 Bar) - 100 psi (4.9 Bar). The required volume is dependent on actual sustained pressure. As the drains are manual and are not connected out of the Analyzer, the filter cups must be inspected on a regular basis. GE Analytical Instruments ©2016 64 of 270 DLM 68100-09 EN Rev. A... -
Page 65: Carrier Gas Co 2 Scrubber Option (On-Line)
The consumable scrubber cartridge must be replaced per the maintenance schedule presented in Table 15, “2-Year Maintenance Worksheet — Sievers InnovOx Online TOC Analyzer,” on page 196. Fail Safe Accessory If the Fail Safe accessory is selected, sensors are installed in the Analyzer to detect when the flow rate of each sample stream stops. -
Page 66: Sample Filter Panel
Some sample streams are not pressurized, or are not sufficiently pressurized to provide the necessary flow to the Analyzer. For that reason, the sample peristaltic pump accessory is available for those applications that require a pump to get the sample to the Analyzer. GE Analytical Instruments ©2016 66 of 270 DLM 68100-09 EN Rev. A... -
Page 67: Chapter 3: Interferences
Compounds such as hydrazine and hydrogen peroxide may generate excessive volumes of gas during the oxidation. However, the InnovOx Analyzer can handle the additional pressure in the reactor associated with gas-producing samples. GE Analytical Instruments ©2016 67 of 270 DLM 68100-09 EN Rev. A... -
Page 68: Reliability
InnovOx TOC Analyzer uses supercritical water oxidation (SCWO). Salts tend to precipitate in the Reactor when supercritical conditions are reached. This makes those species less reactive during the oxidation, while the organic compounds are more soluble and, therefore, more reactive. GE Analytical Instruments ©2016 68 of 270 DLM 68100-09 EN Rev. A... - Page 69 To overcome the effect of reducing agents in the sample, increase the oxidizer percentage until further increases do not produce significantly greater NPOC, TC, or TOC readings. Contact GE Analytical Instruments for questions about specific applications. In North America, contact GE Analytical Instruments Technical Support at 303.444-2009 or 888.245.2595 or [email protected].
- Page 70 Chapter 3: Interferences This page is intentionally left blank. GE Analytical Instruments ©2016 70 of 270 DLM 68100-09 EN Rev. A...
-
Page 71: Chapter 4: Installation
Support at 303.444-2009 or 888.245.2595 or [email protected]. Technical support in Europe, Middle East, and Africa is available at 44 (0) 161 864 6800 or [email protected]. Technical support in Asia Pacific is available at (65) 62674659 or [email protected]. In other parts of the world, contact your local GE Analytical instruments representative. - Page 72 Chapter 4: Installation • Sievers InnovOx On-Line TOC Analyzer Operations and Maintenance Manual (Available for download from www.geinstruments.com). • Accessories included: • Reagent, dilution water, check standard tubes (and tubing weights and fittings) • Vial port tube and fittings • Waste tube ®...
-
Page 73: Additional Installation Equipment
The InnovOx On-Line TOC Analyzer is designed to be mounted on a Mounting Stand or on a wall. For an illustration of the required clearances for the Mounting Stand accessory, see Figure GE Analytical Instruments ©2016 73 of 270 DLM 68100-09 EN Rev. A... -
Page 74: Figure 2 Mounting Stand - Clearances
To mount a Filter Panel on the Mounting Stand, attach the two Filter Panel brackets 30.5 cm apart, as shown in Figure 2. Further instructions for installation of the Filter Panel are provided in the GE InnovOx Filter Panel Operation and Maintenance Manual. -
Page 75: Figure 3 Attaching Mounting Brackets On The Analyzer
We recommend when lifting the instrument that you use a two-person lift. OSHA standards require protecting employees from injury. This instrument weighs over 40 lbs. It is the policy of GE to require a two-person lift for items weighing over 40 lbs. GE Analytical Instruments ©2016 75 of 270 DLM 68100-09 EN Rev. -
Page 76: Figure 4 Mounting The Analyzer To The Stand
Chapter 4: Installation Figure 4: Mounting the Analyzer to the Stand GE Analytical Instruments ©2016 76 of 270 DLM 68100-09 EN Rev. A... -
Page 77: Wall Mount Installation
(soda ash) to the waste container to neutralize acid in the waste. Locate the Analyzer in a well-ventilated area. Avoid stratification of the waste within the container by occasionally agitating the container. GE Analytical Instruments ©2016 77 of 270 DLM 68100-09 EN Rev. A... - Page 78 (lye) or sodium carbonate (soda ash) to the waste container to neutralize acid in the waste. Avoid stratification of the waste within the container by occasionally agitating the container. GE Analytical Instruments ©2016 78 of 270 DLM 68100-09 EN Rev. A...
-
Page 79: Step 5: Fill The Gas-Liquid Separator
There are four terminal blocks on the I/O board, with TB1 located closest to the front of the Analyzer. From front to rear the other terminal blocks are TB2, TB3, and TB4. Consult the tables in this section for a list of GE Analytical Instruments ©2016 79 of 270... - Page 80 • TB4 Alarm Outputs (Alarms 1 and 2) — The maximum load for these ports is 30 VDC at 1.0 A or if using double-insulated wiring the maximum load is 125 VAC at 0.5 A. GE Analytical Instruments ©2016 80 of 270...
-
Page 81: Analog Outputs (Tb1)
14 mA 15 mA Error Output matches the error level set for the first sequentially-ordered active stream, starting with Stream 1 Warning n/a (Does not change current value.) GE Analytical Instruments ©2016 81 of 270 DLM 68100-09 EN Rev. A... -
Page 82: Alarm Outputs (Tb3)
Signal Function BINOUT3_NO BINOUT3_COM User Assigned Alarm #3 BINOUT3_NC BINOUT4_NO BINOUT4_COM User Assigned Alarm #4 BINOUT4_NC BINOUT5_NO BINOUT5_COM Analysis Complete Output BINOUT5_NC BINOUT6_NO BINOUT6_COM System Fault Alarm BINOUT6_NC GE Analytical Instruments ©2016 82 of 270 DLM 68100-09 EN Rev. A... -
Page 83: Alarm Outputs (Tb4)
110 VDC @ 1 AMP. +24 volts and system ground are provided for local use only and are not intended for connections more than 15 feet away from the Analyzer. GE Analytical Instruments ©2016 83 of 270 DLM 68100-09 EN Rev. A... -
Page 84: Installing The 4-20 Ma Connection
Changing the state of the Remote Input will change the Analysis Run state if not already in that mode. The Display Start/Stop Analysis button remains functional while the remote start/stop is in use. This allows for manual override of the analysis mode. GE Analytical Instruments ©2016 84 of 270 DLM 68100-09 EN Rev. A... -
Page 85: Installing The Analysis Complete Output Connection
Once the binary output is wired properly, the Analyzer will automatically provide a one-second contact closure at the end of every sample analysis. No menu configuration is necessary. The binary output is active in the Online, Check Standard, and Grab modes. GE Analytical Instruments ©2016 85 of 270 DLM 68100-09 EN Rev. A... -
Page 86: Installing The Alarms And System Fault Output Connection
Figure 11, a straight-through Ethernet cable is used to connect to a network. Cables are provided with the Analyzer. Figure 10: Connecting the Analyzer to a Computer GE Analytical Instruments ©2016 86 of 270 DLM 68100-09 EN Rev. A... -
Page 87: Installing The Usb Connection
USB port to transfer exported data for import into a spreadsheet or database program. The Analyzer cannot be directly connected to a computer via the USB port. GE Analytical Instruments ©2016 87 of 270... -
Page 88: Step 7: Connecting To A Power Supply
Step 7: Connecting to a Power Supply Installation of the Sievers InnovOx On-Line TOC Analyzer requires an external source of AC power connected to the enclosure using a watertight, grounded conductive conduit connector. A qualified electrician should make the electrical connections according to local Electrical Code. -
Page 89: Step 8: Connect The Sample Inlet System
Analyzer to the sample source. Connect the other end to the barbed Luer-Lok adapter fitting provided with the Sample Peristaltic Pump. Attach the fitting to the pump inlet on the top of the pump head. GE Analytical Instruments ©2016 89 of 270... -
Page 90: Installing The Wastewater Sampler
Analyzer’s main shipping container. You will need to attach the bracket to the side of the Analyzer and install the sampler pipe assembly using one of two configurations (velocity method or the overflow method), as described in the following procedures. GE Analytical Instruments ©2016 90 of 270 DLM 68100-09 EN Rev. A... -
Page 91: To Install The Wastewater Sampler (Velocity Method)
• Top bracket — Slide the following bracket over the plate adapter and secure it by tightening a screw on each end of the plate adapter. Pre-drilled screw holes Figure 16: Top Wastewater Sampler Bracket w/Plate Adapter GE Analytical Instruments ©2016 91 of 270 DLM 68100-09 EN Rev. A... -
Page 92: Figure 17: Lower Wastewater Sampler Bracket
Analyzer. For velocity method, ensure that the pipe (with internal sipper tube) is installed nearest to the instrument. Also, ensure that the sample inlet pipe is installed farthest from the instrument. GE Analytical Instruments ©2016 92 of 270 DLM 68100-09 EN Rev. A... -
Page 93: Figure 19: Velocity Method - Installation
10. If you are also installing the fail safe option, cut and remove the tie wrap used to secure the sensor to the Analyzer during shipping. 11. Remove the U-bolt from the sensor and position the U-bolt over and near the end of the pipe with the sipper tube. GE Analytical Instruments ©2016 93 of 270 DLM 68100-09 EN Rev. A... -
Page 94: To Install The Wastewater Sampler (Overflow Method)
15. Connect the pipe nearest the instrument (the tube with the internal sipper tube) to the waste outlet. (See Figure 19: Velocity Method — Installation on page 93.) To install the Wastewater Sampler (overflow method) Sipper Tube Figure 22: Overflow Method GE Analytical Instruments ©2016 94 of 270 DLM 68100-09 EN Rev. A... -
Page 95: Figure 23 Top Wastewater Sampler Bracket W/Plate Adapter
Figure 24: Lower Wastewater Sampler Bracket If using the installed external sample pump, the pump should be oriented as shown in Figure 25: Overflow Method — External Sample Pump Position on page 96. GE Analytical Instruments ©2016 95 of 270 DLM 68100-09 EN Rev. A... -
Page 96: Figure 25 Overflow Method - External Sample Pump Position
(needle). Leave the pre-installed barb inside the other pipe (the pipe without the internal sipper tube). Locate the filter vents located in the Wastewater Sampler Kit. GE Analytical Instruments ©2016 96 of 270 DLM 68100-09 EN Rev. A... -
Page 97: Figure 27: Overflow Method - Installation
10. Adjust the height of the sipper tube to enable drawing sample from a laminar flow without bubbles. Figure 28: Overflow Method — Adjusting the Sipper Tube Height GE Analytical Instruments ©2016 97 of 270 DLM 68100-09 EN Rev. A... -
Page 98: Installing The Check Standard System
Access one of the 1/8-in. OD tubes in the Analyzer’s accessories. Attach the 1/4-28 PEEK fitting in the Check Standard port on the left side of the Analyzer. The fitting should be finger-tight. GE Analytical Instruments ©2016 98 of 270... -
Page 99: Installing The Grab Sample System
Shake the carboy for approximately one minute to mix the oxidizer powder with the water. To prepare a smaller amount of oxidizing solution, 600 g pouches of oxidizer powder are also available. GE Analytical Instruments ©2016 99 of 270 DLM 68100-09 EN Rev. A... -
Page 100: Step 10: Connect The Compressed Gas
For example, with a 50 psi air supply feeding one Analyzer: 3.1 LPM + .40 LPM = 3.5 LPM The maximum available analytical flow in this example is 1.2 L/min (0.6 scfm). GE Analytical Instruments ©2016 100 of 270 DLM 68100-09 EN Rev. A... -
Page 101: Installing The Gas Supply For The Ip56 Accessory
Analyzer. Tubing from the outlet of the filter is connected to the OPTIONAL GAS INLET port on the right side of the Analyzer. The maximum gas pressure is 100 psig (689 kPa). GE Analytical Instruments ©2016 101 of 270 DLM 68100-09 EN Rev. A... -
Page 102: Specifications - Ip56 Accessory
TOC or NPOC value and which has a concentration of less than 1,000 ppm. Insert the check standard tube into the sample. Press the Setup tab, and then press the Check Standard button. Press the Check Standard Setup button. GE Analytical Instruments ©2016 102 of 270 DLM 68100-09 EN Rev. A... - Page 103 For example, a brine sample with 25% sodium chloride (NaCl) requires a 30% Oxidizer setting. Wastewater discharge will require as little as 5% Oxidizer. For more information, see “Oxidizer” on page 145, GE Analytical Instruments ©2016 103 of 270 DLM 68100-09 EN Rev. A...
-
Page 104: Step 13: Calibrate The Analyzer
Before placing the Analyzer into normal operation, calibrate the Analyzer in a manner suited to your application. Consult Chapter 5, "Calibration and Verification" for details on calibration options. GE Analytical Instruments ©2016 104 of 270 DLM 68100-09 EN Rev. A... -
Page 105: Chapter 5: Calibration And Verification
Chapter 5. Calibration and Verification Overview Calibration of the Sievers InnovOx On-Line TOC Analyzer for NPOC, IC, TC and TOC (TC- IC) measurements is accomplished using standards that contain known concentrations of carbon of interest. It is required that the InnovOx be calibrated for the specific mode that you will be running samples. -
Page 106: Handling Standards
Calibration Group. Handling Standards GE Analytical Instruments recommends special handling of all standards to ensure proper preparation and analysis. Most standards are provided in 250 mL bottles. Before performing calibration or verification, standards solutions should be transferred into 40 mL vials for use with the Analyzer’s vial port. Additionally, observe the following practices: •... -
Page 107: Calibration And Verification Options
= Volume of sample in sparger needed for dilution range, mL = Total solution volume in sparger, mL GE Analytical Instruments ©2016 107 of 270 DLM 68100-09 EN Rev. A... -
Page 108: Figure 31 Calibration Curve For Single-Point Calibration
For best performance of the Auto Range feature, it is recommended that the 50,000 ppm range be calibrated using a six-point, point-to-point calibration (see page 112). The recommended points are: Reagent Water, 100 ppm, 1,000 ppm, 5,000 ppm, 20,000 ppm and 50,000 ppm. GE Analytical Instruments ©2016 108 of 270 DLM 68100-09 EN Rev. A... -
Page 109: Two-Point Calibration
The response of the Analyzer is defined by the equation: C = a + b*R where, R = Mass Response, μg a = Calibration intercept b = Calibration constant (slope) C = mg/L Carbon, ppm GE Analytical Instruments ©2016 109 of 270 DLM 68100-09 EN Rev. A... -
Page 110: Figure 33 Two-Point Calibration (Point 1 Is Reagent Water)
= Response of Analyzer to point 2 = Response of Analyzer to reagent water = TOC concentration of point 1 (= 0 for RW) = TOC concentration of point 2 (mg/L) GE Analytical Instruments ©2016 110 of 270 DLM 68100-09 EN Rev. A... -
Page 111: Calibration With More Than Two Points
C = a + b*R A correlation coefficient, R , is also calculated. The correlation coefficient is a statistical measure of agreement between the measured values (R) and standard concentration (C). GE Analytical Instruments ©2016 111 of 270 DLM 68100-09 EN Rev. A... -
Page 112: Point-To-Point Multi-Point Calibration
When this calibration is later applied to a sample, the Analyzer applies the appropriate intercept and slope, based on the magnitude of its mass response for that sample. GE Analytical Instruments ©2016 112 of 270 DLM 68100-09 EN Rev. A... -
Page 113: Auto Dilution
100 ppm would exceed a dilution ratio. of 10:1, which is not permitted. So, if you wanted to calibrate at a point below 100 ppm via Auto Dilution, you must start with a standard less than 1000 ppm TOC. GE Analytical Instruments ©2016 113 of 270... -
Page 114: Blank Correction
All Auto Dilution ranges are available to include in a calibration group, with the exception of the Up to 100 ppm range. To set up a calibration group From the Menu screen, select Cal/Ver. Select Calibration Groups. Press the New button. GE Analytical Instruments ©2016 114 of 270 DLM 68100-09 EN Rev. A... -
Page 115: Preparing For Calibration
While this USB flash storage device is inserted, the Analyzer will not recognize any additional USB storage devices inserted in other USB ports. The Analyzer can take up to 15 seconds to recognize the flash storage device. GE Analytical Instruments ©2016 115 of 270 DLM 68100-09 EN Rev. A... -
Page 116: Perform Maintenance Tasks
TOC (so called because both TC and TOC are calibrated simultaneously). Select the appropriate default to modify. Certain protocol variables will be enabled or disabled depending on the type of calibration you are creating. GE Analytical Instruments ©2016 116 of 270 DLM 68100-09 EN Rev. A... - Page 117 The box in the lower-left corner of the screen will tell you what type of sample is expected (e.g., NPOC Standard, IC Standard, Rinse or TOC Standard). GE Analytical Instruments ©2016 117 of 270 DLM 68100-09 EN Rev. A...
-
Page 118: Calibrating The Analyzer
• RSD: Indicates the percent relative standard deviation of the non-rejected measurements of the standard. • Adjusted: Indicates the calculated concentration of the standard, using the new calibration constants from the calibration just completed. GE Analytical Instruments ©2016 118 of 270 DLM 68100-09 EN Rev. A... -
Page 119: Editing A Calibration
USB flash memory drives are connected to more than one USB port, the Analyzer will only export to the first USB flash memory drive inserted. The Analyzer can take up to 15 seconds to recognize the flash storage device. GE Analytical Instruments ©2016 119 of 270 DLM 68100-09 EN Rev. A... -
Page 120: Editing A Calibration
When the Back button is pressed, the Calibration Summary screen is shown again, with the new slope, intercept, measured and % RSD. Remember to press the Apply button to save the edited calibration. GE Analytical Instruments ©2016 120 of 270... -
Page 121: Performing A Calibration Verification
If Auto Dilution is employed, more repetitions are possible than are shown in Table 10, but the maximum number of repetitions that can be selected is 20. GE Analytical Instruments ©2016 121 of 270 DLM 68100-09 EN Rev. A... -
Page 122: Reviewing Calibration And Verification History
Then, press the Cal. CSV to Ethernet button or the Ver. CSV to Ethernet button. If the printer is set up, printing of the Cal/Ver history is also available. GE Analytical Instruments ©2016 122 of 270 DLM 68100-09 EN Rev. A... -
Page 123: Chapter 6: Analyzer Operation
Analyzer. When the Analyzer is first powered on, a startup screen appears with basic GE Analytical Instruments contact information and the firmware version number. The Analyzer then begins initialization to check the status of consumables and prepare for making measurements. -
Page 124: Figure 38 The Main Screen (Grab Mode)
Figure 39: The Main Screen (Online Mode) The Main screen provides the following options: • Menu button — Press this button to display the Menu screen and change the Analyzer’s settings. GE Analytical Instruments ©2016 124 of 270 DLM 68100-09 EN Rev. A... -
Page 125: The Menu Screen
40) provides you with access to all Analyzer settings and configuration options. The Menu screen displays five tabs that provide access to the main configuration areas. Figure 40: The Menu Screen GE Analytical Instruments ©2016 125 of 270 DLM 68100-09 EN Rev. A... -
Page 126: Setting Up Measurements (The Setup Tab)
Online Measurements This section provides an overview of planning for online measurements, including: working with continuous measurements, operation with multiple streams, cycle frequency, and calculated run time. GE Analytical Instruments ©2016 126 of 270 DLM 68100-09 EN Rev. A... -
Page 127: Continuous Measurements
The first measurement is ignored because it has been designated as a Reject. Figure 42: Operation with a Cycle Frequency of One Hour GE Analytical Instruments ©2016 127 of 270 DLM 68100-09 EN Rev. A... -
Page 128: Operation With Multiple Streams
Figure 43: Operation with Five Streams and the Check Standard, five Streams are enabled. The Cycle Frequency is set to two (2) hours, so measurement of the enabled Streams starts every two hours. GE Analytical Instruments ©2016 128 of 270 DLM 68100-09 EN Rev. A... -
Page 129: Configure Online Screen
(such as 0.83 hours) of the current protocol (see Figure 31). The message also prompts you with an opportunity to set the Cycle Frequency. Press Yes if you want to increase the Cycle Frequency. If the Cycle GE Analytical Instruments ©2016 129 of 270... -
Page 130: Figure 44 Calculating The Run Time
Auto Range measurements require more time than when a particular Range is selected. Possibly one or more measurements can be made with fewer or no Sample Flushes. GE Analytical Instruments ©2016 130 of 270 DLM 68100-09 EN Rev. A... -
Page 131: Online Measurement-Configuration
5-Stream configuration. With the exception of the number of streams, both Analyzers are set up the same way. GE Analytical Instruments ©2016 131 of 270 DLM 68100-09 EN Rev. A... -
Page 132: Figure 46: Stream 1 Screen
Press the Measure button to specify which value to measure: IC, NPOC, TOC, or TC. Press the Advanced Setup button to display the following options: • Blank Correction button — Set the blank correction feature to On or Off. GE Analytical Instruments ©2016 132 of 270 DLM 68100-09 EN Rev. A... - Page 133 Use Sample Flushes to quickly reach steady-state response when the Analyzer will be switching from one stream to another and the two streams have very different concentrations. • If you have a GE InnovOx Filter Panel installed (ONLY), press the Blowback Pulses button to set the number of pulses.
-
Page 134: Check Standards
“To set check standard measurements (Scheduled)” on page 135. Any changes made to the Check Standard Measurement (Manual Start) are also applied to the Check Standard Measurement (Scheduled). See page 135. GE Analytical Instruments ©2016 134 of 270 DLM 68100-09 EN Rev. A... -
Page 135: Figure 47: Check Standard Setup Screen
20% above the Concentration value. Press the Check Std. Setup button. The following buttons appear on the Check Standard screen. Figure 48: Check Standard (with Setup Buttons) Screen GE Analytical Instruments ©2016 135 of 270 DLM 68100-09 EN Rev. A... - Page 136 On the Setup tab, press the Check Standard button. The Check Standard Setup button appears to the right. Press the Check Standard Setup button. The Check Standard (Setup) screen appears. GE Analytical Instruments ©2016 136 of 270 DLM 68100-09 EN Rev. A...
-
Page 137: Check Standard (Setup) Screen
127. Use this feature to exclude initial measurements when the concentration of the check standard is different from the previously measured sample, so that the average of the check standard measurements is accurate. GE Analytical Instruments ©2016 137 of 270 DLM 68100-09 EN Rev. A... -
Page 138: Clean Inlet
On the Configure Online screen, press the Daily Flush button. An On button and an Off button appear to the right. Press either the On or Off button, as needed. Proceed to the next instruction to set the Daily Flush start time. GE Analytical Instruments ©2016 138 of 270 DLM 68100-09 EN Rev. A... -
Page 139: Summary
On the Setup tab, press the Grab button. The Analysis Protocol button appears on the right. Press the Analysis Protocol button. The Protocol screen appears with a listing of protocols. Figure 50: The Protocol Screen GE Analytical Instruments ©2016 139 of 270 DLM 68100-09 EN Rev. A... -
Page 140: Figure 51 The Grab (Setup) Screen
RSD criteria. If you enter 7 Max Reps and 2 Min Reps, the Analyzer will run at least two repetitions and compare the calculated RSD to the RSD criteria entered. If the calculated RSD is GE Analytical Instruments ©2016 140 of 270... - Page 141 As an example, the following table lists the approximate number of repetitions possible when using 40-mL vials. The possible number of repetitions varies according to the size of the vials used in the protocol. GE Analytical Instruments ©2016 141 of 270 DLM 68100-09 EN Rev. A...
-
Page 142: Table 11 Vial Port - Repetitions Possible
2 Sample 3 Sample Mode Water Auto Range NPOC 100 ppm Range NPOC 1,000 ppm Range NPOC 5,000 ppm Range NPOC 20,000 ppm Range NPOC 50,000 ppm Range NPOC GE Analytical Instruments ©2016 142 of 270 DLM 68100-09 EN Rev. A... -
Page 143: Rinse
(TOC = TC - IC). In order for the TOC measurement to be as accurate as possible, the solution is introduced into the Sparger prior to loading the Reactor. GE Analytical Instruments ©2016 143 of 270 DLM 68100-09 EN Rev. A... -
Page 144: Range
If you are using the Analyzer’s Auto Range function, you will need to specify a calibration group to use with the protocol. For more information, see “Calibration Groups” on page 114. GE Analytical Instruments ©2016 144 of 270 DLM 68100-09 EN Rev. A... -
Page 145: Acid
RSD criteria, the Analyzer will run one more repetition and recalculate the RSD. The number of reps used to calculated the RSD will be the Min Reps value in consecutive order. If the Analyzer continues to not GE Analytical Instruments ©2016 145 of 270... -
Page 146: Sparge
Figure When the User Management feature is enabled, this configuration setup requires the login of an Administrator-level user. For additional information, refer to “User Management” on page 150. GE Analytical Instruments ©2016 146 of 270 DLM 68100-09 EN Rev. A... -
Page 147: Figure 52: The Maintenance Tab
To set up a Conversion Factor equation, press the Factor Equation button and use the keypad to enter the equation. Use the letter "C" in the equation to represent the raw value produced by the Analyzer. (It GE Analytical Instruments ©2016 147 of 270... -
Page 148: Figure 54: Configuring The Factor Equation
MG PER L (Figure 55). Figure 55: Configuring the Factor Units Press the Save button to save the units and return to the Factor screen. GE Analytical Instruments ©2016 148 of 270 DLM 68100-09 EN Rev. A... -
Page 149: Figure 56: Configuring The Factor Name
Each configured conversion factor now appears when setting up Stream measurements or Grab measurements (Figure 57), as described earlier in this chapter. To apply a conversation factor, press its button from this screen. Figure 57: Using a Conversion Factor GE Analytical Instruments ©2016 149 of 270 DLM 68100-09 EN Rev. A... -
Page 150: User Management
Press Password to enter a unique user password, and then press Enter. Write down your passwords and store them in a safe place for future reference. If you have forgotten your password, you will need to contact GE to help unlock your Analyzer with the keycode that appears on the Login screen. -
Page 151: Measuring The Blank
When the analysis is complete, the Analyzer displays a results screen that lists the measured TC, IC and TOC concentrations of dilution water, acid, and oxidizer. To save the measured blank values, press the Apply button. GE Analytical Instruments ©2016 151 of 270 DLM 68100-09 EN Rev. A... -
Page 152: Viewing And Exporting Data
This section describes how to export historical data from the Analyzer directly to a USB memory device (.pdf or .csv file), or export to a computer or computer network via an Ethernet connection (.csv file). For information on GE Analytical Instruments ©2016 152 of 270... -
Page 153: Export (Data) Screen
Press the Range button to select the time frame for the data to export. The following buttons appear on the right: • 1 Day • 1 Week • All • Custom (Enter a specific date and time range.) GE Analytical Instruments ©2016 153 of 270 DLM 68100-09 EN Rev. A... -
Page 154: Figure 60: Export Data Screen
• CSV to Ethernet — Exports a comma-separated text file via the Ethernet port. • Export PDF to USB — Exports a PDF file to a USB flash memory drive. Press the Back button to return to the Data tab. GE Analytical Instruments ©2016 154 of 270 DLM 68100-09 EN Rev. A... -
Page 155: Reviewing Exported Data
Mass of CO measured (mg). Rejects are not reported. Mass Response (µg) Equation Conversion factor equation Method ID Conversion factor name Leak Check Ratio Diagnostic should be <1.008 GE Analytical Instruments ©2016 155 of 270 DLM 68100-09 EN Rev. A... -
Page 156: Setting Up Input And Output (I/O)
To configure the Analyzer’s IP Address Select the I/O tab, and then press the IP Configuration button. The Configuration screen appears. Figure 61: IP Configuration Screen GE Analytical Instruments ©2016 156 of 270 DLM 68100-09 EN Rev. A... -
Page 157: Configuring A Personal Computer
However, there are instances in which autonegotiation may fail or be disabled. In such cases, the Ethernet interface will need to be configured manually to the "10BASE-T half duplex" setting on the remote device. Contact your IT professional for help with this configuration. GE Analytical Instruments ©2016 157 of 270 DLM 68100-09 EN Rev. A... - Page 158 Analyzer IP address is set to the default of 192.168.1.10, you could set the computer to 192.168.1.11. Enter a subnet mask address. This should be the same numbers as those used on the Analyzer. Click the OK button. 10. Click the OK button. GE Analytical Instruments ©2016 158 of 270 DLM 68100-09 EN Rev. A...
-
Page 159: Collecting Historical And Real-Time Data
For direct connection of the Analyzer to a PC, select the crossover Ethernet cable from the Accessories Kit. Attach one end to the Ethernet port in the electronics area of the Analyzer, and the other end to an Ethernet port on the PC. GE Analytical Instruments ©2016 159 of 270 DLM 68100-09 EN Rev. A... -
Page 160: Using The Ethernet Connection And Modbus
I/O Board configuration information. To set the alarms Select the I/O tab. Press one of the alarm output buttons (such as the Alarm Output 1 button). The Alarm Output screen appears. GE Analytical Instruments ©2016 160 of 270 DLM 68100-09 EN Rev. A... -
Page 161: Figure 62 Alarm Output Screen
TOC. The unit of measure appears in the default ppm unit or another unit measure if the stream’s Setup screen has been configured with a conversion factor. GE Analytical Instruments ©2016 161 of 270 DLM 68100-09 EN Rev. A... -
Page 162: Changing The Alarms On Or Off Setting
Disabled button to change it to Printer Enabled. Select the Search button to have the InnovOx search for a connected approved HP Printer. To print data Select the Data tab. Click the Print button. GE Analytical Instruments ©2016 162 of 270 DLM 68100-09 EN Rev. A... -
Page 163: Liquid Sensor Setup
Liquid Sensor buttons appear. Press the Main Enclosure Liquid Sensor button and press the Enabled button. Verify that the Main Enclosure Liquid Sensor button now shows an Enabled state. GE Analytical Instruments ©2016 163 of 270 DLM 68100-09 EN Rev. A... -
Page 164: Figure 65 Liquid Sensor Location - Hazardous Location Enclosure (Atex Or C1/D2)
The leak sensor for the auxiliary Hazardous Location enclosure is now activated. Figure 64: Liquid Sensor Location — Analyzer Enclosure Figure 65: Liquid Sensor Location — Hazardous Location Enclosure (ATEX or C1/D2) GE Analytical Instruments ©2016 164 of 270 DLM 68100-09 EN Rev. A... -
Page 165: Configuring Advanced Setup
Press the Advanced button. The Advanced screen appears. Press the Analyzer Name button, and use the keypad to specify a name for the Analyzer. Press the Set Name button. The Advanced screen appears again. GE Analytical Instruments ©2016 165 of 270 DLM 68100-09 EN Rev. A... -
Page 166: Setting System Properties
To overwrite the system properties with factory settings that you have previously exported to a USB flash drive, insert the drive into the Analyzer and press the USB Restore button. Press the USB Backup button or Ethernet Export button. GE Analytical Instruments ©2016 166 of 270 DLM 68100-09 EN Rev. A... -
Page 167: Setting The Clock
USB key. If you downloaded the upgrade files from the GE website, make sure that the files are saved in the proper folders on your USB key (:\InnovOx\Upgrade). After you install your USB key in the USB port, wait 15 seconds and then select the Upgrade button. -
Page 168: Cleaning The Analyzer Screen
You can deactivate the touchscreen for 30 seconds to allow you to clean the screen without activating any features. To deactivate the screen Select the Maintenance tab. Press the Advanced button. The Advanced screen appears. Press the Clean Screen button. GE Analytical Instruments ©2016 168 of 270 DLM 68100-09 EN Rev. A... -
Page 169: Setting The Fail Safe Option
Press the Advanced button. The Display Options button will either be set to Display Options Negative or Display Options ND. Press the button to choose between the two options. GE Analytical Instruments ©2016 169 of 270 DLM 68100-09 EN Rev. A... -
Page 170: Archiving The Data History
The Analyzer is not shut down until the power switch is turned to Off. If you are planning to perform maintenance inside the Analyzer, make sure to shut down and power off the Analyzer. GE Analytical Instruments ©2016 170 of 270 DLM 68100-09 EN Rev. A... -
Page 171: Checking The Software Version
The main software version appears on top. (This is the same version number that displays when the Analyzer starts up.) The embedded software versions of the different modules in the Analyzer also appear. GE Analytical Instruments ©2016 171 of 270 DLM 68100-09 EN Rev. A... - Page 172 Chapter 6: Analyzer Operation This page is intentionally left blank. GE Analytical Instruments ©2016 172 of 270 DLM 68100-09 EN Rev. A...
-
Page 173: Chapter 7: Operation With The Filter Panel
200 m. The InnovOx On-Line TOC Analyzer is designed to control up to five Filter Panels. Refer to the GE Filter Panel Operation and Maintenance Manual for instructions on the installation and setup of the Filter Panel. -
Page 174: Figure 69: Blowback Pulses And Sample Flow Time
Confirm that the filtered water tube is connected to the Filter Panel and to the Analyzer. The tube should be connected either to the Inlet port of the sample cup, or to the Inlet port on the optional peristaltic sample pump. GE Analytical Instruments ©2016 174 of 270 DLM 68100-09 EN Rev. A... -
Page 175: Flush/Blowback Screen
Press the Flush/Blowback Setup button. The Flush/Blowback Setup screen appears (Figure 71). Figure 71: Flush/Blowback Screen Press the Dilution Water Flush button and then press either the On or Off button that appears. GE Analytical Instruments ©2016 175 of 270 DLM 68100-09 EN Rev. A... - Page 176 10. Press the Sample Back-Flush button and then press either the Enabled or Disabled button that appears. When enabled, this flush will occur at the end of every measurement. 11. Repeat this procedure for each stream installed with a filter panel. GE Analytical Instruments ©2016 176 of 270 DLM 68100-09 EN Rev. A...
-
Page 177: Chapter 8: Maintenance
Table 14 for the recommended consumables replacement schedule. Maintenance items MUST be purchased from GE Analytical Instruments. If you need additional assistance in North America, contact GE Analytical Instruments Technical Support at 303.444-2009 or 888.245.2595 or [email protected]. Technical support in Europe, Middle East, and Africa is available at 44 (0) 161 864 6800 or . -
Page 178: Recommended Spare Parts
6800 and in Asia Pacific, contact us at (8621) 38777735. Technical support in North America is available at 303.444-2009 or 888.245.2595 or [email protected]. Technical support in Europe, Middle East, and Africa is available at 44 (0) 161 864 6800 or [email protected]. Technical support in Asia Pacific is . ... -
Page 179: Preparing The Oxidizer Solution
40 °C. Therefore, the oxidizer reagent should be replaced more often when it is stored at temperatures over 25 °C. The Analyzer can be set to automatically perform the Check Standard measurements. GE Analytical Instruments ©2016 179 of 270 DLM 68100-09 EN Rev. A... -
Page 180: Preparing The Persulfate Oxidizing Solution
Fill the “Dilution Water” 19 L (5 gal) carboy with deionized water or the best-quality water available to you. Performing a Flush When installing new reagents, perform a flush to clear the tubing of bubbles and old solution. To perform a flush Select the Maintenance tab. GE Analytical Instruments ©2016 180 of 270 DLM 68100-09 EN Rev. A... -
Page 181: Cleaning The Analyzer
To clean the gas-liquid separator Warning Contents are acidic. Wear eye protection and gloves during this procedure. Shut down the Analyzer via the on-screen menu (Maintenance Shutdown). GE Analytical Instruments ©2016 181 of 270 DLM 68100-09 EN Rev. A... -
Page 182: Figure 73 The Gas-Liquid Separator
12. Perform other maintenance tasks, or close the Analyzer door and return the Analyzer to normal operation. NDIR Filter NDIR Outlet Sparger Outlet Reactor Outlet Gas-Liquid Separator (GLS) Waste Figure 73: The Gas-Liquid Separator GE Analytical Instruments ©2016 182 of 270 DLM 68100-09 EN Rev. A... -
Page 183: Cleaning The Sparger
12. Secure the sparger to the bracket by tightening the four screws. 13. Reattach the tubing to the four barbs. 14. Perform other maintenance tasks, or close the Analyzer door and return the Analyzer to normal operation. GE Analytical Instruments ©2016 183 of 270 DLM 68100-09 EN Rev. A... -
Page 184: Lubricating The Syringe
Using the Maintenance screen, shut down the Analyzer. Turn off the power to the Analyzer, and unplug the power cord or disconnect the main power. Open the door to the inside of the instrument. GE Analytical Instruments ©2016 184 of 270 DLM 68100-09 EN Rev. A... -
Page 185: Unscrewing The Syringe Base
Analyzer. ignore this step. Figure 75: Locating the Syringe Screw and Washers Unscrew the syringe base by turning the base to the left. Figure 76: Unscrewing the Syringe Base GE Analytical Instruments ©2016 185 of 270 DLM 68100-09 EN Rev. A... -
Page 186: Figure 77 Removing The Syringe
You must place the washer back on the plunger tip when reinstalling. Figure 77: Removing the Syringe Pull the plunger all the way out of the syringe barrel. Figure 78: Pulling Out the Plunger GE Analytical Instruments ©2016 186 of 270 DLM 68100-09 EN Rev. A... -
Page 187: Figure 79 Removing The Stopper
14. Using a 3/32 Allen wrench, tighten the screw that secures the syringe. The top of the syringe moves independently of the syringe plunger, so it can be aligned with the screw hole. GE Analytical Instruments ©2016 187 of 270... -
Page 188: Consumables Replacement
Analyzer’s Main screen and on the Consumables screen. For this procedure, the Analyzer should be powered on. Contact GE Analytical Instruments at 303. 444.2009 or 800.255.2595 for a replacement kit. Technical Support in North America is available at 303.444-2009 or 888.245.2595 or [email protected]. - Page 189 10. Enter the installation date for the new sample tubing. See “Entering Consumables Installation Information” on page 193. 11. Perform other maintenance tasks, or close the Analyzer door and return normal Analyzer operations. GE Analytical Instruments ©2016 189 of 270 DLM 68100-09 EN Rev. A...
-
Page 190: Figure 81 Valve Locations - Innovox On-Line Toc Analyzer
P1-SH V7-R Sparger V3-R V5-R V6-R V4-R P1-R *Valves V3, V4, and V5-MS are installed in 5-Stream option only. Figure 81: Valve Locations - InnovOx On-Line TOC Analyzer GE Analytical Instruments ©2016 190 of 270 DLM 68100-09 EN Rev. A... -
Page 191: Replacing The Peristaltic Pump Head Tubing
• P1-R Pump Head — The tubing on the left connects to the waste line and the right connects to the sample inlet line. GE Analytical Instruments ©2016 191 of 270 DLM 68100-09 EN Rev. A... -
Page 192: Replacing The Ndir Filter
Disconnect the tubing from each end of the filter, and remove the filter from the Analyzer. Dispose of the filter. Attach the new filter to the tubing. Perform other maintenance tasks, or close the Analyzer door and return the Analyzer to normal operation. GE Analytical Instruments ©2016 192 of 270 DLM 68100-09 EN Rev. A... -
Page 193: Entering Consumables Installation Information
Press the Reset Pump or Reset Tubing button for the item you have installed. Other Maintenance Tasks Other maintenance tasks are performed only when required and as indicated in this section. GE Analytical Instruments ©2016 193 of 270 DLM 68100-09 EN Rev. A... -
Page 194: Replacing The High Pressure Valve Seals
Replacing the High Pressure Valve Seals Warning Wear eye protection and gloves when performing this task. The Sievers InnovOx Online TOC Analyzer has two high pressure valves (V4-R and V5-R). These valves are identified in Figure on page 190. Each valve contains a seal that wears over time. The seals should be replaced after one month of operation. -
Page 195: Figure 83: The High Pressure Valve Seal - Before Removal
2, high levels of insoluble particles, and near-saturated brine solutions require more frequent maintenance intervals. Contact GE Analytical Instruments Technical Support or a GEAI Applications Engineer for specific details on your application. GE Analytical Instruments ©2016 195 of 270 DLM 68100-09 EN Rev. -
Page 196: Table 15 2-Year Maintenance Worksheet - Sievers Innovox Online Toc Analyzer
Chapter 8: Maintenance Table 15: 2-Year Maintenance Worksheet — Sievers InnovOx Online TOC Analyzer Item Operating Time Installation Date Notes GLS (clean and refill with DI water) 1 month Oxidizer reagent 1 month, or as needed Dilution water 1 month... - Page 197 Chapter 8: Maintenance Table 15: 2-Year Maintenance Worksheet — Sievers InnovOx Online TOC Analyzer Item Operating Time Installation Date Notes High pressure valve seals 13 months High pressure valve seals 14 months High pressure valve seals 15 months Exterior sample pump tubing...
- Page 198 Chapter 8: Maintenance This page is intentionally left blank. GE Analytical Instruments ©2016 198 of 270 DLM 68100-09 EN Rev. A...
-
Page 199: Chapter 9: Troubleshooting
This chapter provides the starting point for troubleshooting basic issues with your Analyzer. If you need additional assistance in North America, contact GE Analytical Instruments Technical Support at 303.444-2009 or 888.245.2595 or [email protected]. Technical support in Europe, Middle East, and Africa is available at 44 (0) 161 864 6800 or . -
Page 200: Analyzer Warnings And Error Messages
50 - Power Error on System/Controller Board Message: "Power error on System/Controller Board. Please power cycle the Analyzer. If the problem persists, export errors and contact GE Analytical Instruments for further instructions and analysis." Explanation: Replace the System/Controller Board.150 - Software Control Error Message: "Software control error. - Page 201 Message: "The tubing has exceeded its recommended life. Replace the tubing in all pinch valves." Explanation: Based on the history of usage, the Analyzer estimates that the pinch valve tubing life has expired. Order tubing from GE now to avoid down time and more costly failure of pinch valves. GE Analytical Instruments ©2016 201 of 270 DLM 68100-09 EN Rev.
- Page 202 Explanation: Based on the history of usage, the Analyzer estimates that only two weeks of pinch valve tubing remains. The tubing must be replaced to protect the operation of the pinch valves. Order tubing from GE now to avoid down time and more costly failures of pinch valves.
- Page 203 Message: “Stream 1 flow stopped.” Explanation: Check that water is flowing in the sample cup and the inlet valve (if installed) is properly adjusted. If the problem persists, please export the warnings and contact GE Analytical Instruments for further instructions. GE Analytical Instruments ©2016 203 of 270 DLM 68100-09 EN Rev.
- Page 204 Explanation: Check that water is flowing in the sample cup and the inlet valve (if installed) is properly adjusted. If the problem persists, please export the warnings and contact GE Analytical Instruments for further instructions. 6418 – Stream 3 Flow Warning Message: “Stream 3 flow stopped.”...
- Page 205 Explanation: This error is associated with the creation of a .pdf file. If you are creating a .pdf from the Analyzer, shut down the Analyzer, power cycle and repeat. If the problem persists, contact GE Analytical Instruments for further instructions.‘...
- Page 206 Then, check the cable connections. You may be able to regain control of the unit by plugging a mouse into any of the USB port. If the problem persists please export the errors and contact GE Analytical Instruments for further instructions.”...
- Page 207 Message: “Go to the Diagnostics screen and run the Gas Valves test (V7-SH). If the gas flow rate fails to maintain 200 cc/min, please export the errors and contact GE Analytical Instruments for further instructions.” Explanation: The flow rate of gas through the sparger was found to be too low. There may be a problem with valve V7-SH or with the gas tubing.
- Page 208 6438 – Printer Error Message: “System either failed to detect an HP printer, or the printer is not currently supported. Please export the errors and diagnostics, and contact GE Analytical Instruments for further instructions.” Explanation: Please refer to “Printer Setup” on page 162 for a list of supported printers.
- Page 209 4) Thoroughly dry the sensor, the mount, and surrounding surfaces. 5) Reinsert the sensor into its mount. 6) Using the Analyzer’s touch panel, reset the error (Maintenance tab > Errors/Warnings button). GE Analytical Instruments ©2016 209 of 270 DLM 68100-09 EN Rev. A...
-
Page 210: Other Software Errors
If possible, perform the inspection with the Analyzer in analysis mode so you can verify that relevant modules (identified in the following figure) are performing as usual. GE Analytical Instruments ©2016 210 of 270 DLM 68100-09 EN Rev. A... -
Page 211: Figure 85 The Fluidics Side Of The Analyzer
V2-R P1-SH V7-R Sparger V3-R V5-R V6-R V4-R P1-R *Valves V3, V4, and V5-MS are installed in 5-Stream option only. Figure 85: The Fluidics Side of the Analyzer GE Analytical Instruments ©2016 211 of 270 DLM 68100-09 EN Rev. A... -
Page 212: Figure 86 The Electronics Side Of The Analyzer
Power Supply Terminator Board NDIR Board Multi-stream Module Board Gas Control Module Board Reactor Sample Handling Module Board Module Board Figure 86: The Electronics Side of the Analyzer GE Analytical Instruments ©2016 212 of 270 DLM 68100-09 EN Rev. A... -
Page 213: Figure 87 Electronics In The Top Of The Analyzer
Chapter 9: Troubleshooting System Controller Power Supply Board Analog I/O Board Front of Analyzer Multi-stream Module Board Figure 87: Electronics in the Top of the Analyzer GE Analytical Instruments ©2016 213 of 270 DLM 68100-09 EN Rev. A... -
Page 214: Figure 88: Analyzer Schematic
Chapter 9: Troubleshooting Figure 88: Analyzer Schematic GE Analytical Instruments ©2016 214 of 270 DLM 68100-09 EN Rev. A... -
Page 215: External Inspection
If excessive bubbles are present, a flush should be performed. Look to see if air flows into the reagent lines during flushing. GE Analytical Instruments ©2016 215 of 270 DLM 68100-09 EN Rev. A... -
Page 216: Reviewing Solutions For Basic Problems
The Analyzer Will Not Power On If the power switch is on, but the display is not illuminated, touch the display. The Analyzer may be in Standby to save power. GE Analytical Instruments ©2016 216 of 270 DLM 68100-09 EN Rev. A... -
Page 217: Diagnostics
Diagnostics screen, the Analyzer immediately turns off the activated components. Multiple buttons on a screen may be pressed to simultaneously activate multiple components. When you are finished performing each diagnostic test, the component returns its safe (unpowered) condition. GE Analytical Instruments ©2016 217 of 270 DLM 68100-09 EN Rev. A... -
Page 218: Valves
The Flow Control Valve screen contains buttons to test the Multi Stream valves, Sample Handler Valves, and the Reactor Valves. Figure 92: The Flow Control Valve Screen Press the corresponding button to view the detail screen containing buttons for all the valves of that type. GE Analytical Instruments ©2016 218 of 270 DLM 68100-09 EN Rev. A... -
Page 219: Figure 93 Sampler Handler Valves Screen
Figure 81 on page 190 for the name of all the valves and their locations in the Analyzer. 1 = Active state 0 = Inactive state Figure 93: Sampler Handler Valves Screen GE Analytical Instruments ©2016 219 of 270 DLM 68100-09 EN Rev. A... -
Page 220: Gas Valves
(Figure 95). To stop the Gas Valve Test while it is in progress, press the Valve button again or press the Back button. Figure 95: Diagnostic Result Screen GE Analytical Instruments ©2016 220 of 270 DLM 68100-09 EN Rev. A... -
Page 221: Gas Valve Testing Criteria
• Carrier Gas Valve (V1-R) is closed. • Sparge Gas Valve (V7-SH) is closed. • Reactor Purge Valve (V2-R) is opened • Reactor Seal Valves (V4-R) and (V5-R) are opened. GE Analytical Instruments ©2016 221 of 270 DLM 68100-09 EN Rev. A... -
Page 222: Pneumatic Valves
After pressing a pneumatic valve button, you should hear compressed air exit from the selected valve. (The pneumatic valves are mounted on the left side of the Analyzer). Figure 96: Pneumatic Valve Screen GE Analytical Instruments ©2016 222 of 270 DLM 68100-09 EN Rev. A... -
Page 223: Ndir
To start the test, press the Heater button (Figure 98). The button turns orange, the heater powers on, and the system begins going through its programmed heating and cooling profile. GE Analytical Instruments ©2016 223 of 270 DLM 68100-09 EN Rev. A... -
Page 224: Heater Testing Criteria
Cooling Phase — At 180 seconds, the cooling fan comes on and remains on for 110 seconds. After which, a message indicating the heater temperature and test results appears, the timer resets to zero, and the Heater button becomes active again. GE Analytical Instruments ©2016 224 of 270 DLM 68100-09 EN Rev. A... -
Page 225: Liquid Flow Check
If you do not see water exiting the waste tube while P1-R is operating, or if the liquid level in the sparger does not go down, the reactor bypass tube may be plugged. • Waiting — The test is complete. GE Analytical Instruments ©2016 225 of 270 DLM 68100-09 EN Rev. A... -
Page 226: Gas Leak Checks
Also, make sure to insert the small plug (included in the Accessories Kit) into the end of the coiled tube coming from the left side of the NDIR. This prevents leakage of vent gas out of the NDIR during testing. GE Analytical Instruments ©2016 226 of 270... -
Page 227: Figure 100 The Gas Leak Check Screen
When the system passes pressurization, the leak check begins, the timer starts, and “Testing . . .” appears under the timer. The test passes if the drop in pressure is <= 2.0 psi. GE Analytical Instruments ©2016 227 of 270... - Page 228 Control Manifold are not leaking. Check gas connections leading to the NDIR end caps. If all of those items are correct, then contact GE Analytical Instruments for further information. To continue the series of gas leak checks, leave the plug on the NDIR end cap outlet gas line and proceed to the next section, “To perform the (Check 2) Reactor Inlet Valve Leak Check.”...
-
Page 229: Figure 101 Gas Manifold Leak Check
Chapter 9: Troubleshooting Figure 101: Gas Manifold Leak Check GE Analytical Instruments ©2016 229 of 270 DLM 68100-09 EN Rev. A... - Page 230 To continue the series of gas leak checks, leave the plug on the NDIR end cap outlet gas line and proceed to the next section, “To perform the (Check 3) Reactor Bypass Leak Check.” Otherwise, remove the plug for normal operation. GE Analytical Instruments ©2016 230 of 270 DLM 68100-09 EN Rev. A...
-
Page 231: Figure 102: Reactor Inlet Valve Leak Check
Chapter 9: Troubleshooting Figure 102: Reactor Inlet Valve Leak Check GE Analytical Instruments ©2016 231 of 270 DLM 68100-09 EN Rev. A... - Page 232 To continue the series of gas leak checks, leave the plug on the NDIR end cap outlet gas line and proceed to the next section, “To perform the (Check 4) Reactor Leak Check.” Otherwise, remove the plug for normal operation. GE Analytical Instruments ©2016 232 of 270 DLM 68100-09 EN Rev. A...
-
Page 233: Figure 103: Reactor Bypass Leak Check
Chapter 9: Troubleshooting Figure 103: Reactor Bypass Leak Check GE Analytical Instruments ©2016 233 of 270 DLM 68100-09 EN Rev. A... - Page 234 To continue the series of gas leak checks, leave the plug on the NDIR end cap outlet gas line and proceed to the next section, “To perform the (Check 5) Reactor Outlet Valve Leak Check.” Otherwise, remove the plug for normal operation. GE Analytical Instruments ©2016 234 of 270 DLM 68100-09 EN Rev. A...
-
Page 235: Figure 104 Reactor Leak Check
Chapter 9: Troubleshooting Figure 104: Reactor Leak Check GE Analytical Instruments ©2016 235 of 270 DLM 68100-09 EN Rev. A... - Page 236 “To perform the (Check 6) Gas-Liquid Separator, NDIR Filter, NDIR Sample Path and Sparger Leak Check.” Otherwise, remove the plug for normal operation. GE Analytical Instruments ©2016 236 of 270 DLM 68100-09 EN Rev. A...
-
Page 237: Figure 105 Reactor Outlet Valve Check
Chapter 9: Troubleshooting Figure 105: Reactor Outlet Valve Check GE Analytical Instruments ©2016 237 of 270 DLM 68100-09 EN Rev. A... -
Page 238: Leak Check
Separator, NDIR Filter, and Sparger. Remove the clamp from the GLS waste tube. Reinstall the pinch tubing into V7-SH. Remove the plug on the NDIR end cap outlet gas line. GE Analytical Instruments ©2016 238 of 270 DLM 68100-09 EN Rev. A... -
Page 239: Analog Output
When the Binary Output screen first appears, it will show the current state of the outputs. When you exit the Binary Output screen, the outputs return to their original states. GE Analytical Instruments ©2016 239 of 270 DLM 68100-09 EN Rev. A... -
Page 240: Binary Input
Binary Input screen appears, the Analysis Start/Stop button will change from Off to On. However, the Analyzer will not start or stop analysis. GE Analytical Instruments ©2016 240 of 270 DLM 68100-09 EN Rev. A... -
Page 241: Figure 108 Binary Input Check
No Liquid Detected or Liquid Detected state. Before continuing with Diagnostics, re-enable the Main Enclosure Leak Sensor button (I/O tab Liquid Sensor Setup). Figure 108: Binary Input Check GE Analytical Instruments ©2016 241 of 270 DLM 68100-09 EN Rev. A... -
Page 242: Pumps
Press the button again to stop the pump. The pump will ramp down its speed to stop. Repeat steps to test each pump installed on the Analyzer. Press the Back button to return to the Diagnostics screen. GE Analytical Instruments ©2016 242 of 270 DLM 68100-09 EN Rev. A... -
Page 243: Export Diagnostic Data
Figure 110: Sparger Diagnostics Screen Contacting Technical Support If you need further help troubleshooting any of these or other issues in North America, contact GE Analytical Instruments Technical Support at 303.444-2009 or 888.245.2595 or [email protected]. Technical support in Europe, Middle East, and Africa is available at 44 (0) 161 864 6800 or . -
Page 244: Returning The Analyzer To Ge Analytical Instruments
Returning the Analyzer to GE Analytical Instruments In some instances, after consulting with GE Analytical Instruments Technical Support, it may be necessary to return the Analyzer to the factory for repairs. Only return the Analyzer if Technical Support has issued you a Return Authorization (RA) number. - Page 245 13. Close the door on the Analyzer. You can now repackage the Analyzer and ship it to GEAI. For international shipments, coordinate with a representative to ensure quick passage through customs. GE Analytical Instruments ©2016 245 of 270 DLM 68100-09 EN Rev. A...
- Page 246 Chapter 9: Troubleshooting This page is intentionally left blank. GE Analytical Instruments ©2016 246 of 270 DLM 68100-09 EN Rev. A...
-
Page 247: Appendix A: Analyzer Dimension Diagrams
Appendix A: Analyzer Dimension Diagrams Diagrams show Analyzer dimensions and required clearances. Figure 111: Analyzer Dimensions (Front View) GE Analytical Instruments ©2016 247 of 270 DLM 68100-09 EN Rev. A... -
Page 248: Analyzer Dimensions (Right Side View)
Figure 112: Analyzer Dimensions (Right Side View) GE Analytical Instruments ©2016 248 of 270 DLM 68100-09 EN Rev. A... -
Page 249: Analyzer Dimensions (Left Side View)
Figure 113: Analyzer Dimensions (Left Side View) GE Analytical Instruments ©2016 249 of 270 DLM 68100-09 EN Rev. A... - Page 250 This page is intentionally left blank. GE Analytical Instruments ©2016 250 of 270 DLM 68100-09 EN Rev. A...
-
Page 251: Appendix B: Acronyms And Definitions
The advantage of using the Blank Correction feature is that the correction is calculated, regardless of any changes in the measurement Range, or changes in Acid or Oxidizer GE Analytical Instruments ©2016 251 of 270 DLM 68100-09 EN Rev. A... - Page 252 Check Standard carboy should be refilled. It also automatically skips analysis of sample streams when flow stops. Flush The Sievers InnovOx Online TOC Analyzer can perform two types of flushes: Sample Flushes and Dilution Water Flushes (defined later in this section). Sample Flush Sample Flushes should be performed only when there is a very large concentration difference between one sample and the next.
- Page 253 Analyzer, including the calibration that is used. Protocols can be named and saved in the Analyzer’s memory for later use. Protocol Date Date that the protocol was created and saved on the Analyzer. GE Analytical Instruments ©2016 253 of 270 DLM 68100-09 EN Rev. A...
- Page 254 5,000 ppm is analyzed. Reagent Water Reagent-grade water, having a TOC concentration less than 0.1 ppm. Sievers Reagent Water is available in 40 mL vials with a concentration of less than 0.05 ppm from GE Analytical Instruments. Rejects The number of initial measurements for a sample in the Grab, Check Standard, Calibration, or Verification mode that will be omitted from the Analyzer’s calculations.
-
Page 255: Appendix C: Importing Analyzer Data Into A Spreadsheet
“Text Import Wizard” to help you create a spreadsheet from the data in the file. If the “Text Import Wizard” dialog box appears (see Figure 114), make sure Delimited is selected and click the Next button. GE Analytical Instruments ©2016 255 of 270 DLM 68100-09 EN Rev. A... -
Page 256: Figure 114 Microsoft Excel Spreadsheet Screen — Text Import Wizard - Step 1
Make sure the Comma check box is selected, to identify the file as being comma-delimited (see Figure 115). Figure 115: Microsoft Excel Spreadsheet Program — Text Import Wizard - Step 2 GE Analytical Instruments ©2016 256 of 270 DLM 68100-09 EN Rev. A... -
Page 257: Figure 116 Microsoft Excel Spreadsheet Program — Text Import Wizard - Step 3
Figure 116: Microsoft Excel Spreadsheet Program — Text Import Wizard - Step 3 A new spreadsheet containing you exported data opens. You can now modify the document as you would modify any other Microsoft Excel spreadsheet program file. GE Analytical Instruments ©2016 257 of 270 DLM 68100-09 EN Rev. A... - Page 258 This page is intentionally left blank. GE Analytical Instruments ©2016 258 of 270 DLM 68100-09 EN Rev. A...
-
Page 259: Appendix D: Modbus Map
2004 Stream 3 Enabled 2005 Stream 4 Enabled 2006 Stream 5 Enabled 2007 Reject Measurement 2008 2000 See Footnote 3 Coils (write) Stop 2001 Check Standard Enabled 2002 GE Analytical Instruments ©2016 259 of 270 DLM 68100-09 EN Rev. A... - Page 260 3201 16 bit unsigned Error Time - Month 3202 16 bit unsigned Error Time - Day 3203 16 bit unsigned Error Time - Hour 3204 16 bit unsigned GE Analytical Instruments ©2016 260 of 270 DLM 68100-09 EN Rev. A...
- Page 261 Supply 1 to Start Check Standard analysis at address 2008. Supply 1 to Stop Check Standard analysis at address 2009. Refer to “Analyzer Warnings and Error Messages” on page 200. GE Analytical Instruments ©2016 261 of 270 DLM 68100-09 EN Rev. A...
- Page 262 TOC, TC, IC, and NPOC units are: Units Value Stream Value Stream 1 Stream 2 Stream 3 Stream 4 Stream 5 Vial Port Check Standard Value NPOC GE Analytical Instruments ©2016 262 of 270 DLM 68100-09 EN Rev. A...
- Page 263 Current Mode Value Continuous Grab Autosampler Blank Calibration Verification IC Calibration Mock Online Check Standard Rinse Instrument Model Value Laboratory Online GE Analytical Instruments ©2016 263 of 270 DLM 68100-09 EN Rev. A...
- Page 264 This page is intentionally left blank. GE Analytical Instruments ©2016 264 of 270 DLM 68100-09 EN Rev. A...
-
Page 265: Index
111 errors 199 carboy 99 Ethernet 72 Carrier Gas CO2 Scrubber Option 65 Excel 255 Carrier Gas Co2 Scrubber Option 178 export PDF to USB 154 GE Analytical Instruments ©2016 265 of 270 DLM 68100-09 EN Rev. A... - Page 266 POC 49 IP56 65 power 88 precipitates 68 Printing Data 162 Keyboard Options 169 PVC conduit connectors 80 LCD touchscreen 123 range 132 liquid bypass flow 225 reactor 49 GE Analytical Instruments ©2016 266 of 270 DLM 68100-09 EN Rev. A...
- Page 267 132 sulfide 67 summary of confirmation 139 supercritical water oxidation 49 system controller board 87 system fault alarm 83 System Properties 166 system properties 166 system settings 166 GE Analytical Instruments ©2016 267 of 270 DLM 68100-09 EN Rev. A...
- Page 268 Index GE Analytical Instruments ©2016 268 of 270 DLM 68100-09 EN Rev. A...
- Page 269 Notes GE Analytical Instruments ©2016 269 of 270 DLM 68100-09 EN Rev. A...
- Page 270 Notes GE Analytical Instruments ©2016 270 of 270 DLM 68100-09 EN Rev. A...