Table of Contents
Available languages
Available languages
1 1
0 0
" "
( (
2 2
5 5
4 4
1 1
0 0
" "
( (
2 2
5 5
4 4
INSTRUCTION MANUAL
BEFORE RETURNING THIS PRODUCT
FOR ANY REASON PLEASE CALL
1-800-54-HOW-TO
IF YOU SHOULD EXPERIENCE A PROBLEM
WITH YOUR BLACK & DECKER PURCHASE,
CALL 1-800-54-HOW-TO.
IN MOST CASES, A BLACK & DECKER REPRESENTATIVE
CAN RESOLVE YOUR PROBLEM OVER THE PHONE.
IF YOU HAVE A SUGGESTION OR COMMENT,
GIVE US A CALL. YOUR FEEDBACK IS VITAL
TO THE SUCCESS OF BLACK & DECKER'S QUALITY
IMPROVEMENT PROGRAM.
KEY INFORMATION YOU SHOULD KNOW:
•Cut only with sharp blades. Dull blades cut poorly and overload the motor.
•If the saw does not cut accurately, refer to the TROUBLE SHOOTING chart in this
manual.
SAVE THIS MANUAL FOR FUTURE REFERENCE.
VEA EL ESPAÑOL EN LA CONTRAPORTADA.
INSTRUCTIVO DE OPERACIÓN, CENTROS DE SERVICIO Y PÓLIZA DE
GARANTÍA. ADVERTENCIA: LÉASE ESTE INSTRUCTIVO ANTES DE USAR EL
PRODUCTO.
Cat # 1710
Form # 387479
MAR98-CD-1
Important Safety Instructions
WARNING:
For your own safety read instruction manual before operating miter saw.
Polarized Plugs
REPLACEMENT PARTS. When servicing, use only identical replacement parts.
To reduce the risk of electric shock, this equipment has a polarized plug (one blade is wider than
the other). This plug will fit in a polarized outlet only one way. If the plug does not fit fully into the
outlet, reverse the plug. If it still does not fit, contact a qualified electrician to install the proper
outlet. Do not change the plug in any way. Units rated for 220 volts will have a different style plug
that will not fit the outlet and is not polarized.
Important Safety Instructions
• KEEP GUARDS IN PLACE and in working order.
• REMOVE ADJUSTING KEYS AND WRENCHES. Form habit of checking to see that keys and adjusting
wrenches are removed from tool before turning it on.
• KEEP WORK AREA CLEAN. Cluttered areas and benches invite injuries.
• DON'T USE IN DANGEROUS ENVIRONMENT. Don't use power tools in damp or wet locations, or
expose them to rain. Keep work area well lighted.
• KEEP CHILDREN AWAY. All visitors should be kept safe distance from work area.
• MAKE WORKSHOP KID PROOF with padlocks, master switches, or by removing starter keys.
• DON'T FORCE TOOL. It will do the job better and safer at the rate for which it was designed.
• USE RIGHT TOOL. Don't force tool or attachment to do a job for which it was not designed.
• USE PROPER EXTENSION CORD. Make sure your extension cord is in good condition. When using an
extension cord, be sure to use one heavy enough to carry the current your product will draw. An under-
sized cord will cause a drop in line voltage resulting in loss of power and overheating. The table shows
the correct size to use depending on cord length and nameplate ampere rating. If in doubt, use the next
heavier gage. The smaller the gage number, the heavier the cord.
Minimum Gage for Cord Sets
Volts
Total Length of Cord in Feet
120V
240V
Ampere Rating
More Not more
Than Than
0 - 6
6 - 10
10 - 12
12 - 16
• WEAR PROPER APPAREL. Do not wear loose clothing, gloves, neckties, rings, bracelets, or other jewel-
ry which may get caught in moving parts. Nonslip footwear is recommended. Wear protective hair cov-
ering to contain long hair.
• ALWAYS USE SAFETY GLASSES. Also use face or dust mask if cutting operation is dusty. Everyday eye-
glasses only have impact resistant lenses, they are NOT safety glasses.
• SECURE WORK. Use clamps or a vise to hold work when practical. It's safer than using your hand and
it frees both hands to operate tool.
• DON'T OVERREACH. Keep proper footing and balance at all times.
• MAINTAIN TOOLS WITH CARE. Keep tools sharp and clean for best and safest performance. Follow
instructions for lubricating and changing accessories.
• DISCONNECT TOOLS before servicing; when changing accessories, such as blades, bits, cutters, and
the like.
• REDUCE THE RISK OF UNINTENTIONAL STARTING. Make sure switch is in off position before plugging
in.
• USE RECOMMENDED ACCESSORIES. Consult the instruction manual for recommended accessories. The
use of improper accessories may cause risk of injury to persons.
• NEVER STAND ON TOOL. Serious injury could occur if the tool is tipped or if the cutting tool is unin-
tentionally contacted.
• CHECK DAMAGED PARTS. Before further use of the tool, a guard or other part that is damaged should
be carefully checked to determine that it will operate properly and perform its intended function–check
m m
m m
) )
M M
i i
t t
e e
r r
S S
a a
w w
m m
m m
) )
M M
i i
t t
e e
r r
S S
a a
w w
1710
Copyright © 1998 Black & Decker
0-25
26-50
51-100 101-150
0-50
51-100 101- 200 201-300
American Wire Guage (AWG)
18
16
16
14
18
16
14
12
16
16
14
12
14
12
Not Recommended
for alignment of moving parts, binding of moving parts, breakage of parts, mounting, and any other
R
conditions that may affect its operation. A guard or other part that is damaged should be properly
repaired or replaced.
• NEVER LEAVE TOOL RUNNING UNATTENDED. TURN POWER OFF. Don't leave tool until it comes to a
complete stop.
Additional Safety Rules for Miter Saw
• Wear eye protection.
• Keep hands out of path of saw blade.
• Do not operate saw without guards in place.
• Do not perform any operation freehand.
• Never reach in back of saw blade.
• Turn off tool and wait for saw blade to stop before moving workpiece or changing settings.
• Disconnect power before changing blade or servicing.
• Blade adjustment is to be made only with the power off and the blade stopped.
• Rated saw blade diameter is 10".
• No load speed is 5,500 R.P.M.
Additional Safety Instructions for Miter Saws
CAUTION:
DO - Protect electric supply line with at least a 15 ampere time delay fuse or a circuit breaker.
•
•
DO - Make certain the blade rotates in the correct direction and that the teeth at the bottom of
the blade are pointing to the rear of the miter saw.
•
DO - Be sure all clamp handles are tight before starting any operation.
•
DO - Be sure all blade and clamp washers are clean and recessed sides of collars are against
blade. Tighten arbor screw securely.
•
DO - Keep saw blade sharp.
•
DO - Keep motor air slots free of chips and dirt.
DO - Support long work with an outboard tool rest.
•
DON'T - Attempt to operate on anything but designated voltage.
•
•
DON'T - Wedge anything against fan to hold motor shaft.
•
DON'T - Cut ferrous metals (those with any iron or steel content) or any masonry.
DON'T - Use abrasive wheels. The excessive heat and abrasive particles generated by them will
•
damage the saw.
•
DON'T - Allow anyone to stand behind saw.
DON'T - Apply lubricants to the blade when it's running.
•
DON'T - Use blades rated less than 5500 R.P.M.
•
•
DON'T - Attempt to cut pieces smaller than 6" (153mm) without clamping.
•
DON'T - Perform any operation freehand.
DON'T - Reach underneath the saw unless it is turned off and unplugged. The saw blade is exposed
•
on the underside of the saw.
DON'T - Move either hand from saw or workpiece or raise arm until blade has stopped.
•
DON'T - Use any blade which is not 10" (254mm) in diameter.saw.
•
CAUTION: Some wood contains preservatives such as copper chromium arsenate (CCA) which
can be toxic. When cutting these materials extra care should be taken to avoid inhalation and
minimize skin contact.
CAUTION: WHEN SERVICING ALL TOOLS, USE IDENTICAL REPLACEMENT PARTS. REPAIR OR
REPLACE DAMAGED CORDS.
•
DON'T - Tie, tape or otherwise hold guard open when operating saw.
For your convenience and safety, the following warning labels are on your miter saw.
ON GUARD: (DANGER - KEEP AWAY FROM BLADE.)
DANGER
Printed in U.S.A.
ON FIELD CASE:
WARNING:
!
For safe operation read instruction manual. Always
wear eye protection. Keep hands 6'' (153mm) from
path of saw blade. Do not operate saw without guards
in place. Keep guards in working order. Do not perform
any operation freehand. Never reach in back of saw
blade. Turn off tool, keep saw head down and wait for
saw blade to stop before moving work piece or
changing settings. Unplug tool before changing blade,
moving or servicing unit. Never cross arms in front of
blade. Secure unit before using.
Electrical Connection
Be sure your power supply agrees with the nameplate marking. 120 volts, AC only means that
your saw is operated on alternating current only and never on direct current. A voltage decrease of
10 percent or more will cause a loss of power and overheating. All B&D tools are factory tested. If
this tool does not operate, check the power supply.
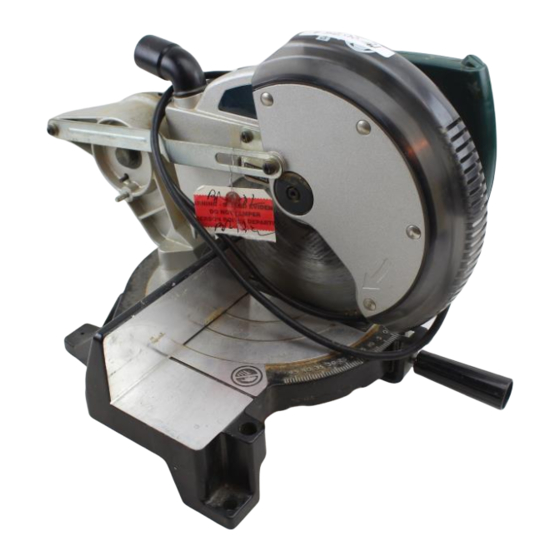
Familiarization
Your miter saw is fully assembled in the carton. Open the box and lift the saw out by the han-
dle, as shown in Figure 1. Place the saw on a smooth, flat surface such as a workbench or
strong table.
Examine Figure A to become familiar with the saw and its various parts. The following section
on adjustments will refer to these terms and you must know what the parts are.
Press down lightly on the operating handle and pull out the lock down pin, as shown in Figure
2. Gently release the downward pressure and allow the arm to rise to its full height. Use the
lock down pin when carrying the saw from one place to another. Always use the handle to
transport the saw.
Bench Mounting
Holes are provided in all four feet to facilitate bench mounting. Always mount your saw firmly
to prevent movement. To enhance the tool's portability, it can be mounted to a piece of 1/2"
(12.7mm) or thicker plywood which can then be clamped to your work support or moved to
other job sites and reclamped.
NOTE: If you elect to mount your saw to a piece of plywood, make sure the mounting screws
don't protrude from the bottom of the wood. The plywood must sit flush on the work support.
When clamping the saw to any work surface, clamp only on the clamping bosses where the
mounting screw holes are located. Clamping at any other point will surely interfere with the
proper operation of the saw.
Changing the Blade
1. TURN OFF TOOL AND DISCONNECT FROM POWER SUPPLY.
2. With the saw arm in the upper position, raise the lower guard as far as possible.
3. Loosen (but do not remove) the guard bracket screw, shown in Figure 3 until the guard
bracket can be raised enough to permit access to the blade screw.
4. Push down on the saw arm to dig the saw blade teeth into a piece of scrap wood. Use the
blade wrench to remove (clockwise) the left hand threaded blade screw.
5. Remove outer clamp washer and saw blade.
6. Install the new blade making sure that the teeth at the bottom edge of the blade are point-
ing toward the back of the saw.
7. Replace the outer clamp washer and tighten the blade screw (counterclockwise) while hold-
Do not connect unit to electrical power source until complete instructions are read and
understood.
SAVE THESE INSTRUCTIONS
KEEP AWAY
FROM BLADE
WARNING:
identical replacement parts. Do not expose to
rain or use in damp locations.
AVERTISSEMENT :
s'assurer du fonctionnement sûr, lire le guide
d'utilisation. Ne pas exposer à la pluie et ne pas
utiliser dans les emplacement humidies.
Black & Decker (U.S.) Inc., Towson, MD 21286 USA
ON TABLE: (2 PLACES)
When servicing use only
Pour
Made in USA
Table of Contents

Related Manuals for Black & Decker 1710


Summary of Contents for Black & Decker 1710
-
Page 1: Instruction Manual
INSTRUCTIVO DE OPERACIÓN, CENTROS DE SERVICIO Y PÓLIZA DE DANGER GARANTÍA. ADVERTENCIA: LÉASE ESTE INSTRUCTIVO ANTES DE USAR EL PRODUCTO. KEEP AWAY FROM BLADE Cat # 1710 Form # 387479 MAR98-CD-1 Copyright © 1998 Black & Decker Printed in U.S.A. Important Safety Instructions WARNING: For your own safety read instruction manual before operating miter saw. - Page 2 FICHE TECHNIQUE ESPECIFICACIONES ing the lower guard up and the saw blade teeth dug into the scrap wood. SPECIFICATIONS 120 volts 120 Volts 8. AFTER INSTALLING THE SAW BLADE, REPOSITION GUARD BRACKET MAKING SURE IT Tensión de alimentación: 120 V~ 1152 watts 1152 Watts IS FULLY SEATED ON GUARD SCREW.
- Page 3 Maintenance Importantes mesures de sécurité 1 All bearings are sealed and lubricated for life. They need no further maintenance. AVERTISSEMENT : Par mesure de sécurité personnelle, lire le guide d’utilisation avant de se servir de l’outil. 2. Periodically clean all dust and wood chips from around AND UNDER the base and the rotary table.
- Page 4 • NE PAS utiliser des meules abrasives. La chaleur excessive et les particules abrasives dégagées du possible (fig. 4). abîmeraient la scie. Lorsque la lame semble parallèle, effectuer le réglage de l’indicateur d’onglets décrit. • NE PAS utiliser des lames abrasives. Sinon, desserrer (mais ne pas enlever) les deux boulons qui se trouvent sous le rebord •...
-
Page 5: Clavijas Polarizadas
Tuyau en plastique et autre matériau rond à coupe transversale " " " " La scie coupe facilement les tuyaux en plastique et autres matériaux semblables. Ils se coupent comme le bois et il faut BIEN LES SAISIR OU LES FIXER AU GUIDE POUR LES EMPÊCHER DE MANUAL DE INSTRUCCIONES ROULER SURTOUT LORSQU’ON COUPE EN ANGLE. - Page 6 Además de este manual de instrucciones, la caja debe contener: una sierra Cuando la sierra alcanza su máxima velocidad (en cerca de un segundo), baje el brazo con angular 1710. suavidad y lentamente para hacer el corte a través de la madera. Deje que el disco llegue hasta el tope antes de levantar el brazo.
- Page 7 La cera, disponible en la mayoría de las ferreterías, proporciona la lubricación adecuada y evita Importante que las rebabas se adhieran al disco. Para garantizar la SEGURIDAD y CONFIABILIDAD del producto, deberán hacerse reparaciones, MATERIAL ARQUEADO: mantenimiento y ajustes (incluyendo inspección y reemplazo de carbones) por centros de servicio autorizados u otras organizaciones de servicio calificadas, que empleen siempre refacciones Cuando corte materiales arqueados colóquelos como se ilustra en la figura 13.