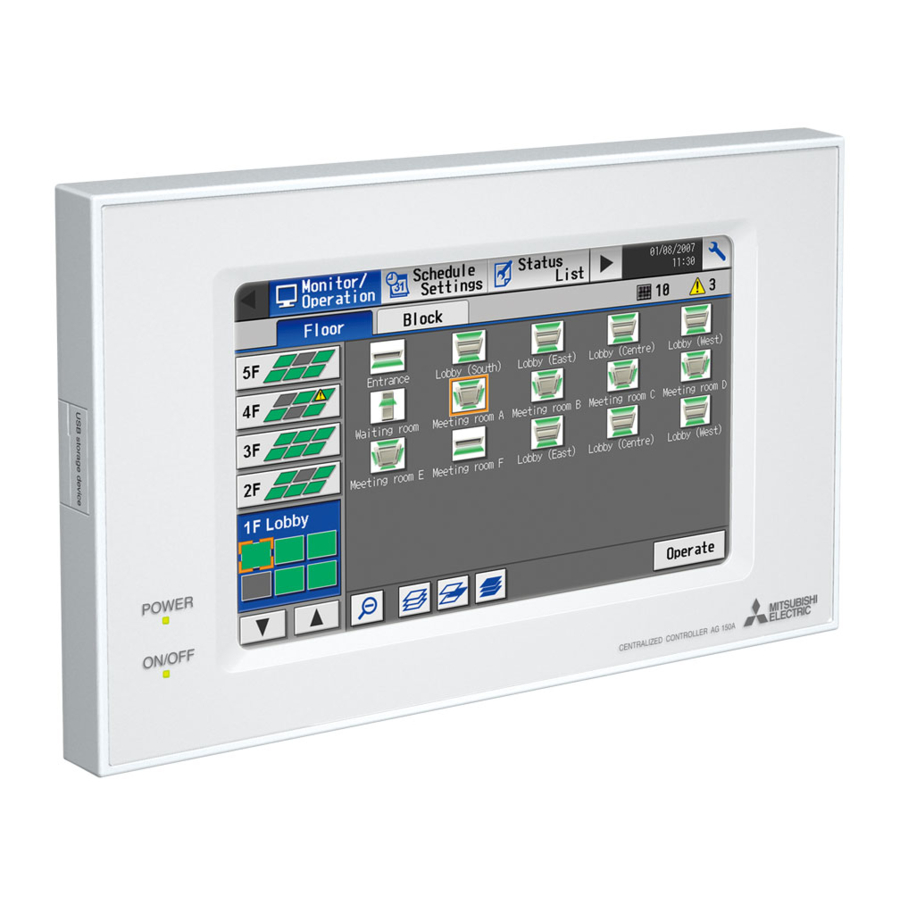
Mitsubishi Electric AG-150A Instruction Book
Air-conditioner network system
Hide thumbs
Also See for AG-150A:
- Instruction book (116 pages) ,
- Installation manual (12 pages) ,
- Instruction book (16 pages)
Table of Contents
Quick Links
Air-conditioner Network System
Centralized Controller
AG-150A
GB-50ADA-A
GB-50ADA-J
Before using the controller, please read this Instruction Book carefully to ensure correct
operation. Retain this manual for future reference.
(Web browser for Initial Settings)
Contents
1 Introduction .......................................................................... 1
1-1 Terms Used in This Manual .................................................... 1
1-2 Computer Requirements ......................................................... 1
software (TG-2000A)................................................................ 1
2 Setting the Operating Environment ...................................... 2
2-1 Setting the PC IP Address....................................................... 2
2-2 Setting the Web Browser......................................................... 4
2-3 Setting the Java Execution Environment................................. 6
3 Performing Operations ......................................................... 7
3-1 Logging in on the AG-150A ..................................................... 7
4 Initial Settings ..................................................................... 10
4-1 Setting the Current Date and Time........................................ 10
4-3 Group Setting ........................................................................ 19
4-4 Interlocked Setting................................................................. 21
4-5 Block Setting.......................................................................... 22
5 Functions 1......................................................................... 23
5-1 Error mail reports/E-mail communication .............................. 23
5-2 Energy-Save Control and Peak Cut Control ......................... 26
5-3 Settings for measurement ..................................................... 31
6 Functions 2......................................................................... 35
6-1 Limiting the Set Temperature Operating Range ................... 35
6-2 Night Mode (Silent Mode) Schedule...................................... 36
6-3 System-Changeover of Y series............................................ 37
7 Functions 3......................................................................... 38
7-1 External Temperature Interlock ............................................. 38
7-2 Night setback control ............................................................. 39
7-3 Interlock control ..................................................................... 40
8 User Setting ....................................................................... 48
9 Registering a License for Optional Function ...................... 50
Instruction Book
WT05491X06
Ver. 2.4
Table of Contents

Related Manuals for Mitsubishi Electric AG-150A


Summary of Contents for Mitsubishi Electric AG-150A
-
Page 1: Table Of Contents
1 Introduction ................1 1-1 Terms Used in This Manual ............ 1 1-2 Computer Requirements ............1 1-3 Notes on using AG-150A with the integrated centralized control software (TG-2000A)..............1 2 Setting the Operating Environment ........2 2-1 Setting the PC IP Address............2 2-2 Setting the Web Browser............ -
Page 2: Introduction
"Web Monitor" is necessary. Note: Use a security device such as a VPN router when connecting the AG-150A to the Internet to prevent unauthorized access. Note: "Booster unit" and "Water HEX unit" are referred to as "Air to water". -
Page 3: Setting The Operating Environment
2-1 Setting the PC IP Address Set an IP address on the PC that enables AG-150A to connect via a web browser. For instance, if the AG-150A IP address is [192.168.1.1], the PC IP address will need to belong to the same system [192.168.1.101]. - Page 4 (4) In the [Internet Protocol (TCP/IP) Properties] dialog, click [Use the following IP address] and enter the IP address (for example, “192.168.1.101”) that you want to set in the IP address field. You normally set [255.255.255.0] as the subnet mask. Note: Ask your LAN administrator to provide the IP addresses and subnet mask.
-
Page 5: Setting The Web Browser
2-2 Setting the Web Browser Use a security device such as a VPN router when connecting the AG-150A to the Internet to prevent unauthorized access. If no security devices are installed, the operation settings may be changed by an unauthorized person without the knowledge of the user. - Page 6 Note: If connecting to more than one AG-150A, you can specify multiple IP addresses like [192.168.1.1; 192.168.1.2], however, it is also possible to use the asterisk (*) and specify [192.168.1.*].
-
Page 7: Setting The Java Execution Environment
2-3 Setting the Java Execution Environment When using Java Plug-in version 1.6.0_10 or later, make the following environment settings (not required for version 1.6.0_09 or earlier). Note: The setting samples and screenshots used in this manual are those of Java Plug-in version 1.6.0_11. 2-3-1 Disabling the next-generation Java Plug-in (1) Open Java Control Panel by double-clicking Java in the Control Panel. -
Page 8: Performing Operations
Text below explains how to connect to the AG-150A and how to make various settings for the AG-150A. Note: If the AG-150A is restarted due to a power interruption etc., wait until the screen on the AG-150A main unit displays the normal operation screen (it takes several minutes before the normal operation screen is displayed) before using a web browser to access the AG-150A. - Page 9 AG-150A can encrypt communication data using HTTPS (SSL). When connecting the AG-150A to the LAN that can be accessed by the general public, it is recommended that the following settings be made so that the units are monitored and controlled on the encrypted Web page.
- Page 10 (4) If the security alert has not been disabled, after entering the web address and hitting the Enter (Return) key, a security alert message will alert asking if you want to proceed . This is because the AG-150A uses the self-authentication system.
-
Page 11: Initial Settings
This chapter explains how to set the settings on the AG-150A’s initial settings screen. *Refer to Chapter 5 in the Instruction Book that came with the Centralized Controller AG-150A for how to set the settings after the initial power on. -
Page 12: Setting The Basic Information And External Input Functions
(2) Enter the AG-150A unit ID in the [Unit ID] field. You must enter 6 numeric characters. Use this setting when you want to control multiple AG-150A units with unit IDs. The unit ID that is entered here will be used on the display screen of the software that controls multiple AG-150A units and for the sender ID in the body of error messages. - Page 13 Expansion Controller. 4-2-2-2 M-NET Setting In M-NET Setting, set the AG-150A M-NET address, whether or not a K-Control unit is present and which machines send the prohibited controller command. (1) Enter the AG-150A M-NET address in the [M-NET Address] field. Normally you should enter [0].
- Page 14 (3) Selecting [ON/OFF (Level signal)] makes it possible to run or stop multiple units using a level signal. In this mode, all air conditioner units connected to the AG-150A will be run or stopped and run/stop operations will be prohibited on the AG-150A unit or remote control.
- Page 15 4-2-3 Time Master Setting Set the clock on each AG-150A to Master or Sub by selecting either Master or Sub next to “Time Master.” If an Expansion Controller (PAC-YG50ECA) is used to connect two AG-150A controllers, the unit whose clock is set to Sub will automatically synchronize its clock to the unit whose clock is set to Master.
- Page 16 4-2-4 Network Setting In Network Setting, set the AG-150A IP address, subnet mask and gateway address. If connecting to the AG-150A via a permanent LAN, consult with the network administrator before setting these addresses.
- Page 17 4-2-4-1 Settings for when the AG-150A is connected to a dedicated LAN (1) Enter the AG-150A IP address in the [IP Address] field. If the LAN wiring has been newly set up, allocate IP addresses to the AG-150A units in a sequential order starting with [192.168.1.1]. For example the first AG-150A unit will receive an IP address of [192.168.1.1], the second AG-150A unit will receive an IP...
- Page 18 4-2-4-2 Settings for when the AG-150A is connected to an existing LAN When connecting the AG-150A to an existing LAN, consult with the network administrator who is responsible for the LAN before setting the IP address, subnet mask, or gateway address.
- Page 19 [OFF] not to. When the filter sign display is set to “OFF,” the filter sign on neither the LCD of the AG-150A nor the monitor screen on the Web browser will appear, even when the indoor unit detects a filter sign.
-
Page 20: Group Setting
Note: If the system is connected to the TG-2000A, make all settings and changes from the TG-2000A so that the data in TG-2000A and AG-150A will match. Note: A contact on the genera interface device is regarded as one unit. The number of units that can be connected to AG-150A is up to 50. - Page 21 (3) To register remote controllers in a group, click on the [Remote Controller Registration] field to display the [Select Unit Addresses] screen, and click on the numbers corresponding to the units to be registered. The ones that are selected will be shown with a yellow-green background.
-
Page 22: Interlocked Setting
Note: If the system is connected to the TG-2000A, make all settings and changes from the TG-2000A so that the data in TG-2000A and AG-150A will match. Note: When connecting multiple AG-150A controllers by connecting an Expansion Controller, all controllers must have the same LOSSNAY unit interlocking conditions settings. -
Page 23: Block Setting
[Initial Settings]-[Blocks] in the menu, and register the groups in the block to utilize these features. Click [Save Settings] to send setting data to the AG-150A. Note: If the user logs in as a building manager, some of the operations may be prohibited. -
Page 24: Functions 1
Note: When sending E-mail via an ISP, a user contract with the ISP is required. Make necessary settings based on the functions that are to be used, using the table below as a reference. Table 5-1 Items that Require Settings to Be Made (E-Mail Settings of AG-150A) Error Mail Report Mail Communication... - Page 25 5-1-3 Setting the Error Mail Destinations (1) Enter the title of the error mail that will be sent from AG-150A in the [Mail Title] field. The title may contain a maximum of 40 characters. Note: The following characters cannot be used in the mail title: <...
- Page 26 Format Remarks Mail title Set title Refer to 5-1-3 (1) for the setting of mail title. Refer to 4-2-1 for the setting of AG-150A unit From AG-150A unit name and unit ID name and unit ID. Date of error Date...
-
Page 27: Energy-Save Control And Peak Cut Control
AG-150A and PLC. and PLC. To enable peak cut, register the "Energy Saving (Peak Cut)" license to all AG-150A, and set the peak cut method and the indoor/outdoor units control methods. When the license is registered, the control can be performed in 5 degrees (Level 0-4). - Page 28 Note: Do not initialize the memory after the operation has begun, for it will clear all operation data. (2) Enter the IP address for the PLC software for demand input. (3) Enter the IP address of the AG-150A to which the demand levels are reported. A maximum of 10 addresses can be registered.
- Page 29 Note: Only up to three AG-150A can be connected to the AG-150A to which the watt-hour meter is connected. When five or more AG-150A are used in a system, use electric amount count PLC method mentioned in 5-2-2.
- Page 30 5-2-5 When From external system Method is used (1) When the energy-save level is set to 0 (It is always set to level 0 in an energy-save control method), energy-save control will not be performed for the indoor units that show a greater difference between the set temperature and indoor temperature than the value set in the window on the right.
- Page 31 To make settings for all the operation blocks at once, check [Batch Operations], and enter the settings. Uncheck [Batch Operations] by clicking on the box again to enable the individual setting of operation blocks. (4) Click [Save Settings] to send setting data to the AG-150A.
-
Page 32: Settings For Measurement
Note: If the user logs in as a building manager, some of the operations may be prohibited. Note: When connecting AG-150A controllers by connecting an Expansion Controller to the system, measurement settings should be made only on one of the AG-150A controllers. - Page 33 (6) To receive an e-mail when the temperature or the humidity exceeds a certain value, set the upper/lower limit alarm values (occurrence, recovery). Note: To avoid repeating occurrence and recovery, it is recommended that the difference between the occurrence value and the recovery value is approx.
- Page 34 The following format will be applied when the alarm mail is sent. From: Mitsubishi Building(000001) Item Format Date/Time: 23/01/2007 09:38:39 AG-150A name + Unit ID Address: 50-1 From Note: Refer to section 4-2-1 for the settings of the Current value: 24.9 deg C AG-150A name and unit ID.
- Page 35 5-3-6 Setting the destination to which temperature/humid trend data mail is sent To send temperature/humid trend data by mail once a day (when the date changes), make the mail sending settings. The trend data is sent as an attachment CSV file. (1) Select the [Trend Data] in the Type of E-Mail pulldown, and enter the Mail Subject and the E-Mail Address.
-
Page 36: Functions 2
*2: This function cannot be used depending on the indoor unit model. Note: The set temperature range for all modes can be limited on the browser operation screen (for administrator), AG-150A operation screen, and TG-2000A operation screen regardless of any settings being made. (The setting made on personal browser operation screen is in effect on the personal screen.) -
Page 37: Night Mode (Silent Mode) Schedule
Note: If the user logs in as a building manager, the operations may be prohibited. Note: When connecting AG-150A controllers by connecting an Expansion Controller to the system, night-mode settings should be made only on one of the AG-150A controllers. -
Page 38: System-Changeover Of Y Series
Note: Set the indoor unit operation mode to [Auto] on the Auto-Changeover models (R2 series). (It is not necessary to change the mode on this screen.) Note: When connecting AG-150A controllers by connecting an Expansion Controller to the system, auto-changeover settings should be made only on one of the AG-150A controllers. -
Page 39: Functions 3
28°C along with outdoor temperature rise. When [+2°C] is selected, the maximum set temperature will rise to 26°C. (3)After the setting, click the Save Settings button to send the setting data to AG-150A. When external temperature interlock is active, the set temperature of air conditioning group is shown below. -
Page 40: Night Setback Control
When the temperature is not measured correctly, switch the sensor to external temperature sensor (PAC-SE40TSA / PAC-SE41TSA) or remote control sensor. Note: When connecting AG-150A controllers by connecting an Expansion Controller to the system, set back settings should be made only on one of the AG-150A controllers. -
Page 41: Interlock Control
When the conditions are met, the interlock action commands will be issued to the output units. By registering an “Interlock Control” license for the AG-150A and making the settings for the input category, interlocking conditions, input unit type, output category, action type, and output unit type for conditions No. 1 through 150, the operation of the equipment that are connected to AG-150A can be interlocked with the operation of the indoor units. - Page 42 Interlock control. Note: Interlock control is not effective when External Input Setting on AG-150A is set to ON/OFF (Level signal) (refer to 4-2-2-3). Note: When the units are in the Emergency Stop mode (refer to 4-2-2-3) or in Stop Control method (refer to 5-2) during Energy-Save Control, only free contact and general interface (PAC-YG66DCA) will be performed and other Interlock control will not.
- Page 43 Off]. (When AG-150A is powered on, even if a condition for a change in status is met, it does not count as an event.) Note: Air conditioning units, LOSSNAY units, and DIDO controller (PAC-YG66DCA) are available for selection as the input unit type (Group (On/Off);...
- Page 44 (2) Set the input unit. Click [Select input units] to set the input unit type. One of the following screens will appear that will allow the user to set the input unit types, depending on the “selection unit” that was selected from a list in Table 7-1. (2-1) Selection unit is “Group.”...
- Page 45 3) Set the output unit type and interlocked actions. Select the equipment type for the output unit type and the interlocked actions according to Table 7-2. Table 7-2 Interlocked actions and the selection unit for each output category OUTPUT OUTPUT SELECTION INTERLOCKED ACTIONS UNIT TYPE...
- Page 46 Note: Temperature setting cannot be made unless the operation mode has been set. Note: If an operation mode is selected that is not available for a group of units that was selected in the output unit type field, the units in the group will not perform any operation. Note: To prevent malfunctions of the air conditioning units, be sure to set the preset temperature to a temperature within the normal operating temperature range, although there may be rare cases in which it is possible to set the preset temperature to a temperature outside the normal operating temperature range (depending on the model of the air conditioning units that...
- Page 47 (4) Set the output unit type. Click “Select output units” to bring up one of the following screens that will allow the user to set the output unit types, depending on the “selection unit” that was selected from a list in Table 7-2. (4-1) Selection unit is “Group.”...
- Page 48 7-3-2 Disabling/Enabling the setting for each interlocking condition To exclude an individual group from certain settings being applied to, use the Enable/Disable button. No actions will be taken for the group that is set to “Disable.” 7-3-3 Temporarily disabling the interlocking control To temporarily disable the interlocking control, click the "Stop Execution”...
-
Page 49: User Setting
Refresh Save settings Read setting data from AG-150A. Send setting data to AG-150A. (1) When changing the user names or passwords of maintenance users, type new information in [User name], [New Password] and [Retype Password] fields to change user names or passwords of maintenance users. - Page 50 Setting of external temperature interlock Functions3 Setback control Setting of setback control Interlock control Setting of interlock control *1: At factory shipment, the operation of the building manager is prohibited. (4) Click [Save Settings] to send setting data to the AG-150A.
-
Page 51: Registering A License For Optional Function
Note: When multiple AG-150A controllers are connected by connecting an Expansion Controller to the system, the license to use the optional functions is required only for the AG-150A controller on which the functions are actually used. - Page 52 This product is designed and intended for use in the residential, commercial and light-industrial environment. The product at hand is • Low Voltage Directive 2006/95/EC based on the following • Electromagnetic Compatibility Directive, EU regulations: 2004/108/EC Please be sure to put the contact address/telephone number on this manual before handing it to the customer.