Pioneer ddj-t1 Operating Instructions Manual
Hide thumbs
Also See for ddj-t1:
- Service manual (135 pages) ,
- Operating instructions manual (96 pages) ,
- Operating instruction (92 pages)
Table of Contents
Available languages
Available languages
Quick Links
See also:
Service Manual
DJ Controller
Controlador DJ
DDJ-T1
http://www.prodjnet.com/support/
The Pioneer website shown above offers FAQs, information on software and various other types of information
and services to allow you to use your product in greater comfort.
El sitio Web de Pioneer indicado más arriba tiene una sección con las preguntas más frecuentes, y además
ofrece información del software y varios tipos de información y servicios para que usted pueda usar su
producto con la mayor comodidad.
Operating Instructions
Manual de instrucciones
Chapters
Table of Contents

Related Manuals for Pioneer ddj-t1


Summary of Contents for Pioneer ddj-t1
- Page 1 El sitio Web de Pioneer indicado más arriba tiene una sección con las preguntas más frecuentes, y además ofrece información del software y varios tipos de información y servicios para que usted pueda usar su producto con la mayor comodidad.
- Page 2 Thank you for buying this Pioneer product. Please read through these operating instructions so you will know how to operate your model properly. After you have finished reading the instructions, put them away in a safe place for future reference.
-
Page 3: Table Of Contents
Inputting the sound of an external device or microphone ....23 Changing the TRAKTOR 2 Preferences List of TRAKTOR Pioneer DDJ-T1 EDITION 2 setting items ....24 Assigning the desired functions to the [NEEDLE SEARCH] pad ..24 Additional information Troubleshooting .................. -
Page 4: Before Start
This product is an all-in-one DJ system for home DJ use, combining TRAKTOR Pioneer DDJ-T1 EDITION 2 Pioneer DJ hardware - the world standard in club DJ equipment – with the “TRAKTOR Pioneer DDJ-T1 EDITION 2” DJ software by Native TRAKTOR Pioneer DDJ-T1 EDITION 2 is a TRAKTOR 2 software applica- Instruments. -
Page 5: About The Ac Adapter
If there are irregularities with the AC adapter or power plug, ask your Safety instructions nearest Pioneer authorized service center or your dealer to carry out To ensure your personal safety and to maximize the full operating poten- repair work. -
Page 6: Using The Laptop Dock
Type 1 (for Japan and North America) left and right feet (2 screws each). DJ CONTROLLER DDJ-T1 Type 2 (for Europe) ! The screws you have removed will be needed when mounting the feet. Be careful not to lose them. The feet cannot be properly mounted using other screws. -
Page 7: Before You Start
Before you start About the TRAKTOR 2 software Installing the TRAKTOR 2 software TRAKTOR Pioneer DDJ-T1 EDITION 2 is a special version of TRAKTOR 2 designed exclusively for the DDJ-T1. For a comparison of the functions About the installation procedure between TRAKTOR Pioneer DDJ-T1 EDITION 2 and other versions of TRAKTOR 2, see the website below. -
Page 8: Launching Traktor 2
11 Click [Finish]. This completes the installation procedure. About the installation procedure (Macintosh) 1 Insert the included TRAKTOR Pioneer DDJ-T1 EDITION 7 Select the Native Instruments hardware driver, then 2 software DVD-ROM into the computer’s DVD drive. click [Continue]. The [Traktor 2] icon appears on the screen. -
Page 9: Performing Product Activation
1 Launch the SERVICE CENTER. The log-in screen is displayed. Performing product activation To use TRAKTOR Pioneer DDJ-T1 EDITION 2, first perform product acti- vation (referred to simply as “activation” below) using Native Instruments SERVICE CENTER (referred to simply as “SERVICE CENTER” below). -
Page 10: Updating The Traktor 2 Software
1 Launch the SERVICE CENTER on the computer on 13 Click [Open] at [Open Activation Return File]. which TRAKTOR Pioneer DDJ-T1 EDITION 2 is to be The launch return file is loaded. installed. 14 Check in the SERVICE CENTER that product activation has completed. -
Page 11: About The Driver Software (Windows)
5 Termination Software end user license agreement Pioneer may terminate this Agreement at any time upon Your breach of any provision. If this Agreement is terminated, You will stop using the This Software End User License Agreement (“Agreement”) is between... - Page 12 Click the Windows [Start] menu>[All by the administrator of your computer. Log on as the administrator of Programs]>[Pioneer]>[DDJ]>[DDJ ASIO Settings Utility]. your computer before proceeding with the installation. ! If you connect this unit to your computer without installing the driver software first, an error may occur on your computer depending on the system environment.
-
Page 13: Connections
Connections Be sure to turn off the power and unplug the AC adapter from the power outlet before making or changing connections between devices. Wait until all connections between devices have been completed before connecting the AC adapter. Only use the AC adapter included with this unit. Refer to the operating instructions for the component to be connected. -
Page 14: Connecting The Input/Output Terminals
Front panel 2 3 4 INPUT SELECT PHONES 1 PHONES terminal — [AUX]: The external device connected to the [AUX] terminals is selected. Connect headphones here. — [MIC]: The microphone connected to the [MIC] terminal is Both stereo phone plugs (Ø 6.3 mm) and stereo mini phone plugs (Ø selected. -
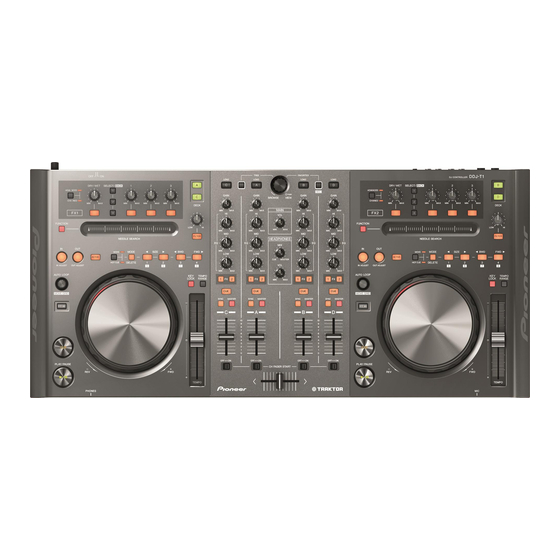
Page 15: Part Names And Functions
Part names and functions Control panel TREE FAVORITES LOAD LOAD LOAD LOAD DRY/ WET SELECT/ BACK DRY/ WET SELECT/ BACK ADVANCED ADVANCED GAIN GAIN PUSH GAIN GAIN BROWSE VIEW CHAINED CHAINED DECK DECK MAIN FUNCTION FUNCTION FILTER FILTER NEEDLE SEARCH HEADPHONES NEEDLE SEARCH MODE... -
Page 16: Browser
1 Browser TREE FAVORITES LOAD LOAD LOAD LOAD PUSH GAIN GAIN GAIN GAIN BROWSE VIEW 1 TREE button ! Turn the rotary selector while pressing the [TREE] button: Moves the cursor in the [TREE] area. The section marked 1 on the above screen is called the [TREE] area. ! Press the rotary selector while pressing the [TREE] button: Opens/closes the folder. -
Page 17: Deck
2 Deck DRY/ WET SELECT/ BACK ADVANCED CHAINED DECK DECK FUNCTION FILTER NEEDLE SEARCH MODE SIZE MOVE ACTIVE [MOVE PANEL] HOT CUE DELETE IN ADJUST OUT ADJUST AUTO LOOP TEMPO LOCK RANGE [HOT CUE PANEL] MOVE GRID SHIFT [GRID PANEL] PLAY/PAUSE TEMPO PHONES... -
Page 18: Deck Button
8 DECK button Switches the deck to be operated. ! Deck on left side of this unit: Deck [A] or [C] ! Deck on right side of this unit: Deck [B] or [D] 9 Filter control ! Turn counterclockwise while filter function is on: Low pass filter. ! Turn clockwise while filter function is on: High pass filter. -
Page 19: Mixer
3 Mixer PUSH GAIN GAIN GAIN GAIN BROWSE VIEW MAIN HEADPHONES MASTER SYNC MASTER SYNC MASTER SYNC MASTER SYNC MASTER CH FADER START 1 MAIN VOL control When the [CH FADER START] switch is set to [ON], the fader start and back cue functions can be used according to the movement of Adjusts the sound level output from the master. -
Page 20: Effect
— [Single] mode: [ADVANCED] ! The [Single] mode cannot be selected with TRAKTOR Pioneer DDJ-T1 EDITION 2. ! The effect panel can be switched to the [Single] mode when you upgrade to TRAKTOR PRO 2 or TRAKTOR SCRATCH PRO 2. -
Page 21: Operations
Importing tracks to TRAKTOR 2 automatically imported to the TRAKTOR 2 [Track Collection] list. This function is operated not on the DDJ-T1 but on the computer. From Explorer or Finder, drag & drop music files or Enlarging the browse display area folders containing music files to [Track Collection] in TRAKTOR 2’s [TREE] area. -
Page 22: Using The Mixer Functions
! For information about setting cue points, see MOVE PANEL/ Monitoring sound with headphones HOT CUE PANEL on page 18. 1 Connect headphones to the [PHONES] terminal. Adjusting the cue point position 2 Press the headphones [CUE] button for the deck you want to monitor. -
Page 23: Inputting The Sound Of An External Device Or Microphone
[Input Routing] setting. Set [Input Aux] as shown below. — [L(Mono)]:1:DDJ-T1 AUX/MIC L — [R]:2:DDJ-T1 AUX/MIC R ! With TRAKTOR Pioneer DDJ-T1 EDITION 2, the above settings are preset. 4 Adjust the audio level input to the [AUX IN] or [MIC] terminals. -
Page 24: Changing The Traktor 2 Preferences
3 Click [Device] under [Device Setup]. 1 Click the TRAKTOR 2 [ (Preferences Button)] button. From the pull-down menu, select [Pioneer. DDJ-T1]. Open the TRAKTOR 2 settings menu. 4 Click [Add In...] under [Assignment Table]. 2 Select the category and make the settings. -
Page 25: Additional Information
Sometimes the trouble may lie in another component. Inspect the other components and electrical appliances being used. If the trouble cannot be rectified after checking the items below, ask your nearest Pioneer authorized service center or your dealer to carry out repair work. -
Page 26: Using As A Controller For Other Dj Software
Using as a controller for other DJ software The DDJ-T1 also outputs the operating data for the buttons and dials in MIDI format. If you connect a computer with a built-in MIDI-compatible DJ software via a USB cable, you can operate the DJ software on this unit. The sound of music files being played on the computer can also be output from the DDJ-T1. -
Page 27: List Of Midi Messages
List of MIDI Messages On this unit, the browser, deck, mixer and effect sections are connected with the MIDI channels shown below. MIDI channel MIDI ch. Value Deck A Deck B Deck C Deck D Effect 1 Effect 2 Browser, mixer 1 Browser MIDI message (this unit to SW Name... - Page 28 MIDI message (computer to this unit) Indicator name Indicator color Notes When SHIFT button is off When SHIFT button is on Yellow-green Off = 0, lit = 127 PLAY/PAUSE f Orange Off = 0, lit = 127 IN (IN ADJUST) Orange Off = 0, lit = 127 OUT (OUT ADJUST)
- Page 29 MIDI message (this unit to SW Name Notes computer) Deck A OFF=0, ON=127 Deck B OFF=0, ON=127 CH FADER START switch Deck C OFF=0, ON=127 Deck D OFF=0, ON=127 0-127 Crossfader 0 at left side, 127 at right side Indicator name MIDI message (computer to this unit) Indicator color Notes...
-
Page 30: About Trademarks And Registered Trademarks
About trademarks and registered Specifications trademarks AC adapter ! Pioneer is a registered trademark of PIONEER CORPORATION. Power ............AC 100 V to 240 V, 50 Hz/60 Hz ® ® ® ® ! Microsoft , Windows Vista , Windows and Internet Explorer Rated current .................. - Page 32 Le damos las gracias por la adquisición de este producto Pioneer. Lea a fondo estas instrucciones de utilización para que aprenda a utilizar correcta- mente su modelo. Después de haber terminado de leer estas instrucciones, guárdelas en un lugar seguro para, en caso de ser necesario, consultarlas en el futuro.
- Page 33 Introducción del sonido de un aparato externo o de un micrófono ..24 Cambio de las preferencias de TRAKTOR 2 Lista de los elementos de configuración TRAKTOR Pioneer DDJ-T1 EDITION 2 ............ 25 Asignación de las funciones deseadas al pad [NEEDLE SEARCH] ..25 Información adicional Solución de problemas ................
-
Page 34: Antes De Empezar A Usar La Unidad
Este producto es un sistema DJ todo en uno para uso de DJ en casa, y com- TRAKTOR Pioneer DDJ-T1 EDITION 2 bina el hardware DJ de Pioneer – la norma en equipos DJ de clubes – con el software DJ “TRAKTOR Pioneer DDJ-T1 EDITION 2” de Native Instruments. -
Page 35: Acerca Del Adaptador De Ca
Si hay irregularidades con el adaptador de CA o la clavija de alimenta- Use un paño húmedo para limpiar la caja exterior. Evite usar cualquier ción, pida a su centro de servicio autorizado por Pioneer más cercano o líquido, aerosoles o productos de limpieza con base de alcohol. -
Page 36: Uso Del Acoplador Para Ordenador Portátil
(2 tornillos en cada una). Tipo 2 (para Europa) DJ CONTROLLER DDJ-T1 ! Los tornillos que ha quitado los necesitará para montar las patas. Tenga cuidado para no perderlos. Las patas no se pueden montar... -
Page 37: Antes De Comenzar
TRAKTOR 2, vea el sitio Web de abajo. (Windows) http://www.prodjnet.com/support/ ! El DDJ-T1 es compatible con TRAKTOR PRO 2 y TRAKTOR SCRATCH 1 Inserte el DVD-ROM del software TRAKTOR Pioneer PRO 2. Si tiene un TRAKTOR PRO 2 y un TRAKTOR SCRATCH PRO 2, actua- DDJ-T1 EDITION 2 incluido en la unidad de DVD del lice a la versión más reciente del software antes de usarlo. - Page 38 Acerca del procedimiento de instalación (Macintosh) 1 Inserte el DVD-ROM del software TRAKTOR Pioneer DDJ-T1 EDITION 2 incluido en la unidad de DVD del ordenador. El icono [Traktor 2] aparece en la pantalla. 2 Haga doble clic en el icono [Traktor 2].
-
Page 39: Inicio De Traktor 2
1 Inicie el SERVICE CENTER. Activación del producto Se visualiza la pantalla de inicio de sesión. Para usar TRAKTOR Pioneer DDJ-T1 EDITION 2, active primero el pro- ducto (llamado simplemente “activación” más abajo) usando Native Instruments SERVICE CENTER (llamado simplemente “SERVICE CENTER”... -
Page 40: Actualización Del Software Traktor 2
[NEXT]. Se crea un archivo de retorno a inicio. Guarde este archivo en un aparato USB, etc. Para activar TRAKTOR Pioneer DDJ-T1 EDITION 2 instalado en un orde- nador que no está conectado a Internet, use SERVICE CENTER en el 11 Inicie el SERVICE CENTER en el ordenador en el que modo de fuera de línea. -
Page 41: Acerca Del Software Controlador (Windows)
Programa y Documentación que estén en su posesión, y lo O DESINSTALACIÓN, SEGÚN CORRESPONDA. confirmará a Pioneer por escrito. Los apartados 2.2, 2.3, 2.4, 3, 4, 5 y 6 seguirán vigentes tras la rescisión del presente Contrato. 1 Definiciones 1 “Documentación”... - Page 42 El presente Contrato no debe Ajuste del tamaño de la memoria modificarse sin el previo consentimiento por escrito de Pioneer, y ningún documento, uso, costumbre o ley tendrán capacidad intermedia para modificar el presente Contrato.
- Page 43 ! Puede verificar la versión del firmware de esta unidad en la pantalla. ! La versión de firmware no se visualiza cuando esta unidad no está conectada al ordenador o cuando esta unidad y el ordenador no se comunican bien. Verificación de la información más reciente en el software controlador Visite nuestro sitio web indicado abajo para conocer la información más...
-
Page 44: Conexiones
Conexiones Asegúrese de desconectar la alimentación y desenchufar el adaptador de CA de la toma de corriente antes de hacer o cambiar conexiones entre aparatos. Espere hasta que todas las conexiones entre los aparatos estén terminadas antes de conectar el adaptador de CA. Use sólo el adaptador de CA incluido con esta unidad. -
Page 45: Conexión De Los Terminales De Entrada/Salida
Panel frontal 2 3 4 INPUT SELECT PHONES — [AUX]: Selecciona el reproductor analógico conectado a los 1 Terminal PHONES terminales [AUX]. Conecte aquí los auriculares. — [MIC]: Se selecciona el micrófono conectado al terminal [MIC]. Se pueden usar clavijas de auriculares estéreo (Ø 6,3 mm) y minicla- vijas de auriculares estéreo (Ø... -
Page 46: Nombres Y Funciones De Los Controles
Nombres y funciones de los controles Panel de control TREE FAVORITES LOAD LOAD LOAD LOAD DRY/ WET SELECT/ BACK DRY/ WET SELECT/ BACK ADVANCED ADVANCED GAIN GAIN PUSH GAIN GAIN BROWSE VIEW CHAINED CHAINED DECK DECK MAIN FUNCTION FUNCTION FILTER FILTER NEEDLE SEARCH HEADPHONES... -
Page 47: Explorador
1 Explorador TREE FAVORITES LOAD LOAD LOAD LOAD PUSH GAIN GAIN GAIN GAIN BROWSE VIEW 1 Botón TREE ! Gire el selector giratorio mientras pulsa el botón [TREE]: Mueve el cursor en el área [TREE]. La sección marcada 1 en la pantalla de arriba se llama área [TREE]. -
Page 48: Deck
2 Deck DRY/ WET SELECT/ BACK ADVANCED CHAINED DECK DECK FUNCTION FILTER NEEDLE SEARCH MODE SIZE MOVE ACTIVE [MOVE PANEL] HOT CUE DELETE IN ADJUST OUT ADJUST AUTO LOOP TEMPO LOCK RANGE [HOT CUE PANEL] MOVE GRID SHIFT [GRID PANEL] PLAY/PAUSE TEMPO PHONES... - Page 49 7 Pad NEEDLE SEARCH f Barra deslizante TEMPO ! Cuando el botón [FUNCTION] está apagado: ! Muévala hacia el lado + (delante): La velocidad de reproducción La función [NEEDLE SEARCH] se puede usar. aumenta. — El sonido en la posición en la que se toca el pad ! Muévala hacia el lado –...
-
Page 50: Mezclador
3 Mezclador PUSH GAIN GAIN GAIN GAIN BROWSE VIEW MAIN HEADPHONES MASTER SYNC MASTER SYNC MASTER SYNC MASTER SYNC MASTER CH FADER START 1 Control MAIN VOL Cuando el interruptor [CH FADER START] se pone en [ON], las fun- ciones fader start y back cue se pueden usar según el movimiento de Ajusta la salida del nivel de sonido desde el maestro. -
Page 51: Efecto
— Modo [Single]: [ADVANCED] ! El modo [Single] no se puede seleccionar con TRAKTOR Pioneer DDJ-T1 EDITION 2. ! El panel de efectos se puede cambiar al modo [Single] cuando usted hace la mejora a TRAKTOR PRO 2 o TRAKTOR SCRATCH PRO 2. -
Page 52: Operaciones
1 Gire el selector giratorio mientras pulsa el botón [TREE] para seleccionar iTunes. Esta función no se realiza en el DDJ-T1, sino en el ordenador. 2 Exploración de la librería y listas de reproducción de Desde Explorer o Finder, arrastre y coloque archivos o igual forma que con iTunes carpetas de música en [Track Collection] en el área [TREE]... -
Page 53: Uso De Las Funciones Del Mezclador
En el modo de bloqueo de tonalidad, el tono no cambia aunque cambie 1 Gire el control [GAIN]. la velocidad de reproducción. Ajusta la entrada de nivel de audio a varios decks. 2 Ponga el fader de canal en la posición interior Establezca el cue Ajusta la salida de nivel de sonido desde varios decks. -
Page 54: Sincronización De La Velocidad De Reproducción Con Otros Decks (Sincronización De Tiempo De Compás)
— [L(Mono)]:1:DDJ-T1 AUX/MIC L — [R]:2:DDJ-T1 AUX/MIC R Sincronización de la velocidad ! Con TRAKTOR Pioneer DDJ-T1 EDITION 2, los ajustes de arriba están preestablecidos. de reproducción con otros decks 4 Ajuste la entrada de nivel de audio a los terminales (sincronización de tiempo de... -
Page 55: Cambio De Las Preferencias De Traktor 2
2 Haga clic en [Controller Manager]. 3 Haga clic en [Device] bajo [Device Setup]. Lista de los elementos de Seleccione [Pioneer. DDJ-T1] desde el menú desplegable. configuración TRAKTOR Pioneer 4 Haga clic en [Add In...] bajo [Assignment Table]. Seleccione la función que va a asignar desde el menú desplegable. -
Page 56: Información Adicional
Si no se puede corregir el problema después de comprobar los elementos de abajo, pida al servicio de Pioneer autorizado más cercano o a su concesionario que realice el trabajo de reparación. ! Esta unidad puede no funcionar bien debido a la electricidad estática o a otras influencias externas. En este caso, el funcionamiento apropiado se puede restaurar desconectando la alimentación, esperando 1 minuto y volviendo a conectar la alimentación. -
Page 57: Uso Como Controlador Para Otro Software Dj
Uso como controlador para otro software DJ El DDJ-T1 envía también los datos de operación para los botones y diales en el formato MIDI. Si conecta un ordenador con un software DJ compatible con MIDI incorporado a través de un cable USB, usted podrá utilizar el software DJ en esta unidad. El sonido de los archivos de música que se reprodu- cen en el ordenador también puede salir del DDJ-T1. -
Page 58: Lista De Mensajes Midi
Lista de mensajes MIDI En esta unidad, las secciones del explorador, el deck, el mezclador y los efectos se conectan con los canales MIDI mostrados abajo. Canal MIDI MIDI ch. Value Deck A Deck B Deck C Deck D Efecto 1 Efecto 2 Explorador, mezclador 1 Explorador... - Page 59 Mensaje MIDI (ordenador a esta unidad) Nombre del indicador Color de indicador Notas Cuando el botón SHIFT está Cuando el botón SHIFT está apagado encendido Amarillo-verde Apagado = 0, encendido = 127 PLAY/PAUSE f Naranja Apagado = 0, encendido = 127 IN (IN ADJUST) Naranja Apagado = 0, encendido = 127...
- Page 60 Mensaje MIDI (esta unidad Nombre de interruptor Notas al ordenador) Deck A OFF=0, ON=127 Deck B OFF=0, ON=127 Botón MASTER Deck C OFF=0, ON=127 Deck D OFF=0, ON=127 Deck A 0-127 Deck B 0-127 Fader de canal Deck C 0-127 Deck D 0-127 Deck A...
-
Page 61: Acerca De Las Marcas De Fábrica Y Marcas Registradas
Cuando se utiliza pulsando el botón [SHIFT], el código es el código para cuando el botón [SHIFT] está encendido. Acerca de las marcas de fábrica y Especificaciones marcas registradas Adaptador de CA ! Pioneer es una marca registrada de PIONEER CORPORATION. Alimentación ..........CA 100 V a 240 V, 50 Hz/60 Hz ® ® ®... - Page 62 感謝您購買先鋒產品。 請詳閱操作手冊以瞭解正確操作購買機型的方式。 閱畢手冊後,請妥善收藏以便未來參考。 在部分國家或地區中,電源插頭與插座的形狀有時會和圖示不同。不過本機的連接及操作方式完全相同。 D28-9-3-2_A1_Zhtw K041_A1_Zhtw D44-9-3_A1_Zhtw_PSV Zhtw...
- Page 63 播放 ......... 21 使用混音器功能 ....... 22 使用音效功能 ......... 22 同步化與其他唱盤(節奏同步)的播放速度 ..22 輸入外部裝置或麥克風的聲音 ....23 變更 TRAKTOR 2 喜好設定 TRAKTOR Pioneer DDJ-T1 EDITION 2 設定項目清單 ......... 24 指定所需的功能至 [NEEDLE SEARCH] 墊 ..24 其他資訊 故障排除 ........25 當成其他 DJ 軟體的控制程式使用 ....27 MIDI 訊息清單...
-
Page 64: 功能與特色
本產品屬供家庭 DJ 使用之多合一 DJ 系統,本產品結合 TRAKTOR Pioneer DDJ-T1 EDITION 2 先鋒 DJ 硬體 - 擁有俱樂部 DJ 設備全球標準 – 並搭 TRAKTOR Pioneer DDJ-T1 EDITION 2 為專門為 DDJ-T1 設 載 Native Instruments 的「TRAKTOR Pioneer DDJ-T1 計的 TRAKTOR 2 軟體應用程式。 所有按鍵及控制鍵皆預 EDITION 2」DJ 軟體。 您只需連接本產品與電腦,就能... -
Page 65: 關於 Ac 變壓器
關於 AC 變壓器 安全說明 能會導致產品受損,並需要合格技師花費更長的時間 才能將本機還原回正常操作。 若要確保您的個人安全並將本機完整操作潛能發揮至最 ! 當本產品在效能上出現明顯的變化時 – 代表本產品 大,請詳閱並遵循這些安全說明。 需要維修。 請檢查 AC 變壓器或電源插頭是否合乎規格,然後利用指 閱讀 & 保留說明 閱讀本產品隨附的所有操作及使用者資訊。 定的程序將電源插頭插入 AV 變壓器指定的位置,直到聽 見卡嗒聲。 關於詳細資訊,請參閱 第 6頁 上 安裝電源 清潔 插頭 。 使用沾濕的布清潔外表機殼。 避免使用任何包含液體、 若 AC 變壓器或電源插頭的規格不符,請向最近的先鋒授 噴霧或酒精成分的流質清潔產品。 權服務中心或經銷商要求進行維修。 ! AC 變壓器與電源插頭間塞住硬幣、迴紋針或其他金屬 水或濕氣... -
Page 66: 使用膝上型電腦底座
按下 AC 變壓器上的 [PUSH] 按鍵時,如下圖所示將電源 電腦的鍵盤部分可容納在本機下方。 插頭滑離變壓器以取出。 只要安裝電源插頭,就無須取出。 ! 視您(筆記型電腦)電腦的大小而定,鍵盤部分可能 與 LAPTOP DOCK 不符。 ! 此安裝方式可讓電腦不觸碰本機。 ! 此安裝方式可讓連接電腦的纜線不會在本機下打結。 電源插頭 本產品隨附的電源插頭類型如下所示。 請使用適合您所 取下雙腳使用 在國家或地區的電源插頭。 本機的雙腳可取下。 類型 1(適用日本及北美) 使用十字螺絲起子取下左右腳(各 2 顆螺絲)的螺絲。 DJ CONTROLLER DDJ-T1 類型 2(適用歐洲) ! 安裝雙腳時, 將需要您之前取下的螺絲。 請小心不要 遺失。 無法使用其他螺絲來正確安裝雙腳。 類型 3(適用英國) Zhtw... -
Page 67: 關於 Traktor 2 軟體
供優化的功能及效能。 在此情況下, 需釋放足夠的記 閱以下網站。 憶體。 建議安裝額外記憶體讓操作更為穩定。 http://www.prodjnet.com/support/ ! 視電腦的省電設定而定, CPU 及硬碟的處理能力有可能 ! DDJ-T1 支援 TRAKTOR PRO 2 及 TRAKTOR SCRATCH PRO 2。 不足。 尤其是筆記型電腦,在使用 TRAKTOR 2 時,請 若您擁有 TRAKTOR PRO 2 及 TRAKTOR SCRATCH PRO 2, 確定該電腦為具備固定高效能的正常狀態(例如維持 在使用前請更新至最新軟體版本。 連接 AC 電源) 。... - Page 68 [ 繼續 ]。 勾選適用您硬體的核取方塊。 關於安裝程序(Macintosh) 8 選擇安裝 TRAKTOR 2 的位置,然後按一下 [ 安裝 ]。 若要選擇一般安裝地點,按一下 [ 安裝 ] 即可。 1 將隨附的 TRAKTOR Pioneer DDJ-T1 EDITION 2 軟體 若要在不同的位置安裝,請按一下 [ 更改安裝位置…], DVD-ROM 光碟插入電腦的 DVD 光碟機。 選擇安裝地點,然後按一下 [ 安裝 ]。 畫面上會出現 [Traktor 2] 圖示。...
-
Page 69: 啟動 Traktor 2
Instruments] > [Traktor 2],再按兩下 [Traktor] 圖示。 — 線上啟動: 電腦連接至網際網路時 — 離線啟動: 電腦未連接網際網路時 執行產品啟動 線上啟動 若要使用 TRAKTOR Pioneer DDJ-T1 EDITION 2,請先使 用 Native Instruments SERVICE CENTER(以下簡稱為 1 啟動 SERVICE CENTER。 顯示登入畫面。 「SERVICE CENTER」 ) 執行產品啟動 (以下簡稱為 「啟動」 ) 。 啟動 SERVICE CENTER 啟動共有三種方式:... -
Page 70: 更新 Traktor 2 軟體
3 輸入 TRAKTOR Pioneer DDJ-T1 EDITION 2 軟體 調查畫面出現時,選擇各項問題的回答,然後按一下 DVD-ROM 包裝上的序號,然後按一下 [Activate]。 [SUBMIT]。 密碼將傳送至表格上輸入的電子郵件地址。 返回登入 畫面並登入。 ! 在 Native Instruments 網站上註冊新使用者帳號時輸入 的個人資訊會依據隱私權政策予以收集、處理及使用。 先鋒公司不會收集、處理或使用此項個人資訊。 9 [Service Center Activation Page] 出現時,按一下 [NEXT]。 10 檢查 [Product] 為 [TRAKTOR Pioneer DDJ-T1 EDITION 2] 且 [Status] 為 [OK],然後按一下 [NEXT]。... -
Page 71: 關於驅動程式軟體(Windows
4 違約的賠償與補償 關於驅動程式軟體(Windows) 您同意因任何違反本契約約定之行為,將導致先鋒發生 無法挽回之損害, 且該等損害無法以金錢加以賠償, 因此 驅動軟體是一款專用的 ASIO 驅動程式,用來從電腦中輸 除了賠償以及任何先鋒有權取得之其他補償之外,您同 出音頻信號。要連接 DDJ-T1 到電腦使用時,如果電腦安 意先鋒得尋求任何法令之救濟,包括假扣押或假處分等 裝有 Windows,要事先安裝驅動軟體到該電腦。 保全方式, 以避免發生於本契約實際上的、 具威脅性的或 ! 使用 Mac OS X 時,不需要安裝驅動程式軟體。 持續的違約行為。 5 契約終止 軟體使用權授契約書 先鋒有權在您違反任一條款時, 隨時終止本契約。當本契 軟體使用權授契約書 (以下簡稱 「契約」 ) 是由您 (安裝程 約終止後, 您必須停止使用該程式, 並將其從安裝之電腦... - Page 72 ! 關閉本機的電源開關, 然後中斷連接本機與電腦的 USB 按一下 Windows [ 開始 ] 功能表 >[ 所有程 式 ]>[Pioneer]>[DDJ]>[DDJ ASIO 設定公用程式 ]。 連接線。 ! 若電腦上正在執行其他程式,請立即結束。 ! 若要安裝或解除安裝驅動程式軟體,必須獲得電腦系 統管理員的授權。 在繼續安裝程序前, 請以電腦系統 管理員身份登入。 ! 若您不先安裝驅動程式軟體就連接本裝置與電腦,則 視系統環境而定,電腦可能會發生錯誤。 ! 若在開始安裝驅動程式後遭中斷,請再次重新開始安 裝程序。 支援的作業系統 32 位元版 本 ® Windows 7 Home Premium/ Professional/Ultimate 64 位元版...
-
Page 73: 端子名稱
連接 在裝置間連接或變更連線前,請確定關閉電源並從插座上拔下 AC 變壓器插頭。 在連接 AC 變壓器前,請等候至完成裝置間的所有連線為止。 只能使用本機隨附的 AC 變壓器。 有關已連接元件,請參閱操作手冊。 本機供電裝置為 AC 變壓器或 USB 匯流排電源。 本機可透過以 USB 纜線連接本機與電腦使用,無 AC 變壓器亦可。 ! 使用隨附的 USB 纜線可直接連接本機與電腦。 ! 無法使用 USB 集線器。 ! 使用 USB 匯流排電源時,請使用連接 AC 電源供應器的電腦。 ! 在類似以下情形時,供電可能會不足,且本機無法倚賴 USB 匯流排電源操作。 — 電腦的 USB 電源供應器電容不足時。 —... -
Page 74: 連接輸入/輸出端子
前面板 2 3 4 INPUT SELECT PHONES — [AUX]:選擇連接至 [AUX] 端子的外接裝置。 1 PHONES 端子 在此連接耳機。 — [MIC]:選擇連接至 [MIC] 端子的麥克風。 立體聲電話插頭(Ø 6.3 mm)及立體聲迷你電話插頭 3 VOL 控制鍵 (Ø 3.5 mm)皆可使用。 調整 [MIC] 端子的音訊位準輸入。 ! 耳機同時連接至立體聲電話插孔及立體聲迷你電話 4 MIC 插孔 插孔時,音量會降低。 連接至麥克風。 2 AUX/MIC 選擇器開關 ! 操作... -
Page 75: 控制面板
零件名稱與功能 控制面板 TREE FAVORITES LOAD LOAD LOAD LOAD DRY/ WET SELECT/ BACK DRY/ WET SELECT/ BACK ADVANCED ADVANCED PUSH GAIN GAIN GAIN GAIN BROWSE VIEW CHAINED CHAINED DECK DECK MAIN FUNCTION FUNCTION FILTER FILTER NEEDLE SEARCH HEADPHONES NEEDLE SEARCH MODE SIZE MODE SIZE... -
Page 76: 瀏覽器
1 瀏覽器 TREE FAVORITES LOAD LOAD LOAD LOAD PUSH GAIN GAIN GAIN GAIN BROWSE VIEW 1 TREE 按鍵 ! 按下 [TREE] 按鍵時轉動轉盤: 移動 [TREE] 區域 中的游標。 在以上畫面標記 1 的部分稱為 [TREE] 區域。 ! 按下 [TREE] 按鍵時按下轉盤 : 開啟/關閉資料夾。 2 旋轉選擇器 ! 旋轉轉盤: 移動 [TRACK] 區域中的游標。 在以上畫面標記... -
Page 77: 唱盤
2 唱盤 DRY/ WET SELECT/ BACK ADVANCED CHAINED DECK DECK FUNCTION FILTER NEEDLE SEARCH MODE SIZE MOVE ACTIVE [MOVE PANEL] HOT CUE DELETE IN ADJUST OUT ADJUST AUTO LOOP TEMPO LOCK RANGE [HOT CUE PANEL] MOVE GRID SHIFT [GRID PANEL] PLAY/PAUSE TEMPO PHONES... - Page 78 7 NEEDLE SEARCH 墊 e TEMPO RANGE 按鍵 ! [FUNCTION] 按鍵關閉時: 每次按下此鍵都會切換 [TEMPO] 滑桿的變化範圍。 可使用 [NEEDLE SEARCH] 功能。 [±6] [±10] [±16] [±100] — 可輕易播放觸碰 [NEEDLE SEARCH] 墊位置的 聲音。 f TEMPO 滑桿 ! [FUNCTION] 開啟時: ! 向 +(前)側移動: 播放速度增加。 可指定所需的功能。 ! 向 –(後)側移動: 播放速度降低。 —...
-
Page 79: 混音器
3 混音器 PUSH GAIN GAIN GAIN GAIN BROWSE VIEW MAIN HEADPHONES MASTER SYNC MASTER SYNC MASTER SYNC MASTER SYNC MASTER CH FADER START 1 MAIN VOL 控制鍵 b CH FADER START 開關 開啟/關閉 [CH FADER START] 功能。 調整主要輸出聲音位準。 [CH FADER START] 開關設為 [ON] 時,可依據聲道 2 HEADPHONES MIX 控制鍵... -
Page 80: 音效
! 在本機上,TRAKTOR 2 音效模式會如下顯示。 — [Group] 模式: [CHAINED] — [Single] 模式: [ADVANCED] ! [Single] 模式無法用 TRAKTOR Pioneer DDJ-T1 EDITION 2 選擇。 ! 升級至 TRAKTOR PRO 2 或 TRAKTOR SCRATCH PRO 2 後,音效面板即可切換為 [Single] 模式。 1 ADVANCED/CHAINED 選擇器按鍵 ! [Group] 模式: 在音效面板上最多可同時選取及... -
Page 81: 匯入曲目至 Traktor 2
操作 匯入曲目至 TRAKTOR 2 2 可利用與 iTunes 相同方式瀏覽資料庫及播放清單。 ! 無法使用 TRAKTOR 2 瀏覽器編輯 iTunes 資料庫及播放 此功能無法在 DDJ-T1 上操作,但可於電腦上使用。 清單。 ! 在 TRAKTOR 2 瀏覽器中播放時, 會自動匯入 iTunes 音 在 Explorer 或 Finder 中,拖 & 放含音樂檔案的音 樂檔案至 TRAKTOR 2 [Track Collection] 清單。... -
Page 82: 使用混音器功能
! 有關設定指令點的資訊,請參閱 第 18頁 上 調整音質 MOVE PANEL / HOT CUE PANEL。 轉動各唱盤的 [EQ(HI、MID、LOW)] 控制鍵。 調節指令點位置 以耳機監控音效 1 按下頂部的同時旋轉轉輪。 調整暫停位置。 1 連接耳機至 [PHONES] 端子。 2 按下 [CUE] 按鍵。 2 按下耳機 [CUE] 按鍵以控制要監控的唱盤。 指令點 [a] 設為最接近按下按鍵位置的 [Beat Grid]。 3 轉動 [HEADPHONES MIX] 控制鍵。 —... -
Page 83: 輸入外部裝置或麥克風的聲音
3 完成 TRAKTOR 2 軟體的 [Preferences] > [Input Routing] 設定。 如下所示設定 [Input Aux]。 — [L(Mono)]:1:DDJ-T1 AUX/MIC L — [R]:2:DDJ-T1 AUX/MIC R ! 使用 TRAKTOR Pioneer DDJ-T1 EDITION 2 後, 以上設 定將變為預設。 4 調整 [AUX IN] 或 [MIC] 端子的音訊位準輸入。 — 轉動主機前面板上的 [VOL] 控制鍵: [MIC] 端子 的輸入音訊位準已調整。... -
Page 84: 變更 Traktor 2 喜好設定
2 選擇類別並進行設定。 Function1 Function3 Function5 Function2 Function4 (Preferences Button)] 按鍵。 1 按一下 TRAKTOR 2 [ TRAKTOR Pioneer DDJ-T1 EDITION 2 設 開啟 TRAKTOR 2 設定選單。 定項目清單 2 按一下 [Controller Manager]。 類別 說明 3 按一下 [Device Setup] 下的 [Device]。 選擇要用於音訊輸入/輸出的音訊裝 在下拉式選單中選擇 [Pioneer. DDJ-T1]。... -
Page 85: 故障排除
是否亮起。 檢查在 [Preferences] > [Controller Manager] > - [Device Setup] > [Device] 中是否選擇 [Pioneer. DDJ-T1]。 ( 第 24頁 ) 即使在使用隨附的 AC 變 是否確實連接隨附的 AC 變壓器? 請在隨附的 AC 變壓器上確實安裝電源插頭。 ( 第 6頁 ) 壓器時,本機也會使用 確實連接隨附的 AC 變壓器至電源插座。 ( 第 14頁 ) USB 匯流排電源操作。... - Page 86 [Audio Device] > [PIONEER DDJ-T1](Mac OS X) 或 [Pioneer DDJ ASIO](Windows) [Output Routing] > [Output Monitor] [L] > [3:DDJ-T1 PHONES L] 及 [R] > [4:DDJ-T1 PHONES R] [Output Routing] > [Output Master] [L] > [1:DDJ-T1 MASTER L] 及 [R] >...
-
Page 87: 當成其他 Dj 軟體的控制程式使用
設定指令點。 ( 第 21頁 ) 循環播放功能無效。 循環點是否設定? 設定循環點。 ( 第 21頁 ) 當成其他 DJ 軟體的控制程式使用 DDJ-T1 也可以按照通用 MIDI 格式輸出按鈕以及轉盤等的操作數據。 當使用 USB 導線與具有內裝式 MIDI 相容 DJ 軟體 的電腦連接時,可以從本機上操作 DJ 軟體。 在電腦上播放的音樂檔案的聲音也可以通過 DDJ-T1 輸出。 若要當成其他 DJ 軟體的控制程式使用,請先進行 DJ 軟體的音訊及 MIDI 相關設定。 有關詳細資料,請參閱 DJ 軟體的操作手冊。 Zhtw... -
Page 88: Midi 訊息清單
MIDI 訊息清單 在本機、瀏覽器、唱盤、混音器及音效部分上皆與以下顯示的 MIDI 聲道連接。 MIDI ch. Value MIDI 聲道 唱盤 A 唱盤 B 唱盤 C 唱盤 D 音效 1 音效 2 瀏覽器、混音器 1 瀏覽器 SW 名稱 MIDI 訊息 (本機至電腦) 注意 TREE 按鍵 OFF=0, ON=127 與之前操作時的計數差異 ! 順時針轉動: 1 –(最大值)30 旋轉選擇器(轉動)... - Page 89 MIDI 訊息(本機至電腦) SW 名稱 注意 [SHIFT] 按鍵關閉時 [SHIFT] 按鍵開啟時 SIZE c 按鍵、1 按鍵、5 按鍵 OFF=0, ON=127 SIZE d 按鍵、2 按鍵、6 按鍵 OFF=0, ON=127 c BWD 按鍵、3 按鍵、7 按鍵 OFF=0, ON=127 FWD d 按鍵、4 按鍵、8 按鍵 OFF=0, ON=127 KEY LOCK 按鍵 OFF=0, ON=127 TEMPO RANGE 按鍵...
- Page 90 SW 名稱 MIDI 訊息 (本機至電腦) 注意 唱盤 A 0-127 唱盤 B 0-127 GAIN 控制鍵 唱盤 C 0-127 唱盤 D 0-127 唱盤 A 0-127 唱盤 B 0-127 EQ [HI] 控制鍵 唱盤 C 0-127 唱盤 D 0-127 唱盤 A 0-127 唱盤 B 0-127 EQ [MID] 控制鍵...
- Page 91 SW 名稱 MIDI 訊息 (本機至電腦) 注意 0-127 交叉音控器 0 在左端,127 在右端 指示燈名稱 MIDI 訊息(電腦至本機) 指示燈色彩 注意 唱盤 A 9n 橘色 熄滅 = 0, 亮起 = 127 唱盤 B 9n 橘色 熄滅 = 0, 亮起 = 127 唱盤 C 9n 橘色 熄滅...
-
Page 92: 關於商標及註冊商標
熄滅 = 0, 亮起 = 127 ! n 是通道號碼。 音效指定按鍵 1 為 4,音效指定按鍵 2 為 5。 ! 按下 [SHIFT] 按鍵同時操作時,代碼即為 [SHIFT] 按鍵開啟時的代碼。 關於商標及註冊商標 音訊部分 額定輸出位準 ! Pioneer 為 PIONEER CORPORATION 的註冊商標。 MASTER OUT 1 ....... 4.2 Vrms ! Microsoft ® ® ® 、Windows Vista 、Windows... - Page 96 PIONEER GULF FZE Lob 11-017, Jebel Ali Free Zone P.O. Box 61226, Jebel Ali Dubai TEL: 971-4-8815756 PIONEER ELECTRONICS DE MEXICO S.A. DE C.V. Blvd.Manuel Avila Camacho 138 10 piso Col.Lomas de Chapultepec, Mexico, D.F. 11000 TEL: 55-9178-4270 PIONEER INTERNATIONAL LATIN AMERICA S.A.